
DIY Candles Make Great Gifts for Friends and Family
Imagine this: you’re in your favorite cozy spot at home, sipping a warm drink, and the flickering glow of a candle fills your space with a soothing aroma. Sound familiar? Candles have this magical way of creating an inviting atmosphere, don’t they? But here’s the truth: they can be pretty pricey, especially if you’re gifting them. What if I told you that you could create stunning DIY candles that not only look beautiful but also make heartwarming gifts for friends and family?
Let’s dive into the world of DIY candles. They’re perfect for any occasion—birthdays, holidays, or just because. I promise, you don’t need to be a craft expert to whip these up. So grab a cup of tea, sit back, and let’s explore 10 fantastic DIY candle ideas that are as thoughtful as they are beautiful.
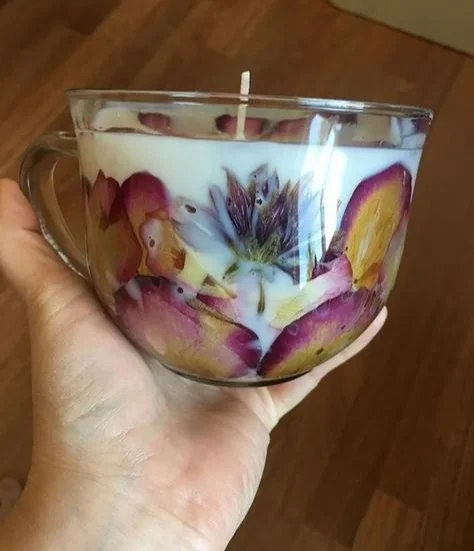
Flower Candle
Nothing says “I care” like a flower, right? A flower candle combines both nature and warmth, making it a truly stunning option. Here’s how to create one:
What You Need:
- Clear glass jars or molds
- Beeswax or soy wax
- Dried flowers (like lavender, rose petals, or chamomile)
- Wick
- Double boiler or microwave
- Stirring stick
- Essential oils (optional for added fragrance)
Instructions:
Prepare Your Flowers: Carefully layer the dried flowers in the bottom of your glass jar or mold. Don’t hold back; these will provide a beautiful display.
Melt the Wax: In a double boiler, melt your wax until it’s completely liquefied. If you’re using a microwave, heat in short bursts, stirring in between.
Add Scents: If you’re feeling fancy, now’s the time to add a few drops of essential oils to the melted wax for an aromatic touch.
Place the Wick: Fix the wick to the bottom of the jar using a dab of melted wax or a wick holder.
Pour and Set: Slowly pour the melted wax into your jar, making sure not to disturb the flowers. Let it cool completely before trimming the wick.
This flower candle not only brightens any space but also brings the essence of nature indoors. It’s a great gift for friends who love a touch of floral elegance!
Citrus Candles
Let’s be honest, who doesn’t love the refreshing scent of citrus? These vibrant candles not only look appealing but also smell delightful.
What You Need:
- Oranges or lemons
- Soy wax or beeswax
- Wick
- Essential oils (citrus scents like lemon or orange work beautifully)
- Knife and spoon
Instructions:
Prepare the Citrus: Slice your oranges or lemons in half and scoop out the insides, leaving a thin layer of fruit around the edges.
Melt the Wax: Follow the same melting instructions as above until you have a smooth consistency.
Add Essential Oils: Mix in some essential oils for an extra burst of fragrance.
Insert the Wick: Stick the wick into the center of your citrus half. Pour the melted wax carefully into the peel.
Cool Down: Allow your citrus candle to set before using or gifting.
These cheerful candles bring a refreshing vibe and make for a great conversation starter in any home!
Coffee Bean Candle
For the coffee lovers in your life, a coffee bean candle is a fantastic choice. It fills the space with a rich aroma and looks rustic and charming.
What You Need:
- Coffee beans
- Glass jar
- Soy wax or beeswax
- Wick
- Essential oils (coffee or vanilla)
Instructions:
Layer the Beans: Fill your glass jar with coffee beans about halfway.
Melt the Wax: As usual, melt your wax according to previous instructions.
Add Scent: Mix in essential oils for a burst of flavor.
Add the Wick: Insert the wick, and slowly pour the melted wax over the coffee beans.
Cool Completely: Allow it to solidify before trimming.
This candle not only creates a cozy ambiance but also provides a coffee fix in the form of fragrance!
Coconut Shell Candle
Embrace the tropical vibes with a coconut shell candle. It’s a unique and eco-friendly gift that looks beautiful!
What You Need:
- Coconut shells
- Soy wax or beeswax
- Wick
- Essential oils (coconut, vanilla, or your favorite scent)
Instructions:
Prepare the Shell: Clean out coconut shells and dry them thoroughly.
Melt the Wax: Melt your wax in a double boiler.
Mix in Fragrance: Add in some essential oils for that tropical scent.
Insert the Wick: Secure the wick in the center of the coconut shell.
Pour the Wax: Slowly fill in the wax, allowing it to settle.
Let it cool completely before lighting up your bright, tropical candle!
Layered Color Candles
Want to catch someone’s eye? Layered color candles are visually stunning and not as complicated as they might seem.
What You Need:
- Soy wax
- Dyes (for coloring)
- Wick
- Glass jars
- Double boiler
Instructions:
Melt the Wax: Melt the wax in your double boiler; separate into different bowls for coloring.
Color the Wax: Add your dyes to each bowl of melted wax until you achieve your desired shades.
Create Layers: Pour the first color into the jar and let it cool slightly before adding the next layer.
Wick Placement: Insert the wick before the final layer sets.
These candles become an instant decoration piece and can be made in colors that suit the recipient’s aesthetic!
Herbal Infused Candle
This candle is ideal for the wellness enthusiasts out there. It brings in herbs that can help promote relaxation.
What You Need:
- Soy wax
- Aloe vera leaves or chamomile flowers
- Wick
- Essential oils (lavender or chamomile)
Instructions:
Prepare the Base: In a clean glass jar, layer the herbal ingredients.
Melt and Mix: Melt your wax and blend in essential oils.
Pour: Carefully add the melted wax over the herbs and allow it to cool.
This candle not only provides a soothing aroma but also brings the benefits of herbal wellness directly into your home.
Cinnamon Stick Candle
Picture this: a candle that smells like your favorite holiday dessert. Enter the cinnamon stick candle. It’s perfect for cozying up during those chilly evenings.
What You Need:
- Soy wax
- Cinnamon sticks
- Wick
- Glass jar
- Essential oils (cinnamon for added fragrance)
Instructions:
Prepare Your Jar: Secure the cinnamon sticks to the inside of your jar using hot glue.
Melt Wax: In a double boiler, melt your wax.
Add Oils: Mix in essential oils to kick up the cinnamon scent.
Pour Over: Slowly pour the wax into the jar while keeping the cinnamon sticks in place.
This rustic-looking candle evokes warmth and encapsulates the spirit of the holiday season.
Scented Gel Candles
Scented gel candles add a unique twist. They look crystal-clear and allow for creative layering.
What You Need:
- Gel wax
- A clear container
- Wick
- Scented oils
- Add-ins (like small fruits or shells)
Instructions:
Melt the Gel Wax: Follow the instructions provided with the gel wax and melt accordingly.
Add Your Fragrance: Stir in essential oils for scent.
Layer with Add-ins: Pour a thin layer of gel and allow to set, placing your add-ins carefully.
Continue Layering: Add more gel until each layer is complete.
These candles are incredibly versatile and can be customized in countless ways!
Concrete Candle Holders
Here’s a fun idea: create concrete candle holders and pair them with simple candles. They look modern and chic, perfect for anyone’s home.
What You Need:
- Concrete mix
- Disposable container for the mold
- Wick
- Soy wax
- Essential oils
Instructions:
Prepare the Mold: Mix concrete, pour into a disposable container, and embed a wick.
Melt and Pour the Wax: Melt your wax and add essential oils. Once the concrete hardens, pour the wax inside.
These holders become a statement piece while showing off your creative flair!
Conclusion
Creating your own DIY candles is not just an art; it’s an expression of love and thoughtfulness. Whether it’s the calming scent of a flower candle, the vibrant energy of a citrus creation, or the warming notes of a cinnamon stick candle, each of these gifts is sure to touch the hearts of those you care about.
What’s wonderful about DIY candles is that you truly can make them your own—from the colors and scents to the presentation. So, the next time you’re thinking about what to gift a friend or even yourself, remember these ideas. You’re not just giving a candle; you’re giving a personalized experience wrapped in warmth and love.
Let’s dive into the world of creativity and light up the lives around us! Happy crafting!