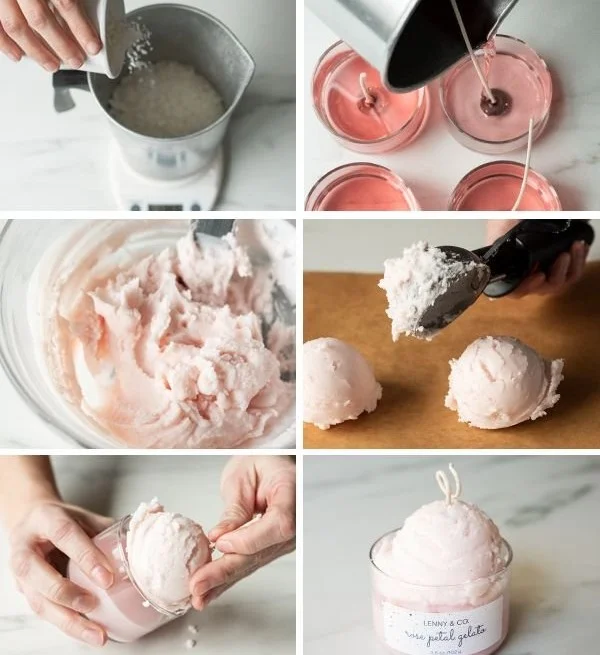

Treat Yourself and Learn How to Make Your Own Adorable Ice Cream Candles!
Creating your own ice cream candles can be both a creative outlet and a cozy addition to your home. These charming candles not only look like delectable ice cream treats but also offer delightful fragrances that can fill your space with warmth and cheer. Whether for yourself or as a handmade gift, ice cream candles are sure to spark joy. Let’s dive into the fun world of DIY candle-making!
Why You Will Love This Recipe
Making ice cream candles is a relaxing and satisfying project that allows you to tap into your artistic side. You’ll enjoy:
- The joy of creating something unique
- The satisfaction of using your own candles to brighten up your home
- The opportunity to customize scents and colors
- The fun of gifting something truly handmade to friends and family
Plus, these candle creations are perfect for birthday parties, summer gatherings, or cozy nights in!
Ingredients
Here’s what you’ll need to create your ice cream candles:
- Wax: 16 oz. of paraffin or soy wax (soy wax is a natural alternative)
- Wicks: 4-6 cotton wicks (size can vary based on the container)
- Dye (optional): Candle-safe dye in your choice of colors
- Fragrance Oil: 2 oz. of your favorite scent
- Container: 4 ramekins or small bowls to mimic ice cream cups
Equipment
Gather these essential supplies:
- Double boiler or wax melter
- Thermometer
- Stirring spoon
- Pouring pitcher
- Scissors
- Ice cream scooper or a spoon (for texture)
- Heat-resistant gloves (for safety)
Step-by-Step Instructions
Now, let’s get to the fun part—making our adorable ice cream candles!
1. Prepare Your Workspace
Set up a clean, well-ventilated area for candle-making. Lay down newspaper or a silicone mat to catch any spills.
2. Melt the Wax
- In a double boiler, add the wax and heat it until melted, stirring occasionally. Aim for a temperature of about 170°F (77°C).
- If you’re using dye, add it once the wax is melted, and stir well until fully incorporated.
3. Add Fragrance
- Remove the melted wax from heat and allow it to cool slightly (to about 160°F or 71°C).
- Add the fragrance oil, mixing thoroughly to ensure it is evenly distributed.
4. Prepare the Containers
- Secure the wicks in the center of your ramekins using a small amount of melted wax or wick stickers.
- Make sure the wicks are straight and upright.
5. Pour the Wax
- Carefully pour the wax into the ramekins, filling them about 2/3 full. Allow the first layer to cool slightly—this will create the “ice cream” effect.
6. Create the "Ice Cream"
- Scoop a little more wax out to a separate bowl. Add dye to achieve your desired ice cream color.
- Let the wax cool until it thickens slightly but is still pourable.
- Using your ice cream scooper, scoop the wax and place it on top of the first layer in each container to create a textured ice-cream appearance.
7. Final Touches
- Add extra decoration if desired, such as sprinkles or candle-safe toppings, before letting the candles set completely.
8. Cool and Trim Wicks
- Allow the candles to cool for several hours until hardened.
- Once set, trim the wicks down to about 1/4 inch above the wax.
Tips for Success
- Temperature Matters: Always monitor the temperature of the wax. Adding fragrance or dye at the right temperature ensures better scent throw and color.
- Wick Size: Test different wick sizes based on the container size to prevent issues like flickering or excessive smoking.
- Use Patience: Don’t rush the layering process; let the first layer cool adequately before adding the second scoop.
Common Mistakes to Avoid
- Not Securing the Wicks: Make sure your wicks are firmly anchored. A loose wick can lead to uneven burning.
- Skipping Temperature Checks: Pouring wax at incorrect temperatures can cause issues with your candle’s appearance and scent throw.
- Adding Too Much Dye/Fragrance: Start with small amounts and adjust as needed. Too much can interfere with the wax’s ability to burn properly.
Variations and Customization Ideas
- Scent Combos: Experiment by mixing different fragrance oils to create custom scents that reflect your personality or the season.
- Add Toppings: Use elements like candle-safe glitter or other decorative objects to enhance the visual appeal of your candles.
- Theme It: Create candles themed for holidays (like peppermint for Christmas) or seasonal events (like pumpkin spice for fall).
Storage and Shelf Life
Store your ice cream candles in a cool, dry place, away from direct sunlight. Properly stored, they should last for about 6-12 months. Be sure to keep them in their original containers or wrap them in protective materials to prevent dust accumulation.
Safety Tips
- Work in a Ventilated Area: Always ensure good ventilation while melting wax and using fragrance oils.
- Avoid Skin Contact: Handle hot wax and fragrance oils carefully to avoid burns.
- Never Leave Candles Unattended: Always supervise burning candles; trim wicks to prevent excessive flames.
Frequently Asked Questions
1. Can I use different types of wax?
Yes, soy wax is a great alternative for those looking for a more natural option. You can also explore beeswax or palm wax, though their melting points and behaviors may vary.
2. How do I choose the right wick?
Wick size can depend on the diameter of your container and the type of wax used. For beginners, brands often recommend specific wick sizes based on wax and container size.
3. What should I do if my candles don’t smell strong enough?
Ensure you’re adding the fragrance at the right temperature (around 160°F). If they still seem weak, experiment with increasing the amount of fragrance oil you use, always following the manufacturer’s guidelines.
4. How do I prevent tunneling in my candles?
To minimize tunneling, allow your candles to burn long enough for the top layer of wax to melt all the way to the edge of the container during the first burn. Aim for about 1 hour of burn time per inch of diameter.
5. Can these candles be burned safely?
Yes, as long as you follow safe candle-burning practices, including trimming wicks and burning the candles away from flammable materials.
6. How can I can fix cracks or imperfections in my candles?
If you notice cracks or imperfections, melt a small amount of wax and pour it over the affected area to smooth it out.
Conclusion
Creating your own ice cream candles is a delightful way to express your creativity and enhance your ambiance at home. With the right supplies, a little patience, and this easy-to-follow guide, you’ll have charming candles that smell just as good as they look. Enjoy this rewarding DIY project, and don’t forget to share your creations with others! Happy candle making!