
Ladybug Nails Are the Luckiest Trend of 2026
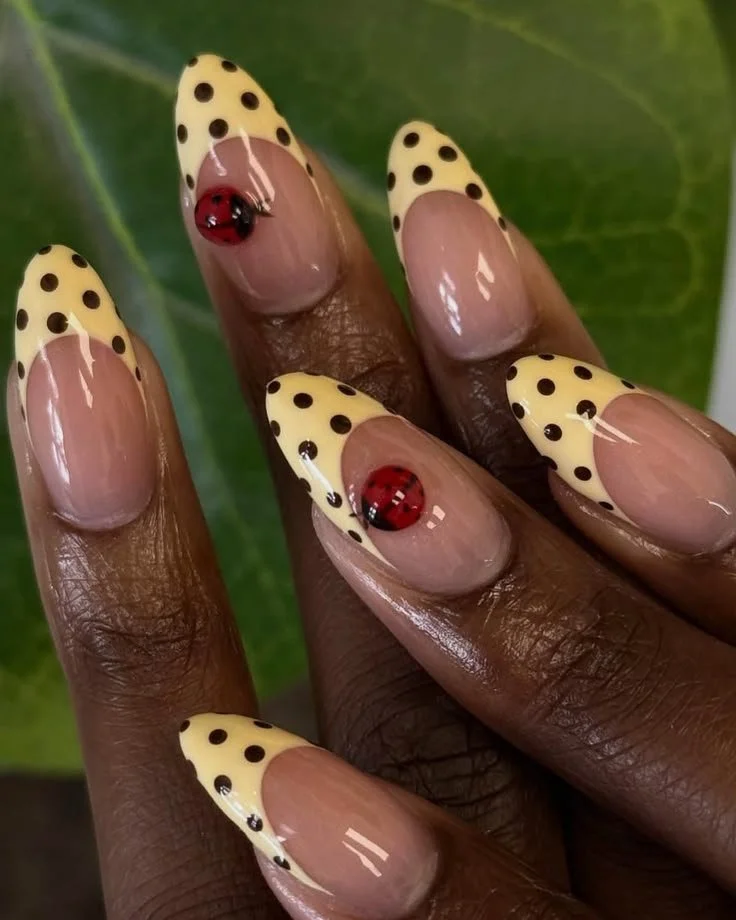
As we step into 2026, one of the most charming nail trends that has captured the hearts of beauty enthusiasts everywhere is none other than ladybug nails. These delightful designs not only evoke feelings of nostalgia but also carry the spirit of good luck and whimsy associated with these adorable creatures. Whether you’re preparing for a joyful celebration or simply want to add a touch of cuteness to your everyday look, ladybug nails are here to inspire you. So, let’s dive into this trend and unearth all the lovely details you should know!
Why You Will Love These Nails
Ladybug nails are perfect for those who adore playful and feminine nail art. The design combines classic elements with a fresh twist, giving you a sense of nostalgia while remaining trendy. With vibrant colors and creative patterns, these nails are perfect for expressing your unique style. Plus, they embody the fun nature of nail art, turning your fingertips into a canvas for creativity.
What You Need
To achieve the perfect ladybug nails, gather the following supplies:
- Base coat: A good quality base coat will protect your natural nails and prolong the wear of your manicure.
- Red nail polish: The key color for your ladybug design.
- Black nail polish: For detailing and creating the iconic spots.
- White nail polish: For the eyes or any accent designs.
- Nail art brush or dotting tool: Essential for precision in your designs.
- Top coat: To finish off your nails with a glossy or matte finish depending on your preference.
- Optional: Nail gems for added sparkle.
How to Recreate the Look
Creating the perfect ladybug nails at home is easier than you might think! Follow these simple steps to get started:
Prep Your Nails: Begin by cleaning and filing your nails. Push back your cuticles and apply a base coat to protect your nails from staining.
Apply Base Color: Paint your nails with red nail polish. Depending on the opacity of your polish, you may need to apply two coats. Allow them to dry completely.
Create Ladybug Details:
- For the spots, use a dotting tool or a thin nail art brush dipped in black nail polish to add dots on the red. The placement can be random but should mimic the natural appearance of ladybugs.
- For the eyes, use a small dot of white polish followed by a tiny dot of black for pupils. This adds life to your ladybugs!
Add a Top Coat: Once you’ve perfected your design and it’s dried, seal your artwork with a top coat for extra shine and durability.
Incorporate Accent Nails: For a fun twist, you can choose one or two accent nails to feature different designs, like hearts or glitter, that complement the ladybug theme.
Best Nail Shapes for This Design
Ladybug nails look fabulous on various nail shapes. However, here are the most complementary shapes for this playful design:
- Almond Nails: The tapered shape can enhance the whimsical nature of the ladybug design.
- Square Nails: For a bold and structured look, square nails beautifully support the design’s detailing.
- Stiletto Nails: If you’re feeling daring, the pointed shape can give your ladybug nails a chic edge.
Best Nail Length
While ladybug nails can be rocked on any length, here are some recommendations:
- Short Nails: Perfect for those who prefer minimal maintenance. The charming design will still stand out without overwhelming the fingertip.
- Medium Nails: A versatile length that provides enough space for intricate details while remaining easy to manage.
- Long Nails: Ideal for those who want to showcase creativity with an extended canvas to incorporate multiple ladybug designs.
Color Combinations
While red and black are traditional, you can play with various color palettes for a refreshing twist:
- Classic Red and Black: The original choice for an authentic ladybug look.
- Pastel Hues: Soft pinks, lilacs, and mint greens can add an airy, spring-like feel.
- Vibrant Colors: Experimenting with bright colors like neon pinks or greens can make your ladybug nails pop even more!
Cute Variations to Try
Once you have mastered the basic ladybug design, feel free to explore these cute variations:
- Glitter Gradient: Add a shimmering gradient effect at the tips of your nails for a touch of sparkle.
- Patterned Backgrounds: Incorporate patterns, such as polka dots or stripes, in complementary colors beneath the ladybug design.
- Floral Accents: Pair ladybugs with delicate floral designs for a whimsical garden feel.
Nails for Different Occasions
Ladybug nails are versatile enough for various occasions:
- Casual Outings: Perfect for brunch or a day out with friends, these nails are a fun conversation starter.
- Festivals: Add a cheerful touch to your festival look with these lucky ladybugs.
- Birthday Parties: Celebrate in style with this joyful and playful design.
Seasonal Ideas
You can tailor your ladybug nails to fit into any season:
- Spring: Use pastel colors alongside ladybug designs for a fresh outlook.
- Summer: Brighten up with tropical colors and add some sunshine-themed accents.
- Fall: Incorporate autumn colors like burnt orange and deep browns along with ladybugs resting on leaves.
Beginner Tips
If you’re new to nail art, here are some simple tips to keep in mind:
- Practice on Fake Nails: If uncertain, practice your designs on nail wheels or fake nails before committing to your natural nails.
- Don’t Rush: Allow each layer to dry before applying the next to avoid smudging.
- Embrace Imperfections: Nail art can be forgiving; if your design isn’t perfect, add more details to achieve a balanced look.
How to Make Your Manicure Last Longer
To ensure that your beautiful ladybug nails stay chip-free for as long as possible, consider these tips:
- Use a Base Coat: This acts as a protective barrier between your nail and the polish.
- Avoid Hot Water: Try to keep your nails away from hot water for at least a few hours after application.
- Apply a Top Coat Regularly: Reapply a top coat every few days to protect your design and maintain shine.
- Careful with Cleaning Products: Use gloves while cleaning to prevent nails from chipping.
Frequently Asked Questions
How do I remove ladybug nail art safely?
Gently soak a cotton ball in acetone or nail polish remover and hold it against your nails for a few seconds. Wipe away carefully to avoid damaging your natural nails.
Can I use gel polish for ladybug nails?
Absolutely! Gel polish can give your ladybug nails extra shine and longevity. Just ensure you follow the gel application and curing process correctly.
Do I need to be skilled to create ladybug nails?
Not at all! With practice, even beginners can achieve beautiful ladybug nails. Start with simple designs, and as you gain confidence, you can add more intricate details.
Conclusion
As 2026 unfolds, ladybug nails are undoubtedly one of the luckiest trends you’ll want to embrace for your next manicure. With their playfulness and charm, they make the perfect addition to any nail art enthusiast’s repertoire. Whether you prefer a strikingly simple design or something a bit more elaborate, there’s room for creativity in this trend. So grab your favorite red and black polishes, and let your imagination run wild with ladybug nails! You might just find them becoming your new go-to design. Happy nail painting!