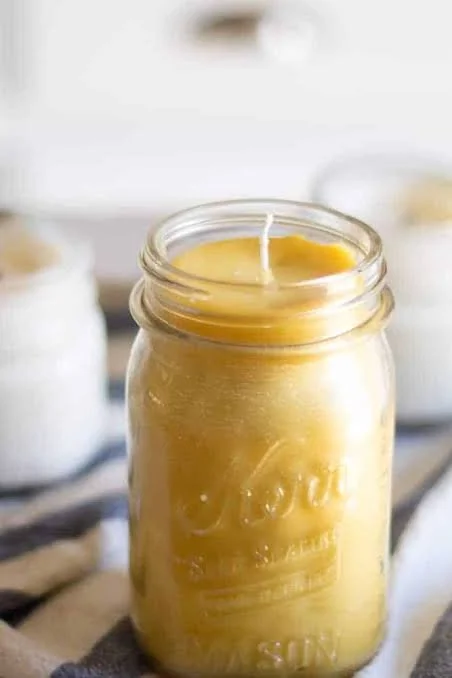

Cozy Up Your Space with Homemade Honey Vanilla Beeswax Candles
Picture this: you’re curling up on the couch, a soft blanket draped over your lap, and the gentle flicker of candlelight illuminating your favorite reading nook. The scent of sweet honey and warm vanilla fills the air, making everything feel just a bit more inviting. It’s these little moments that elevate our everyday life, don’t you think?
You might be wondering how to capture that cozy ambiance at home. Here’s the truth: making your own candles can be a delightful, satisfying experience, especially when they’re made from all-natural ingredients. Today, I’m excited to share a simple step-by-step guide on how to create your own honey vanilla beeswax candles that can easily transform any space in your home. Not only will they add warmth and charm to your decor, but they’re also a fantastic self-care project!
Why Choose Homemade Candles
We all love candles, but have you ever taken a moment to think about what goes into those store-bought options? Often, they come packed with synthetic fragrances and paraffin wax, which can be harmful to our health and the environment. Let’s be honest — that’s not what we want while trying to embrace a self-care moment, right?
Here are three reasons why making your own candles is the perfect solution:
Natural Ingredients: By using beeswax, raw honey, and essential oils, you’re creating a wholesome product that’s free from harmful chemicals.
Custom Scenting: You choose the scents that resonate with you. If honey and vanilla aren’t for you, experiment with other essential oils for a unique fragrance.
Personal Touch: There’s something incredibly rewarding about crafting something with your own hands. Every candle is infused with your energy and intention, making it feel extra special.
Ready to dive into this fun project? Let’s gather our supplies and get started!
What You’ll Need
Before you jump in, you’ll want to gather a few essential supplies. This isn’t just a DIY project; it’s a moment of self-care, and we want to set ourselves up for success. Here’s what you need:
Candles Supplies
- Beeswax Pastilles or Sheets: About 1 pound (if you can find organic, that’s even better!)
- Raw Honey: 1/4 cup
- Vanilla Essential Oil: 10 to 20 drops (adjust based on your scent preference)
- Wick: Cotton or wooden wicks (make sure they’re suitable for the size of your container)
- Containers: Glass jars, tin cans, or any heat-safe containers you love
- Double Boiler: If you don’t have one, a heatproof bowl over a pot of simmering water will work
- Candy Thermometer: Optional, but helpful for monitoring wax temperature
- Wooden Stick or Spoon: For stirring
Setting the Mood
Before you begin, let’s set the mood. Play your favorite playlist or light some calming incense. Think about how you want these candles to make you feel. Creating a peaceful atmosphere will make this a full-on self-care experience.
Step-by-Step Instructions
Once you’ve gathered your supplies, it’s time to roll up your sleeves and get crafting! Don’t worry; this is a straightforward process that anyone can master (yes, even if you think you’re not crafty).
Step 1: Measure Your Beeswax
Start by measuring out the amount of beeswax you need. If you’re using pastilles, 1 pound is a good amount for several candles. If you have sheets, you might need to shred them into smaller pieces. This may sound tedious, but trust me—it’s all worth it in the end.
Step 2: Melt the Beeswax
In your double boiler (or makeshift one), add the beeswax and heat it slowly. The key here is to not rush the process; beeswax melts at a higher temperature than other waxes, so patience is essential. Stir occasionally with your wooden stick until it’s fully melted.
Step 3: Mix in Honey and Scent
Once the beeswax is melted, remove it from heat and let it cool slightly. Here’s the fun part: stir in the raw honey and your vanilla essential oil. The mixture will be warm, and the honey will naturally add a beautiful sweetness that complements the beeswax.
Step 4: Prepare Your Containers
While the mixture is cooling, prepare your containers. If you’re using wicks that need to be anchored, dip the bottom of the wick in the melted beeswax and stick it to the bottom of your container. This little trick keeps it steady while you pour in your wax.
Step 5: Pour the Wax
Once your beeswax mixture is at around 150°F (give or take, no need to be precise), slowly pour it into your prepared containers. Leave a little room at the top for any additional topping or embellishment you might want to add later.
Step 6: Secure the Wick
Before the wax sets, make sure your wick stays centered. You can secure it with a chopstick laid across the mouth of the container, with the wick being held in place by the stick. Personal tip: I like to take this time to make sure my wick is just the right length, so it fits my container perfectly.
Step 7: Let Them Set
Now, the hardest part—waiting! Allow your candles to set for a few hours at room temperature. Once they feel firm, you can trim the wick to about 1/4 inch above the surface, getting them ready to light!
Common Mistakes to Avoid
As with any DIY project, mistakes can happen. Here are a few pitfalls to watch out for:
Rushing the Melting Process: Beeswax can scorch easily. Stay patient, and melt at a low temperature.
Adding Too Much Fragrance: A little goes a long way. Too much can overpower the natural aroma of the beeswax.
Skipping Wick Anchoring: If you don’t anchor your wick, it might shift when you pour in the wax, leading to uneven burning.
Quick Beauty Tips
As you’re embracing this candle-making journey, here are a few beauty tips to keep in mind:
Reuse Containers: Old containers like jars and mugs make great candle holders! It’s an eco-friendly choice that’ll give a vintage vibe to your decor.
Decorate Your Candles: Once set, you can even add some dried flowers or herbs on top for that extra touch.
Layered Scents: If you’re feeling adventurous, try layering scents by adding more than one type of essential oil or creating candle sets with different fragrances.
FAQs about Homemade Candles
How long do these candles last?
If stored properly and kept away from direct sunlight, these candles can last for quite a while. Just remember that homemade candles are best enjoyed fresh, so light them up!
Can I use other waxes?
Absolutely! While I adore beeswax for its natural properties and the delightful honey scent, you can experiment with soy or palm wax if you prefer.
What if the candles don’t set properly?
Don’t panic! If your candles seem too soft, return them to the double boiler with a little more wax and re-pour them once melted.
Bonus Self-Care Ideas
While you’re enjoying your freshly made candles, consider indulging in these additional self-care moments:
Enjoy a Bubble Bath: Light those candles, add bubble bath, and soak your cares away.
Make a Cozy Space: Create a reading nook with plenty of cushions and throw blankets, inviting those candles to share their light.
Mindful Moments: Spend some time journaling or meditating in your candle-lit space. This can be a powerful way to wind down and reflect.
Conclusion
So, there you have it! Your own homemade honey vanilla beeswax candles that not only make your home feel cozier but also fill it with a sweet, soothing aroma. Remember, it’s not just about lighting a candle; it’s about creating feelings of warmth and comfort in your space.
With just a few simple ingredients and some time set aside for yourself, you can craft a beautiful addition to your home. The best part? You get to enjoy the fruits of your labor every time you light them. So go ahead—nurture that creative side, embrace the process, and transform your space into a sanctuary that reflects you.
You’re not just making candles; you’re creating moments. Enjoy the glow!