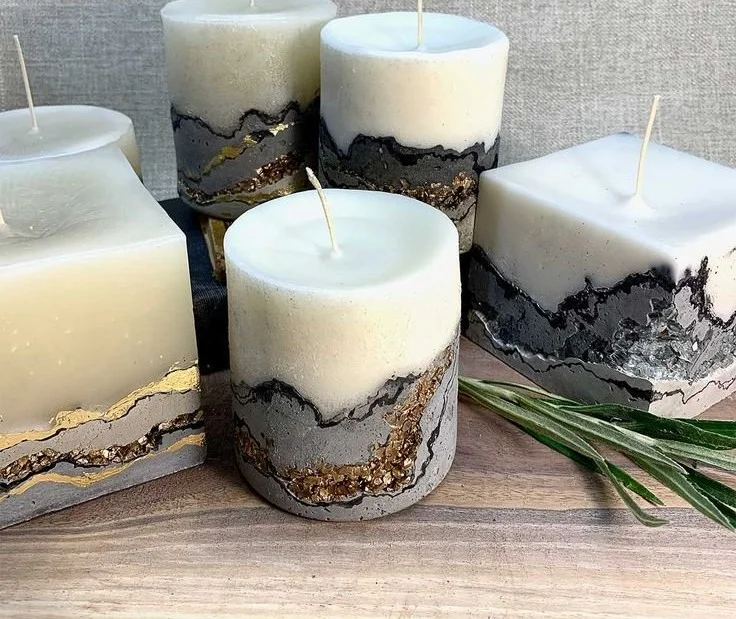

Bring a Bit of Nature Inside: How to Make Concrete Geode Candles with Reusable Molds
Imagine the soft flicker of a candle, casting a warm glow while sitting inside a beautiful, geode-inspired concrete vessel. In this tutorial, I’ll guide you through the delightful process of making your own Concrete Geode Candles using reusable molds. This project is not only aesthetically pleasing but also offers an engaging, hands-on experience that brings a touch of nature indoors. Perfect for beginners, this DIY candle-making project is an opportunity to learn and create something truly unique.
Why You Will Love This Project
Concrete geode candles are an impressive addition to any home décor, serving as both decorative elements and functional candles. With their stunning geometric designs and natural color variations, they provide a creative outlet that is both fun and relaxing. You’ll love experimenting with different scents and colors, plus they make fantastic handmade gifts for loved ones!
Ingredients
- Concrete Mix: 1 lb (You can find this at any hardware store—choose a fast-setting, all-purpose mix)
- Candle Wax: 1 lb (Soy wax is recommended for an even burn and easier scent absorption)
- Candle Fragrance: Optional, 1–2 oz (Choose your favorite scent!)
- Dye: Optional (Use candle dye for coloring your wax)
- Wicks: 3-4 cotton or wooden wicks (Select one size larger than your container width)
- Adhesive: Hot glue or wick stickers (to secure the wicks)
- Mica Powder or Glitter: Optional (for a shimmering effect in your concrete)
Equipment
- Mixing Bowl: For combining the concrete
- Spoon or Stir Stick: For stirring the concrete mix
- Candle Pouring Pitcher: For melting and pouring the candle wax
- Thermometer: To monitor wax temperature
- Reusable Molds: Silicone molds that create geode shapes (these come in various designs)
- Double Boiler: For melting wax (or use a microwave-safe container to melt in the microwave)
- Protective Gloves: To keep your hands safe while working with concrete and hot wax
- Safety Goggles: Especially important when handling concrete
Step-by-Step Instructions
Step 1: Prepare Your Molds
- Make sure your silicone molds are clean and dry.
- If desired, sprinkle mica powder or glitter directly into the molds; this will create a sparkling effect on your candle’s surface.
Step 2: Mix the Concrete
- In your mixing bowl, combine the concrete mix with water according to the instructions on the bag (usually a 1:1 ratio, but check for specifics).
- Stir until you have a smooth, lump-free consistency.
Step 3: Fill the Molds with Concrete
- Carefully pour the mixed concrete into the molds, filling them about halfway.
- Use your spoon or stir stick to create a small hole in the center for the wick later.
- Allow the concrete to set according to package instructions (usually 30 minutes to an hour).
Step 4: Prepare the Candle Wick
- Once the concrete has set, secure the wick in the center of each mold using hot glue or wick stickers.
- Make sure the wick is straight and centered for an even burn.
Step 5: Melt the Candle Wax
- Set up your double boiler or microwave. If using a double boiler, fill the bottom pot with water and bring it to a gentle simmer.
- Place your wax in the pouring pitcher and melt it, stirring occasionally with a thermometer. The ideal temperature for pouring is around 170°F (77°C).
- Optional: If you want to add fragrance or color, remove the wax from the heat and mix in your desired fragrance oil and candle dye.
Step 6: Pour the Wax
- Carefully pour the melted wax into the prepared molds over the installed wicks. Fill to the top.
- Allow the candles to cool completely, which might take several hours. You can place them in a cool spot to speed up the process.
Step 7: Unmold Your Candles
- Once the candles have cooled and hardened, gently pull the silicone mold away from the concrete.
- Trim the wicks to about a quarter inch above the wax surface.
Tips for Success
- Use Reusable Molds: Invest in high-quality silicone molds to make demolding easier, and they can be used repeatedly for other projects.
- Mix Thoroughly: Always mix your concrete well to avoid lumps, and thoroughly stir your wax to ensure the fragrance is evenly distributed.
- Experiment: Try various colors and scents to find a combination that speaks to you. This is where your creativity can shine!
Common Mistakes to Avoid
- Pouring Wax Too Hot: Pouring wax at temperatures above 180°F can result in cracks. Stick to the recommended temperature range.
- Not Securing Wicks: Ensure your wicks are properly centered and adhered; otherwise, they may sink.
- Overmixing Concrete: While it’s essential to mix your concrete thoroughly, overmixing can introduce air bubbles, so stir carefully.
Variations and Customization Ideas
- Scent Combinations: Combine complementary fragrances, like lavender and chamomile, for a luxurious aroma.
- Color Layers: Create layered candles by pouring multiple colors of wax at different intervals.
- Geode Effects: For a more pronounced geode appearance, use contrasting colors of dye or add crushed glass as decoration.
Storage and Shelf Life
Store your finished geode candles in a cool, dry place away from direct sunlight. Properly stored, they can last for several months. If you used natural ingredients, be mindful of their bake times and scents.
Safety Tips
- Work in a Well-Ventilated Area: Ensure there’s good airflow, especially when melting wax.
- Protective Gear: Always wear gloves and goggles when working with concrete, and use caution when handling hot wax.
- Keep Away from Flammable Materials: Always burn your candles on a stable surface, away from flammable items, and never leave candles unattended.
Frequently Asked Questions
1. Can I use a different type of wax for this project?
Yes, you could use beeswax, palm wax, or paraffin. Just be mindful of the melting temperatures for each type.
2. How can I tell when my wax is at the right temperature?
Use a thermometer to check; the ideal pouring temperature is around 170°F.
3. Can I add essential oils instead of fragrance oils?
Yes, but essential oils have a lower scent throw and may not hold up as well when burned.
4. What do I do if my concrete cracks while drying?
Minor cracks can usually be patched with more concrete mix. If the structural integrity is compromised, it may be best to start fresh.
5. How long does it take for the candles to set?
Typically, concrete takes about 30 minutes to an hour to set, and wax should cool completely for several hours.
Conclusion
Creating Concrete Geode Candles is a rewarding DIY project that allows you to unleash your creativity while crafting a stunning piece of functional art. With easy-to-follow instructions, customizable options, and plenty of room to experiment, this tutorial provides everything you need to get started. So gather your materials, prepare for some fun, and bring a little nature’s beauty into your home! Happy crafting!