
How to Make Your Own Candles with Natural Ingredients and Essential Oils
Creating your own candles at home using natural ingredients and essential oils not only cozies up your space but also provides an opportunity to explore the wonderful benefits of aromatherapy while purifying the air. This DIY project is perfect for both beginners and seasoned crafters, and it results in unique handmade gifts that friends and family will adore.
Why You Will Love This Recipe
Making your own candles is an enjoyable and rewarding experience, allowing for creativity and personalization. Using natural waxes like soy or beeswax, along with essential oils, ensures that you’re not only making a beautiful candle but also promoting a healthier environment in your home. Homemade candles can cater to your scent preferences and can even be tailored for special occasions throughout the year, making it a perfect DIY Christmas gift.
Ingredients
- Wax: 1 pound of soy wax or beeswax
- Essential oils: 1 ounce (or about 30 ml) for fragrance (try lavender for relaxation, lemon for freshness, or eucalyptus for clarity)
- Wicks: Cotton or woodwick, appropriate for the container size (usually 1 wick for candles 8oz and below, consider multiple for larger containers)
- Dyes (optional): Natural candle dye or crayon shavings (about half a crayon for a subtle hue)
Equipment
- Double boiler or a heat-safe bowl and pot
- Scale (for measuring wax)
- Thermometer (to check wax temperature)
- Stirring utensil (like a wooden stick)
- Pouring pitcher
- Candle containers (glass jars, tins, or any heat-safe vessel)
- Wick holder or adhesive (to keep the wick centered)
Step-by-Step Instructions
Prepare Your Workstation
- Lay down newspaper or a silicone mat to catch any spills. Have all your materials ready.
Melt the Wax
- Fill the bottom part of your double boiler with water and bring it to a gentle simmer. Measure out 1 pound of your chosen wax and place it in the upper part or heat-safe bowl. Stir occasionally as it melts.
Check the Temperature
- Use the thermometer to ensure the wax reaches about 180°F (82°C) for optimal blending of scents.
Add Fragrance
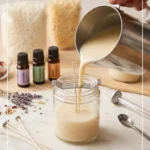
- Once melted, take the wax off the heat and add 1 ounce of your selected essential oils. Stir well to ensure even distribution.
Color the Wax (Optional)
- If you’re using natural dye or crayon shavings, add them to the wax after the essential oils and mix thoroughly until completely dissolved.
Secure the Wick
- Place the wick in your container using a wick holder or a drop of melted wax to hold it in place. Ensure it stands upright in the center.
Pour the Wax
- Allow the wax to cool to about 140°F (60°C) before carefully pouring it into the container. Leave some space at the top.
Cool and Set
- Let the candles cool for at least 4 hours at room temperature or overnight for best results. Avoid moving them until they’re set.
Trim the Wick
- Once completely cooled and hardened, trim the wick to about 1/4 inch above the wax surface.
Tips for Success
- Temperature Matters: Always check the temperature of the wax before adding scents or pouring, as this affects the bond and throw of the fragrance.
- Test Burn: Perform a test burn to see how well your chosen wick burns with the candle size and wax type.
- Scent Strength: Feel free to adjust the amount of essential oils according to your fragrance preference.
Common Mistakes to Avoid
- Overheating Wax: Always melt wax slowly to avoid burning. If it smells like it’s burning, it’s too hot.
- Ignoring Wick Size: Ensure your wick is the correct size for your container or wax type; otherwise, you may end up with poor burning or excessive soot.
- Pouring Too Hot: If the wax is too hot during pouring, it can cause cracking in your finished candle.
Variations and Customization Ideas
- Scent Blends: Combine different essential oils for a unique fragrance. For example, mix vanilla with cinnamon for a warm, festive feel or peppermint with eucalyptus for a refreshing scent.
- Layering Colors: For a more decorative candle, pour different colored layers of wax. Make sure each layer cools before adding the next.
- Additives: Consider adding dried herbs or flower petals into the wax for aesthetic appeal and added scent.
Storage and Shelf Life
Store your candles in a cool, dry place away from direct sunlight to prevent fading of scents and colors. Properly stored, your homemade candles should last for about 6 to 12 months.
Safety Tips
- Use Caution with Hot Wax: Always be mindful when working with hot wax to prevent burns. Wear heat-resistant gloves if necessary.
- Ventilation: Work in a well-ventilated area, especially when using essential oils and dyes.
- Never Leave Burning Candles Unattended: Always practice safe candle-burning practices. Keep candles away from flammable materials and children.
Frequently Asked Questions
Can I use any type of wax?
- Yes! Soy wax and beeswax are popular choices due to their natural properties and better scent throw. Paraffin wax can be used as well, but it’s not as eco-friendly.
What’s the best wick for my candle?
- A cotton wick is good for most smaller candles. For larger containers, consider wood wicks or multiple cotton wicks.
How much essential oil should I add for fragrance?
- A general rule of thumb is about 1 ounce per pound of wax, but you can adjust based on how strong you want the scent.
What containers are best for candle making?
- Glass jars, metal tins, or ceramic pots work well. Just make sure they can withstand heat.
How do I fix cracked candles?
- If your candle cracks after cooling, you can melt the top layer again and smooth it out, or fill the cracks carefully with additional melted wax.
Conclusion
Making your own candles with natural ingredients and essential oils is a delightful way to add both coziness and a personalized touch to your home. With just a few simple ingredients and steps, you can create beautiful, aromatic candles that enhance your living space or make thoughtful gifts for loved ones. So gather your materials, follow the steps, and enjoy the pleasures of candle-making! Happy crafting!