
The Joy of Homemade Christmas Mug Candles
Imagine this: it’s a chilly December evening, with soft twinkling lights illuminating your home and that unmistakable scent of pine and cinnamon wafting through the air. You’re cozied up with a hot cup of cocoa, wrapped in your favorite blanket, and a gentle flicker dances from a candle, casting warm shadows across your space. Does it feel like a scene from a holiday movie? It’s magical, right? Now, what if I told you that you could spread that same warmth and festive spirit to your loved ones this Christmas with handmade gifts? Enter the delightful world of homemade Christmas mug candles.
Let’s be honest: we’re all looking for gifts that not only show our affection but also carry a personal touch. DIY projects can be intimidating—so often we think we need to be crafting experts to tackle them. But trust me, making Christmas mug candles is not just easy; it’s therapeutic, fun, and incredibly rewarding. Plus, these little creations will leave your friends and family feeling oh-so-special. So, grab your crafting supplies, and let’s dive into an experience that combines creativity with the holiday spirit!
Why Choose Homemade Candles
You might be wondering why you should make your candles instead of simply picking some up at the store. Here’s the truth: homemade candles are personal. These beauties provide a chance to customize scents, designs, and even the containers they come in. Imagine creating a signature scent that reminds someone of cherished memories or a particular aspect of your relationship. Plus, there’s something uniquely satisfying about making something with your own hands.
The Benefits of Homemade Mug Candles
- Personalization: Choose scents that resonate with the person you’re gifting them to.
- Eco-Friendly: By using natural waxes and materials, you’re reducing the carbon footprint.
- Cost-Effective: Making candles at home can be significantly cheaper than store-bought options.
- Therapeutic: The process can be a great stress-reliever. It taps into that creative side we all need.
What You’ll Need
Alright, let’s gather our materials! Here’s a quick list of what you’ll need to make these adorable and festive Christmas mug candles:
- Mugs: Opt for ceramic or glass mugs that suit your style (think holiday themes, patterns, or colors).
- Wax: Soy wax is a great choice because it burns cleaner and longer.
- Wicks: Make sure to choose the right size for your mugs.
- Essential oils or fragrance oils: Get creative with scents—cinnamon, vanilla, pine, or peppermint can bring that holiday vibe right to your candles.
- Double boiler: For melting the wax safely.
- Thermometer: This helps in checking your wax’s temperature.
- Stirring utensil: Wooden spoons work well.
- Dye (optional): If you want your candles to have a pop of color.
- Labels: To give a personal touch to your candles.
Step-by-Step Guide to Making Mug Candles
Ready to dive into the creative process? Here’s a step-by-step guide to help you craft your homemade Christmas mug candles.
Step 1: Prepare Your Work Area
Before you start, clear a space on your kitchen counter or dining table. Lay down some newspaper or a crafting mat to protect your surface from potential wax spills (trust me, they’ll save you a lot of scrubbing later!).
Step 2: Measure Wax and Prepare Mugs
Start by measuring the amount of wax you’ll need for your mugs. A good rule of thumb is to fill the mug with water, then pour that into a measuring cup to see how much wax you’ll need (remember to add a little extra because wax shrinks as it cools).
Once measured, go ahead and place your wicks into the mugs. It helps to use a little bit of melted wax on the bottom of the wick to keep it in place. You can also use a pencil or chopstick to balance the wick across the top of the mug, anchoring it.
Step 3: Melt the Wax
Fill a pot with water and place your double boiler over it to create a gentle simmer. Add the wax into the top pot and heat until it reaches around 170-180 degrees Fahrenheit. This is when you can add any dye if you’re choosing to color your candles.
Step 4: Add Scents
Once your wax is melted, let it cool until it reaches around 160 degrees Fahrenheit before adding your essential or fragrance oils. Typically, it’s about 1 ounce of fragrance oil per pound of wax, but feel free to adjust based on how strong you want the scent to be. Stir well to combine.
Step 5: Pour the Wax
Carefully pour the melted wax into your prepared mugs, ensuring the wick stays centered. Leave about half an inch from the top to avoid spillovers. Let them sit at room temperature for a couple of hours until they’re solid.
Step 6: Trim Wicks and Finish Up
Once solid, trim the wicks to about 1/4 inch above the surface. At this point, you can add labels or decorative touches to your mugs—think holiday stickers or cute quotes.
Step 7: Gift and Enjoy
Enjoy your creation, or gift them to your loved ones with heart! You could even host a small gathering where your friends can join in the candle-making fun, turning it into a festive activity.
Common Mistakes to Avoid
Now, let me save you some potential headache! There are a few common pitfalls you might encounter while making your candles.
- Using Too Much Fragrance: While scents are delightful, overdoing it can lead to burning issues.
- Not Securing Wicks: Making sure the wicks stay in place is crucial; otherwise, they can drift and ruin the look.
- Working with Too Hot Wax: Always keep an eye on temperatures—too hot can burn off the scent!
Creative Variations to Try
Looking to spice up your mug candles? Here are a few creative variations you can explore:
- Layering Scents: Create layered candles with different scents for a unique olfactory experience.
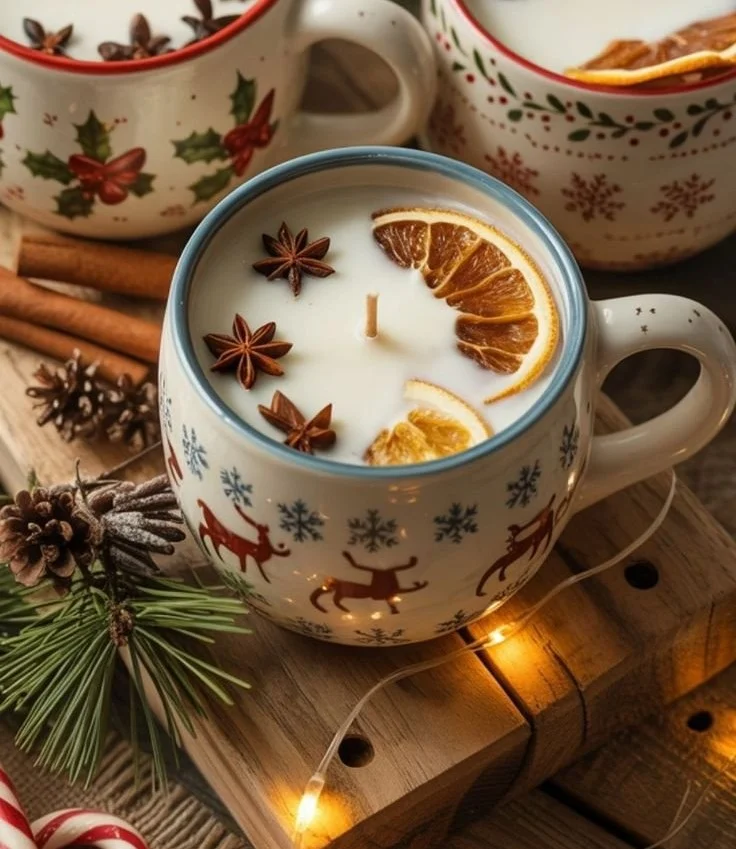
- Embedded Items: Add dried flowers, cinnamon sticks, or coffee beans to the wax for a beautiful effect and extra texture.
- Seasonal Colors: Feel free to play with color—think deep reds, greens, and even metallics for extra festive flair.
Quick Beauty Tips for Candle Care
While you’re basking in the glow of your beautifully created candles, don’t forget some candle care tips:
- Don’t burn your candles for more than 4 hours at a time to prevent soot buildup and unsightly mushroomed wicks.
- Keep the candle away from drafts, which can cause uneven burning.
- When extinguishing, try to avoid blowing on it; instead, use a snuffer for a cleaner finish.
Bonus Self-Care Ideas
With the hustle and bustle of the holidays, we sometimes forget to take care of ourselves. Here are some ideas to incorporate self-care into your season:
- Cozy Night In: Light your new candles, put on your favorite holiday movie, and enjoy a face mask.
- Journaling Sessions: Spend some time reflecting on the year while you’re surrounded by the soothing aroma of your candles.
- Warm Baths: Light up a few while you soak and unwind. Nothing beats a care-free evening to recharge.
Conclusion
As the holidays swiftly approach, the warmth and comfort of homemade gifts like Christmas mug candles are a heartfelt way to show you care. You’ll not only create something beautiful but you’ll also engage in a soothing, self-care practice that allows you to step away from the hustle and bustle of the season.
So, are you ready to make this holiday memorable? Grab your supplies, settle in, and let your creativity flow. Creating something personal brings more joy than any store-bought gift ever could. Plus, who knows? This might just become a new beloved holiday tradition for you and your loved ones. Happy crafting!