
How to Make Neapolitan Soap Bars: A Fun DIY Project
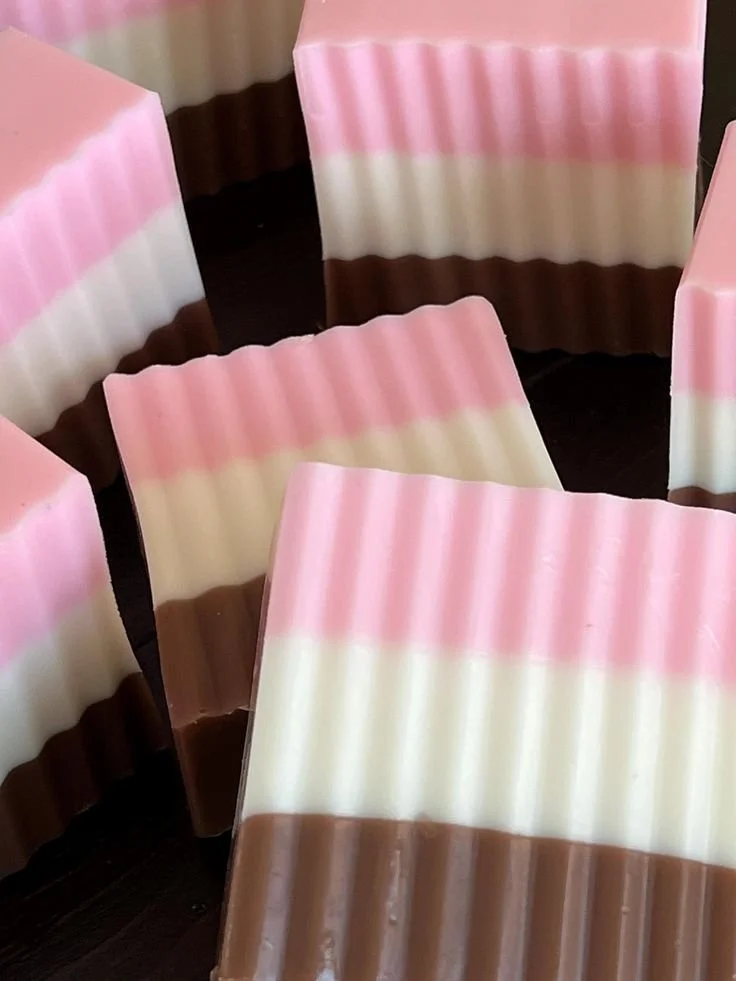
Creating your own Neapolitan Soap Bars is not only a delightful DIY project, but it also makes for unique handmade gifts that are sure to be adored. Featuring the delightful scents of chocolate, vanilla, and strawberry in a whimsical, triple-layered presentation, this soap brings a touch of dessert-inspired joy to your bathing routine. In this guide, I’ll walk you through the process of making these artisan soaps step by step, using the melt and pour method that’s perfect for beginners.
Why You Will Love This Recipe
- Beginner-Friendly: The melt and pour method requires no special skills or equipment.
- Customizable: You can easily personalize fragrances and colors to match your preferences.
- A Great Gift Idea: Handmade soap makes a thoughtful gift for any occasion—birthdays, holidays, or just because!
- Fun and Engaging: This project is enjoyable to make, and the result is visually stunning.
Ingredients
For this Neapolitan Soap Bar, you’ll need the following:
Base Ingredients:
- 14 oz (400g) Clear or White Glycerin Soap Base: For a clear or creamy look.
- 2 tsp (10ml) Chocolate Fragrance Oil: Represents the chocolate layer.
- 2 tsp (10ml) Vanilla Fragrance Oil: For the creamy vanilla scent.
- 2 tsp (10ml) Strawberry Fragrance Oil: Adds the fruity strawberry scent.
- Soap Colorants: Brown for chocolate, white for vanilla, and pink for strawberry. Use according to the manufacturer’s instructions.
Optional Additives:
- Dried Herbs or Flowers: Such as rose petals or cocoa powder, for added texture or visual appeal.
Equipment
Here’s what you’ll need:
- Cutting Board: To chop the soap base.
- Knife: For cutting the soap base into small pieces.
- Microwave-Safe Bowl or Double Boiler: For melting the soap.
- Pouring Jug: To help you pour the melted soap into your mold.
- Soap Molds: Silicone molds are great for easy release.
- Mixing Spoon: For blending fragrances and colors.
- Pipette or Squeeze Bottle: Optional, for precise color layering.
Step-by-Step Instructions
Preparation Time: 10 minutes
Making Time: 1 hour (including cooling)
Approximate Yield: 3 large bars
Step 1: Prepare the Soap Base
- Cut the glycerin soap base into small cubes and place them into your microwave-safe bowl.
- Heat the soap base in the microwave in 30-second intervals, stirring after each burst until fully melted. Alternatively, you can use a double boiler on the stovetop.
Step 2: Color and Scent the First Layer
- Once the soap base is melted, add two teaspoons of chocolate fragrance oil and a few drops of brown soap colorant. Mix until completely incorporated.
- Pour the mixture into your mold to fill about one-third of the height. Gently tap the mold on the counter to eliminate air bubbles.
- Allow the first layer to cool and harden, which should take about 15-20 minutes.
Step 3: Color and Scent the Second Layer
- Repeat the melting process for the second layer. This time add two teaspoons of vanilla fragrance oil and a few drops of white soap colorant.
- Once melted, pour this mixture over the hardened chocolate layer until the mold is half full.
- Again, allow this layer to cool completely.
Step 4: Color and Scent the Third Layer
- For the final layer, melt a new batch of soap base, adding two teaspoons of strawberry fragrance oil and a few drops of pink soap colorant.
- Pour this mixture on top of the vanilla layer and fill the mold to the top.
- Let the soap bars cool completely. This may take up to an hour.
Step 5: Demold and Cut
- Once fully set, gently remove the soap from the mold. If you used a silicone mold, it should pop out easily.
- If you poured a large loaf, cut the soap into individual bars with a sharp knife.
Tips for Success
- Work in a well-ventilated area when using fragrance oils.
- Stir well after adding fragrance oils and colors to ensure an even blend.
- Use a kitchen scale to measure your soap base accurately for consistent results.
Common Mistakes to Avoid
- Overheating the Soap Base: Microwaving for too long can cause the soap to boil, which may lead to a bubbly texture. Always melt in short intervals.
- Not Letting Layers Cool Properly: If the layers are not allowed to cool before pouring the next one, they may blend together instead of forming distinct layers.
Variations and Customization Ideas
- Herbal Infusions: Consider adding dried lavender or chamomile to the soap for a unique scent and texture.
- Layer Thickness: Adjust the proportions of each layer to create thicker or thinner layers according to your style preference.
- Swirls: For a marbled effect, you can lightly swirl the different soap mixtures together before they set.
Storage and Shelf Life
Keep your handmade soaps in a cool, dry place. Wrap them in wax paper or store in an airtight container to preserve their fragrance and longevity. When properly stored, your Neapolitan Soap Bars should last for up to six months.
Safety Tips
- When working with fragrance oils, avoid contact with skin, eyes, and mucous membranes. Use gloves if necessary.
- Be sure to clean your equipment thoroughly after use, especially if you’re switching between different colors or scents.
Frequently Asked Questions
1. Can I use essential oils instead of fragrance oils?
Absolutely! Essential oils can be substituted, but keep in mind that they may behave differently in soap—some may not provide a strong scent throw.
2. What if my soap is too soft?
If your soap remains soft, it may need more time to cool and harden. Always follow the cooling times mentioned.
3. Can I use any type of mold?
Yes, but silicone molds are recommended for easy removal of the soap bars once set.
4. How do I create a stronger scent?
To increase the fragrance, try using a bit more fragrance oil, but be careful not to exceed the manufacturer’s recommended usage rate.
5. What should I do if my layers don’t stick together?
Ensure that each layer cools slightly before adding the next. Also, consider spraying a little rubbing alcohol on the hardened layer to encourage adhesion.
Conclusion
Making your own Neapolitan Soap Bars is a fun and rewarding project, perfect for both gifting and personal use. With just a few ingredients and some time, you can craft beautiful, scented bars that look and smell like a delightful dessert. Remember to enjoy the process, experiment with variations, and most importantly, have fun creating your handmade artisanal soaps. I encourage you to give this project a try—your bath (and your friends) will thank you!