
Embrace Chic Polka Dots with a French Tip Nail Design
Imagine walking into a room, and your nails are making just as much of a statement as your outfit. You’ve got that perfect balance of chic and playful, all thanks to a stunning nail design. The chic polka dot French tip nail design is not just for special occasions; it can brighten up any day. If you’re someone who loves to express their personality through beauty, you’ll find this nail art to be a delightful mix of elegance and fun.
Now, I know what you might be thinking: “Can I really pull off something that bold?” Here’s the truth — beauty is all about confidence and playfulness. Whether you’re headed to brunch with friends or a special celebration, this nail design is perfect for stylish everyday wear or those extra special moments. Let’s break down this irresistible nail look and provide you with everything you need to recreate it yourself.
The Beauty of French Tips with a Twist
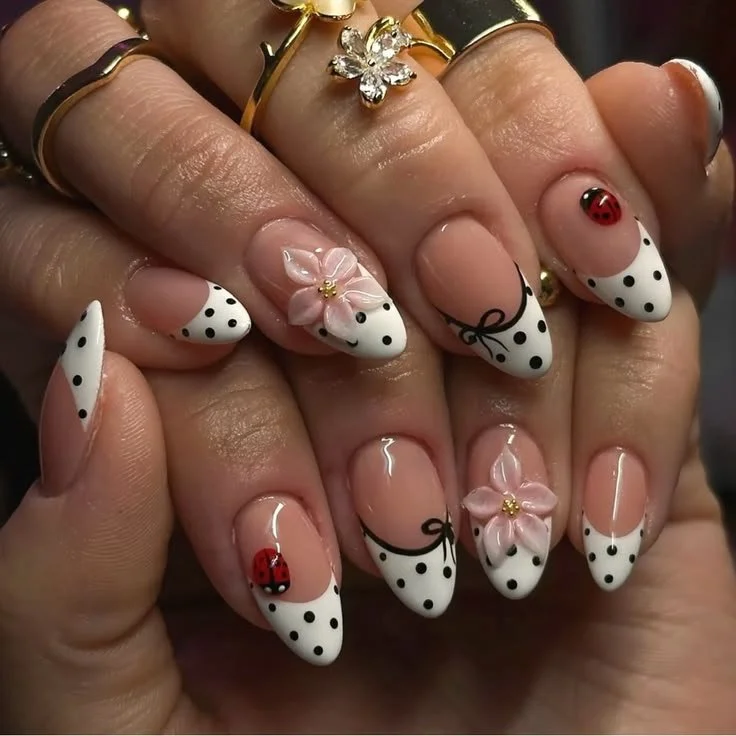
French tips have been a classic staple in nail art, but why not add a twist to make them extra special? What sets this design apart is the combination of glossy white tips adorned with charming polka dots and delicate 3D flowers. It’s a wonderful blend of sophistication and whimsy.
Why Choose Polka Dots?
Polka dots are timeless. They evoke feelings of cheerfulness and fun while still keeping it classy. Plus, they’re super versatile. Depending on how you choose to style them (big or small, colorful or monochrome), polka dots can suit just about any mood or occasion.
Incorporating Delicate Pink Flowers
These gentle pink floral embellishments add an undeniably feminine touch. They introduce a soft, romantic vibe to the look, making your nails appear more elegant and polished. Playing with different sizes and placements of the flowers can create a unique twist every time you replicate the design.
Playful Ladybug Accents
The cherry on top? Tiny ladybugs. These little critters add a playful accent to your nails, bringing a sense of joy and charm. Plus, who doesn’t love a dash of whimsy in their life? They’re the finishing touch that complements your chic polka dot design without overpowering it.
Essentials for Your Polka Dot French Tips
Before you dive into application, make sure you have the right tools and products on hand. Here’s a checklist of what you need to create this beautiful look:
- Base Coat: This is crucial for protecting your nails and ensuring your design lasts longer.
- White Nail Polish: For the classic French tips.
- Black Nail Polish: To create the polka dots, bows, and ladybug accents.
- Pink Nail Polish: Choose a soft, delicate pink for the floral details.
- Top Coat: To give your nails that glossy finish.
- Dotting Tool: Or a toothpick if you don’t have one, perfect for creating your polka dots.
- Nail Art Brush: For flowers and bows.
- 3D Floral Embellishments: These can be bought or made, depending on your skills!
Steps to Create the Look
Here’s a step-by-step guide to achieving that chic polka dot French tip with delicate floral details. Gather your materials and let’s get started!
Step 1: Prep Your Nails
Start with clean, dry nails. Remove any old polish, push back your cuticles, and buff the surface for a smooth base. Apply a layer of base coat to protect and nourish your nails.
Step 2: Apply the Base Color
Paint your nails with the white polish, creating a sophisticated base. You might need two coats here to ensure even coverage. Let it dry completely to avoid smudging later on.
Step 3: Create the French Tips
Using either tape or a steady hand, create the classic French tip by painting the tips of your nails with the same white polish. The tips should be about a third of the way down your nails — but feel free to adjust this based on your style!
Step 4: Add Polka Dots
Once your tips are dry, grab your black polish and dotting tool. Dip the tool into the polish and carefully create polka dots at the base of the nail and along the sides. The dots should be inconsistent in size for a playful, artsy look.
Step 5: Floral Embellishments
Now it’s time to bring in the flowers. Use the nail art brush and your pink polish to create delicate flower shapes. You don’t need to go overboard with these; small touches can make a big difference. You can even add a tiny dot in contrasting color at the center of the flower for extra flair.
Step 6: Bows and Ladybugs
Using the black polish, paint simple bow shapes at the base of the nail or on top of the flower. For the ladybug accents, use a small dot for the body and add tiny black dots for the speckles. Talk about detail!
Step 7: Finish with a Glossy Top Coat
To seal your design, apply a generous coat of top coat. This step enhances the glossy white tips and allows your artwork to shine!
Quick Beauty Tips for Nail Art Success
- Have Patience: Don’t rush the drying process. It’s crucial to allow each layer to dry completely to prevent smudging.
- Use Tape for Clean Lines: If you’re not confident with your hand, tape can help you achieve sharper edges.
- Practice Makes Perfect: Your first attempt might not be perfect, and that’s okay! Nail art is all about practice.
Common Mistakes to Avoid
- Skipping the Base Coat: This can lead to staining and unhealthy nails. Always start with one!
- Overloading the Dotting Tool: Too much polish can create blobs instead of dots. A little goes a long way!
- Ignoring Aftercare: Moisturize your cuticles after a nail session to keep your nails strong and healthy.
FAQs about Polka Dot Nail Designs
How long will this design last?
With proper care, you can expect your chic nails to last around one week before they might need a touch-up.
Can I use gel polish for this design?
Absolutely! Gel polish may give you a longer-lasting finish but requires a UV lamp to cure the polish.
Is this design suitable for short nails?
Definitely! This design looks fabulous on short nails; in fact, the elegance of the design might be even more showcased on shorter nails.
Bonus Self-Care Ideas
While your nails dry and shine, don’t forget about the rest of you. Here are a few self-care ideas to consider during your nail art sessions:
- Face Masks: Treat your skin to a nourishing mask while your nails dry.
- Essential Oils: Diffuse some calming oils like lavender or eucalyptus as you pamper your nails.
- Hair Care: Use this time to deep condition your hair. It’s a win-win!
The Perfect Occasions for this Nail Art
- Everyday Elegance: You’ll feel chic even on your most casual days.
- Special Events: Perfect for weddings, family gatherings, or holiday parties.
- Seasonal Cheer: Adapt the color palette for seasons — think pastels for spring or richer tones for fall.
In closing, the chic polka dot French tip nail design with delicate pink flowers and playful ladybug accents proves that nails can be both fun and fabulous. We all have those days when we want to feel a little extra cute, and what better way to express that than through your nails? So go ahead, experiment, and let your creativity shine! You’ve got this, and your nails will be the talk of the day!