
Keep Your Outdoor Spaces Mosquito-Free with DIY Mason Jar Candles
As the sun sets and warm summer evenings beckon us outdoors, the last thing you want to do is share your space with pesky mosquitoes. Fortunately, making your own DIY Mason Jar Candles is a delightful and effective way to enjoy your outdoor spaces without annoying insect interruptions. Not only do these candles serve a practical purpose, but they also bring a touch of style to your garden or patio. Let’s dive into how to create these charming and functional candles!
Why You Will Love This Recipe
Whether you’re hosting a backyard barbecue or simply enjoying a quiet evening outdoors, these homemade candles are perfect for repelling mosquitoes while adding ambiance to your space. They are easy to make, customizable to your scent preferences, and make thoughtful gifts. Plus, with just a few simple ingredients, you can create something beautiful and practical.
Ingredients
Here’s what you’ll need to make your DIY Mason Jar Mosquito Repellent Candles:
- Wax: 2 cups of soy wax or beeswax
- Essential Oils: 30-40 drops (a combination of citronella, eucalyptus, lemongrass, and mint)
- Wicks: 4-inch wooden or cotton wicks (1 for each jar)
- Containers: 4 small Mason jars (or any heat-resistant jars)
- Optional Add-ins: Dried herbs like lavender or rosemary for extra fragrance
Equipment
Before you start, make sure you have the following equipment on hand:
- Double boiler or a microwave safe bowl
- Stirring utensil (like a wooden spoon or spatula)
- Wick holder (you can use chopsticks or a pencil)
- Thermometer
- Scissors
Step-by-Step Instructions
Preparation Time: 20 minutes
Making Time: 1-2 hours (including drying)
Approximate Yield: 4 candles
Prepare Your Workspace: Lay out newspaper or a protective mat to catch any spills. Make sure your jars are clean and dry.
Melt the Wax: Use a double boiler or microwave to melt your wax. If using a double boiler, fill the bottom pot with water and bring it to a gentle simmer. Add the wax to the top pot. If using a microwave, heat the wax in a safe bowl for 1 minute, then stir. Continue in 30-second intervals until completely melted.
Add Essential Oils: Once the wax is melted, remove it from heat. Allow it to cool to around 140-150°F (60-65°C), then add your essential oils. Stir well to combine.
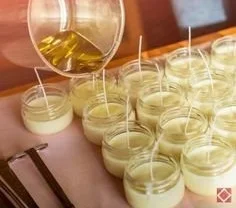
Prepare the Wicks: Attach the wick to the bottom of each jar with a small amount of melted wax or a glue dot. Use your wick holder (chopsticks or a pencil) to keep the wick centered.
Pour the Wax: Carefully pour the wax mixture into each jar, leaving about 1/2 inch at the top. Keep the wicks centered as you pour.
Add Optional Add-ins: If you’re using dried herbs, sprinkle a small amount on top before the wax sets. This not only looks attractive but also enhances the scent.
Cool and Set: Allow the candles to cool and set completely, which may take an hour or two.
Trim the Wicks: Once fully set, trim the wicks to about 1/4 inch above the wax.
Tips for Success
- Wick Selection: Ensure your wicks are suitable for the type of wax you are using. Check for the right size wick for your jar diameter.
- Essential Oil Blends: Experiment with essential oil combinations until you find your favorite. Citronella is known for its mosquito-repelling properties.
- Mind the Temperature: If your wax is too hot when pouring, it may result in unsightly cracks as it cools.
Common Mistakes to Avoid
- Overheating the Wax: Always monitor the temperature of the wax; overheating can cause it to smoke or become unusable.
- Wrong Wick Size: Using a wick that is too small will result in a weak flame; too large will create a soot buildup.
- Pouring Too Quickly: Allow the wax to cool slightly before pouring to avoid creating air bubbles.
Variations and Customization Ideas
- Coloring Your Candles: Add natural colorants, or crayon shavings to your wax to create colored candles.
- Decorative Touches: Customize the outside of your Mason jars with twine, paint, or labels for a personal touch. You can even paint the jars for a vibrant look.
- Additional Essential Oils: Consider experimenting with rosemary or tea tree oil for a different scent profile and possibly added benefits.
Storage and Shelf Life
Store your completed candles in a cool, dry place. They should last up to a year if stored properly. Be sure to keep them out of direct sunlight to prevent melting or fading.
Safety Tips
- Safety Equipment: When melting wax, use a heat-safe container and keep a fire extinguisher nearby just in case.
- Ventilation: Make sure your workspace is well-ventilated, especially when using essential oils.
- Burning Candles: Never leave a burning candle unattended and keep them away from flammable materials.
Frequently Asked Questions
Q1: Can I use paraffin wax instead of soy or beeswax?
A1: Yes, you can use paraffin wax, but it’s less eco-friendly. Soy and beeswax are better choices for natural, cleaner-burning candles.
Q2: How strong should the essential oils smell?
A2: Start with 30-40 drops. You can increase the amount if you desire a stronger scent, but be careful not to exceed the wax’s fragrance load.
Q3: How can I troubleshoot if my candle doesn’t burn evenly?
A3: An uneven burn usually indicates the wick size is incorrect. Try a larger wick for a stronger flame to improve burn efficiency.
Q4: Can I reuse old candle wax?
A4: Yes, you can melt and reuse leftover candle wax, but make sure to blend it with fresh wax to ensure scent and burning quality.
Q5: What do I do if the wick keeps extinguishing?
A5: Check the wick length—if it’s too short, trim the wick further. Also, ensure the wick is properly centered and not touching the side of the jar.
Q6: How do I prevent my candles from tunneling?
A6: To avoid tunneling, make sure you allow the wax to melt all the way to the edge of the container during the first burn.
Conclusion
DIY Mason Jar Candles are a perfect blend of style and function. Making these candles not only keeps your outdoor spaces mosquito-free but also adds charm to your environment. The process is straightforward, and with practice, you’ll find customizing them can be a fun and enjoyable experience. Don’t be afraid to experiment with different scents, colors, and decor. So gather your materials, roll up your sleeves, and enjoy the satisfaction of creating something beautiful with your hands! Happy candle-making!