
Make Herbal Soap with Rosemary and Peppermint Essential Oils
Picture this: you’re at home, surrounded by a bit of chaos — maybe toys strewn across the living room, a never-ending laundry pile, and a schedule packed to the brim. You squeeze in a moment for yourself, and it’s time for a little self-care. You light a few candles, brew your favorite herbal tea, and suddenly the world feels a little less overwhelming. Sound familiar?
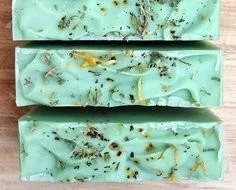
In those moments, I often find solace in creating something beautiful and practical. One of my all-time favorite projects is making herbal soap infused with uplifting rosemary and refreshing peppermint essential oils, along with dried herbs and flowers. Not only is it an enjoyable and therapeutic process, but it also leaves you with a luxurious product that can elevate your daily shower or bath into a self-care ritual. So, let’s dive into this delightful craft together!
Why Make Your Own Soap
We’ve all been there — scrolling through the aisles of skincare products and feeling overwhelmed. So many options, so many ingredients that we can’t even pronounce. Here’s the truth: making your own herbal soap allows you to control what goes into your product. You can customize it based on your preferences and skin needs while avoiding potentially harmful chemicals.
Plus, there’s something incredibly satisfying about using a product you’ve made yourself. You’ll be able to give it as a heartfelt gift or simply enjoy its aromatic benefits every day. So let’s get to it — it’s easier than you might think!
Gathering Your Ingredients
To start your soap-making journey, you’ll need the following ingredients. Don’t worry if this list feels a bit long — it’s easy to find most of these items online and in local craft stores.
Essential Oils and Dried Herbs
- Rosemary Essential Oil: Known for its invigorating scent, rosemary can help improve concentration while offering antibacterial properties.
- Peppermint Essential Oil: This refreshing oil is perfect for revitalizing your senses and adds a cool, tingly feeling when used in soap.
- Dried Rosemary and Peppermint Leaves: These will add a lovely textural element to your soap and intensify the herbal aroma.
Base Ingredients
- Melt-and-Pour Soap Base: You can choose a transparent or opaque base depending on your preference. Look for one that’s free of harsh chemicals.
- Dried Herbs and Flowers: Think chamomile, lavender, calendula, or even rose petals. They lend beauty and additional skin benefits.
- Colorants: Optional — mica powders can give a lovely hue to your soap if you want to add some visual flair.
Tools
- Soap molds (silicone molds work best for easy release)
- Mixing bowls
- Microwave-safe container or double boiler
- Stirring spoon or spatula
- Measuring spoons
- Scales for accuracy (optional but recommended)
- Optional: a thermometer to ensure gentle heating.
Step-by-Step Guide
Now that you have your ingredients ready, let’s dive into the soap-making process!
Step 1: Prepare Your Workspace
Start by creating a clutter-free environment. Clean your surfaces and gather all your tools and ingredients. Trust me, it’ll save you time and frustration later.
Step 2: Measure the Soap Base
Using a knife, slice your melt-and-pour soap base into small cubes. You’ll need about 1 pound of the base for this recipe, which typically yields about 4-6 bars of soap, depending on your mold size.
Step 3: Melt the Soap Base
Place the soap cubes in your microwave-safe container and heat them in bursts of 30 seconds, stirring in between, until fully melted. If you’re using a double boiler, heat the soap gently to avoid bubbling.
Step 4: Add Your Essential Oils
Once melted, remove the soap base from the heat. Let’s be honest; this part is where the magic happens. Add about 20-30 drops of rosemary essential oil and 10-15 drops of peppermint essential oil to the mixture. Stir well to incorporate those amazing scents. The aroma will envelop you, and your mood will already start to lift.
Step 5: Mix in Dried Herbs and Flowers
Now is the time to add your dried herbs and flowers. You might want to use about two tablespoons of each. Feel free to get creative! The dried flowers not only look beautiful in the soap but also offer additional benefits for your skin.
Step 6: Pour into Molds
Carefully pour the soap mixture into your molds. If you want to be extra fancy, you can layer different colors or scents, but for a simple and lovely soap, just pour evenly and smoothly.
Step 7: Let It Set
Allow the soap to cool at room temperature for several hours until it hardens completely. If you’re in a hurry, you can place them in the fridge for quicker setting.
Step 8: Remove from Molds
Gently flex the mold to release the soap. Don’t rush this step; you don’t want to accidentally break your beautiful creations.
Step 9: Cure Your Soap
Even though it’s technically ready to use, letting your soap cure for a few days allows the scents to fully develop and meld together. This is a great way to build anticipation!
Step 10: Enjoy
Now that your soap is ready, it’s time to enjoy your homemade creation! Use it in the shower, give it as a lovely gift, or display it beautifully in your bathroom.
Common Mistakes to Avoid
- Not measuring accurately: Soap-making is a science, so use a scale for precise measurements to ensure consistency.
- Overheating the soap: Keep a close eye while melting your base. Overheating can cause bubbling and can ruin the texture.
- Skipping the essential oils: If you want to create a truly aromatic soap, don’t skip the essential oils; it’s what makes it special!
- Rushing the cooling process: Patience is key. Once poured, let the soap sit undisturbed for a good few hours.
Quick Beauty Tips for Your Soap-Making Journey
- Customize Your Recipe: Feel free to experiment with different essential oils and dried herbs. You can swap out rosemary and peppermint for lavender and chamomile for a calming effect.
- Test for Allergies: Always do a patch test with essential oils if you have sensitive skin. You want your soap to be soothing and enjoyable, not irritating.
- Use Labels: Consider labeling your soaps if you’re gifting them. It adds a professional touch and lets the recipient know the delightful ingredients inside.
FAQs About Herbal Soap Making
How long will my soap last?
When stored properly in a cool, dry place, your handmade soap can last anywhere from 6 to 12 months, though using it fresh will always give you the best experience!
Can I use any essential oils?
Absolutely! Just make sure to research them first. Some essential oils are phototoxic and shouldn’t be used in products meant for sun exposure.
What if I want a harder soap?
If you prefer a harder bar of soap, consider adding a small amount of a hard oil, like coconut oil, before melting your soap base.
Is this soap safe for all skin types?
It’s generally safe for most skin types, but always ensure you check for allergies or sensitivities to the ingredients, especially essential oils.
A Few Extra Self-Care Ideas
Incorporating your herbal soap into a broader self-care routine can transform your self-care moments into something truly special. Consider creating a complete pampering night with:
- A warm bath with your herbal soap
- A nourishing facial mask
- Soothing music or a good book to unwind with
- Your favorite snacks or herbal tea to sip on
Conclusion
And there you have it! Your very own homemade herbal soap, infused with the beautiful scents of rosemary and peppermint. You’ve embraced the art of soap-making, likely created a wonderful little moment of self-care, and gifted yourself or a loved one something uniquely special.
So, the next time life feels chaotic (and let’s be honest, it often does), think about taking a little time to create. This simple act can transform an ordinary day into something extra special. By making herbal soap, not only do you get a practical item to use, but you also nurture your creativity and sense of well-being. You’re not just crafting soap; you’re crafting moments of joy. Happy soap making!