
Valentine’s Day Nail Ideas: Celebrate with Love
As Valentine’s Day approaches, it’s the perfect occasion to express your love not only to others but also to yourself! One of the most delightful ways to embrace this spirit is by trying out some fun and flirty nail designs. Whether you’re planning a romantic dinner, a fun night out with friends, or simply want your nails to reflect the joyous vibe of the season, this guide offers plenty of creative nail art ideas that will help you celebrate love in style!
Why You Will Love These Nail Ideas
Nail art is a unique form of self-expression that allows you to showcase your personality and mood through design. These Valentine’s Day nail ideas are not just about aesthetics; they are an invitation to celebrate love, kindness, and creativity. From classic reds and pinks to playful hearts and glittery accents, there’s a perfect design for everyone.
Popular Valentine’s Day Nail Designs
Here’s a collection of charming designs to inspire your next manicure:
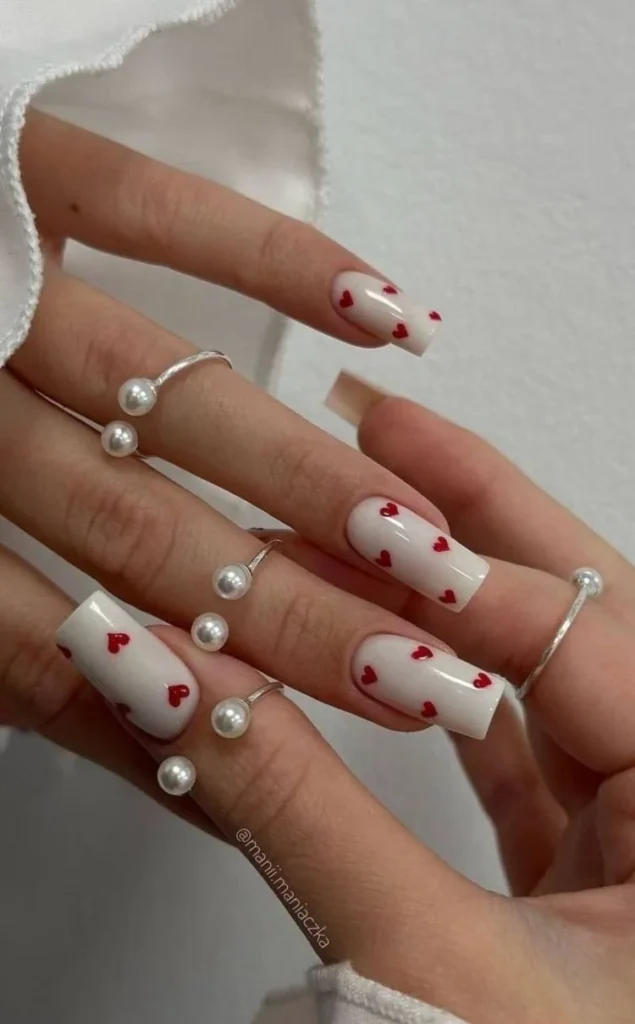
1. Romantic Red Heart Tips
What You Need:
- Base nail polish in nude or light pink
- Red nail polish
- Dotting tool or toothpick
- Top coat
Instructions:
- Apply a base coat to protect your nails.
- Paint your nails with the base color and let it dry completely.
- Use the dotting tool to create small red hearts at the tips of each nail.
- Seal your design with a top coat.
2. Glittery Pink Ombre
What You Need:
- Pink nail polish (two shades – light and dark)
- Fine glitter (preferably pink or red)
- Makeup sponge
- Top coat
Instructions:
- Start with a clean nail base and apply a base coat.
- Paint your entire nail with the light pink polish.
- Once dry, use the makeup sponge to dab the darker pink polish onto your nails, gradually blending it upwards.
- Apply fine glitter to the tips for extra sparkle.
- Finish with a top coat.
3. Sweetheart Stripes
What You Need:
- White nail polish
- Red nail polish
- Striping tape
- Top coat
Instructions:
- Apply a base coat and let it dry.
- Paint your nails white and allow to dry.
- Once dry, place striping tape in a diagonal or vertical pattern.
- Paint over the tape with red polish, and remove the tape quickly to reveal the stripes.
- Seal with a top coat.
4. Love Notes Accent Nail
What You Need:
- Any base color (light pink or white works well)
- Black nail polish
- Nail art brush or toothpick
- Top coat
Instructions:
- Begin with a base coat and let it dry.
- Paint your nails with the base color.
- For the accent nail, use the black polish to create tiny hearts and arrows as if they’re love notes.
- Finish with a top coat for shine.
Tips for Success
- Preparation is Key: Always start with clean, dry nails. Use a base coat to prevent staining and enhance the longevity of your nail art.
- Patience: Allow each layer to dry before applying the next to avoid smudging the designs.
- Precision Tools: Investing in basic nail art tools like dotting tools, brushes, and striping tape can significantly enhance the precision of your designs.
Common Mistakes to Avoid
- Skipping the Base Coat: This can lead to your nail polish chipping faster and may stain your nails.
- Rushing the Process: Allow each layer to dry completely before moving on to the next. Patience pays off!
- Too Much Polish: When applying colors, thin coats are better than thick ones to achieve a more even finish.
Variations and Customization Ideas
- Color Choices: Feel free to change up the colors based on your personal preference. Try pastel shades for a softer look or bold colors for a dramatic effect.
- Additions: Incorporate nail stickers, gems, or metallic foils to personalize your designs even further.
Storage and Shelf Life
Store your nail polishes in a cool, dry place, away from direct sunlight. Most nail polishes have a shelf life of 2-3 years if stored correctly.
Safety Tips
- Ensure proper ventilation while using nail products, especially in confined spaces.
- Avoid using nail art supplies on damaged or broken nails to prevent further injury.
Frequently Asked Questions
1. How do I make my nail art last longer?
Apply a high-quality top coat and consider reapplying it every few days to maintain shine and protect your design.
2. Can I use regular household items for nail art?
Absolutely! Items like toothpicks, sponges, and even tape can be used effectively for creative designs.
3. How do I remove nail art without damaging my nails?
Use a good nail polish remover and be gentle. Soak a cotton pad in remover, place it on your nails for a few moments, then wipe gently.
4. What if I don’t have a dotting tool?
You can use a toothpick or the end of a bobby pin to create dots and detailed designs.
5. Are there any non-toxic nail polishes?
Look for brands that offer non-toxic formulas, typically free from harmful chemicals like toluene and formaldehyde.
6. Can I paint my nails the day before an event?
Yes! Just make sure to allow enough drying time and apply a top coat for additional protection.
Conclusion
This Valentine’s Day, don’t just celebrate love—wear it! With these delightful nail ideas, you can express your creativity and showcase your unique style. Whether you choose to keep it simple with a classic red or go all-out with intricate designs, the most important thing is to enjoy the process. So gather your materials, get inspired, and let your nails tell a love story to the world!