
Vintage Tin Candles: A Guide to DIY Candle Making
Candles have a unique way of transforming a space into a cozy retreat. As we explore the art of making vintage tin candles, you’ll not only enjoy a beautifully crafted product, but also the process itself. Whether you’re a seasoned DIYer or just beginning, creating your own candles in charming tins is both a fulfilling and practical skill.
Why You Will Love This Recipe
Making vintage tin candles is a delightful activity that allows you to customize your scents, colors, and styles. They make unique gifts for friends and family, or simply a lovely addition to your home decor. Plus, the warmth of a homemade candle adds an extra layer of comfort to any setting.
Ingredients
For this candle-making project, you will need:
- Wax: 16 ounces of soy wax (eco-friendly and easy to work with)
- Fragrance oil: 1 ounce (optional, but recommended for scented candles)
- Dye: Candle dye chips or liquid (optional, for coloring)
- Wick: One cotton or wood wick per tin (size usually between 6 to 8 inches, depending on your candle diameter)
Equipment
To successfully make your vintage tin candles, gather the following equipment:
- Double boiler or microwave-safe container
- Scale (for measuring wax and fragrance)
- Thermometer (to check wax temperature)
- Stirring utensil (spoon or stick)
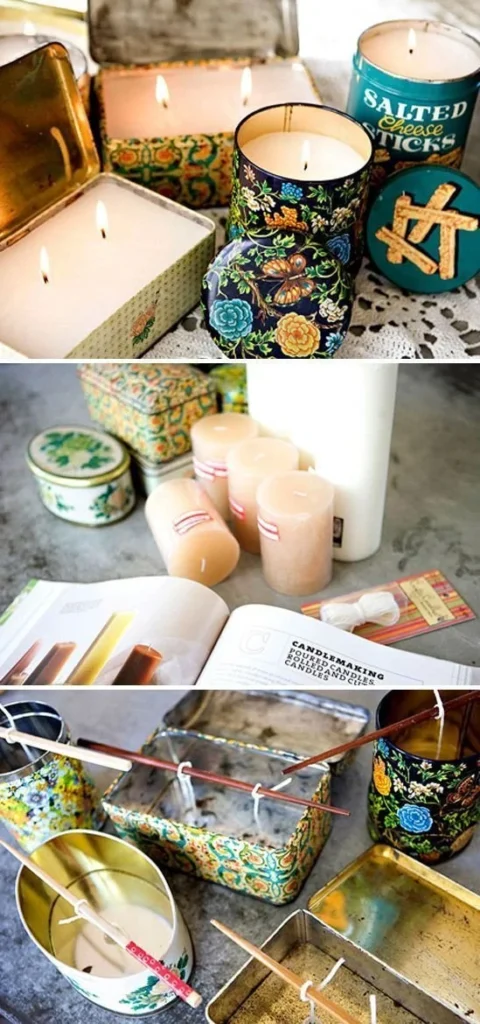
- Vintage tin containers (ensure they are clean and dry)
- Wick holder (or a pencil to keep wick centered)
- Safety equipment (such as gloves and goggles)
Step-by-Step Instructions
Prepare the Work Area: Ensure your workspace is clean and free from clutter. Put on gloves and goggles for safety.
Measure the Wax: Use the scale to measure out 16 ounces of soy wax.
Melt the Wax:
- If using a double boiler: Fill the bottom pot with water and place the wax in the top pot. Heat slowly until melted.
- If using a microwave: Place wax in a microwave-safe container and heat in 30-second intervals until fully melted.
Check the Temperature: Use a thermometer to check that the wax reaches about 170°F (77°C).
Add Fragrance and Dye: If you want to scent your candles, add 1 ounce of fragrance oil and, if desired, a few dye chips. Stir gently to combine.
Attach the Wick: Secure the wick to the bottom of the tin using adhesive or a small amount of melted wax.
Pour the Wax: Carefully pour the melted wax into the tin, leaving about ½ inch of space at the top. Use the wick holder to keep the wick centered.
Cool the Candle: Allow the candle to cool undisturbed for several hours or until completely solid.
Trim the Wick: Once cooled, trim the wick to about ¼ inch above the wax surface.
Label and Decorate (Optional): Consider adding labels or decorations to personalize your vintage tins.
Tips for Success
- Wick Testing: Different wick sizes and materials can affect burn performance. Test your wick by burning the candle for 2-3 hours and observing how it burns.
- Fragrance Load: If you prefer a stronger scent, you can adjust the fragrance oil to 1.5 ounces, but be cautious not to exceed the manufacturer’s recommended percentage.
- Cooling Method: To avoid sinkholes, pour the wax at a cooler temperature (around 160°F or 71°C) if needed.
Common Mistakes to Avoid
- Overheating Wax: Wax can be sensitive to high temperatures. Never exceed 200°F to prevent degradation.
- Skipping Wick Size Testing: Not all wicks work the same for every wax type and container size. Always test the wick before making a larger batch.
- Pouring Too Fast: Pour slowly and steadily to minimize air bubbles, which can cause an uneven surface.
Variations and Customization Ideas
- Coloring: You can add natural colorants like spices or food coloring if you prefer a more natural approach.
- Layered Candles: For a decorative touch, pour two or three layers of different colors, allowing each layer to solidify before pouring the next.
- Scent Blends: Mix different fragrance oils to create a unique scent profile.
Storage and Shelf Life
Store your candles in a cool, dry place away from direct sunlight to preserve their scent and color. Properly made candles can last up to a year if stored correctly.
Safety Tips
- Always work in a well-ventilated area when melting wax and adding fragrance.
- Never leave melting wax unattended, as it can catch fire.
- Keep all materials out of reach of children and pets.
Frequently Asked Questions
Q1: Can I use paraffin wax instead of soy wax?
A: Yes, you can use paraffin wax, but it’s less eco-friendly. Soy wax is a great alternative and often burns more cleanly.
Q2: How do I prevent my candles from sinking in the middle?
A: Ensure proper cooling techniques and pour at the right temperature to prevent sinkholes.
Q3: What do I do if my wick keeps mushrooming?
A: Try trimming the wick shorter or using a different thickness wick.
Q4: How can I make my candles smell stronger?
A: Use more fragrance oil within the recommended limits and consider adding fragrance oil just before pouring.
Conclusion
Making vintage tin candles is a beautiful blend of creativity and practicality. With simple ingredients and a few steps, you can customize your own enchanting candles that evoke warmth and charm in your home. I encourage you to try your hand at candle-making—you may just find a new favorite hobby! Enjoy the process and the lovely results. Happy crafting!