
Learn How to Make Candles for Beginners: A Simple Step-by-Step Guide
Creating beautiful homemade candles can be an incredibly rewarding and creative hobby. Whether you’re looking to light up your own space or make thoughtful, handmade gifts for friends and family, candle making is a wonderfully accessible craft. In this comprehensive guide, we’ll walk you through the entire candle-making process, ensuring that even beginners can enjoy this DIY project with confidence.
Why You Will Love This Recipe
Making your own candles allows for endless customization. You can choose the wax type, blend your favorite fragrances, and create unique colors to suit any occasion or decor. Plus, there’s something incredibly satisfying about lighting a candle that you crafted yourself.
Ingredients
- Wax: 2 pounds of soy wax (a beginner-friendly and eco-friendly option)
- Fragrance oil: 4 ounces (ensure it’s specifically designed for candle making)
- Dye (optional): Candle-safe dye chips or liquid dye (quantity as per manufacturer’s instructions)
Equipment
- Double boiler (or a heatproof bowl over a pot of boiling water)
- Candy thermometer
- Candle wick (size varies depending on your container; for this guide, a medium cotton wick works well)
- Wick holder (or a pencil/chopstick for balancing the wick)
- Heat-resistant container (like a glass jar or metal tin)
- Stirring utensil (a wooden spoon or stainless steel stick)
- Pouring jug (a small pitcher or heat-resistant container)
- Scale (for precise measurements)
- Protective gloves and eyewear (for safety)
Step-by-Step Instructions
Prepare Your Workspace: Clear a flat surface and lay down newspaper or a silicone mat for easy cleanup. Make sure the area is well-ventilated.
Measure the Wax: Weigh out 2 pounds of soy wax using your scale. This will yield approximately 4, 8-ounce candles.
Melt the Wax:
- Fill your double boiler with water and bring it to a gentle simmer over medium heat.
- Place the wax in the top section, stirring occasionally until fully melted. This should take around 10-15 minutes. Monitor the temperature – aim for around 170°F (77°C).
Add Fragrance: Once the wax is melted, remove it from heat. Add 4 ounces of your chosen fragrance oil to the melted wax. Stir gently for at least 2 minutes to ensure it’s evenly mixed in.
Optional Dye: If you want to color your candle, now is the time to add the dye. Start with a small amount and stir well. You can always add more for a deeper color.
Prepare the Wick: While the wax cools to about 160°F (71°C), secure the wick in your container.
- Dip the wick base in the melted wax, then press it firmly to the bottom of your candle container.
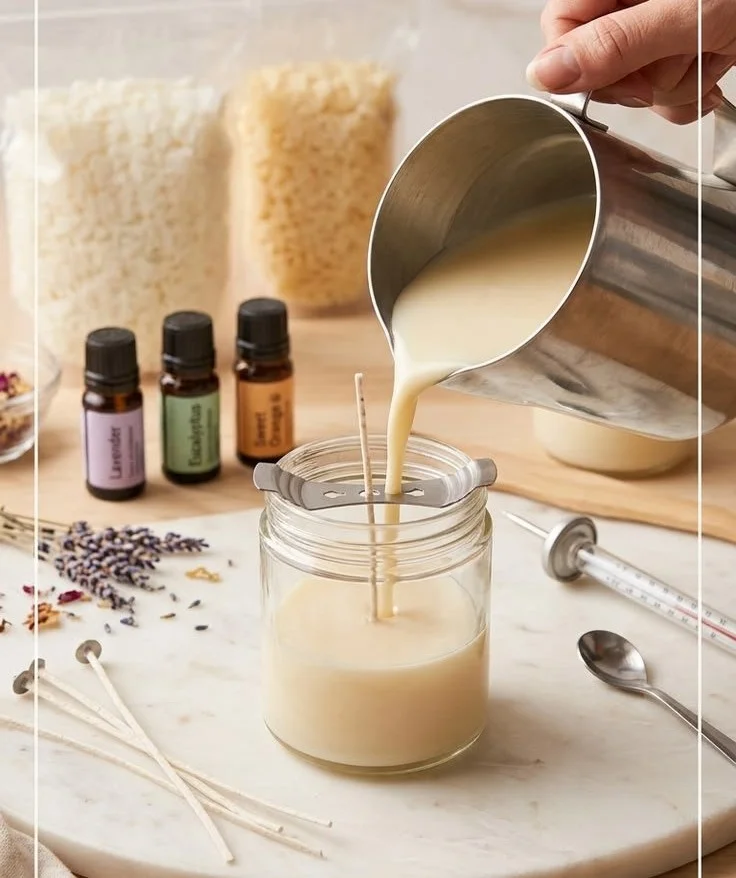
- Use a wick holder to keep the wick centered while pouring.
Pour the Wax: Slowly pour the wax into your container, taking care not to disturb the wick. Leave a little space at the top (around half an inch).
Cool and Set: Allow the candle to cool at room temperature until fully set, usually about 4-6 hours. Avoid moving the candles during this time.
Trim the Wick: Once set, trim the wick to about ¼ inch above the wax.
Cure Your Candle: For the best fragrance throw, allow your candles to cure for at least 48 hours before burning.
Tips for Success
- Choose Quality Fragrance: Always use fragrance oils that are specifically made for candle making to avoid undesirable results.
- Test Wicks: Wicking can be tricky. It’s often helpful to do a test burn with different wick sizes to see which performs best for your wax and container.
- Stir Gently: When adding fragrance or dye, stir gently to avoid creating air bubbles in the wax.
Common Mistakes to Avoid
- Overheating the Wax: Always monitor the temperature to avoid burning the wax, which can produce soot.
- Wrong Wick Size: If your wick is too small, your candle will burn weakly; if too large, it may flicker or create excessive soot.
- Adding Fragrance Too Late: Adding fragrance when the wax is too cool can prevent it from properly binding, resulting in weak scent throws.
Variations and Customization Ideas
- Layered Candles: Pour different colors at intervals to create a layered look.
- Scent Blends: Experiment with combining different fragrance oils for a unique scent profile.
- Decorative Additions: Add dried flowers, herbs, or glitter to the candle once it starts to set but is still slightly pliable.
Storage and Shelf Life
Store your candles in a cool, dry place away from direct sunlight. Properly stored, they can last up to a year. If your candles develop a white film (known as "bloom"), don’t worry—it’s a sign of quality soy wax.
Safety Tips
- Avoid Flammable Areas: Always make candles in a space free from flammable materials.
- Supervise Children: Keep children and pets away from hot wax and candle-making materials.
- Practice Fire Safety: Never leave a burning candle unattended, and ensure it’s placed on a heat-resistant surface when lit.
Frequently Asked Questions
Can I use any type of wax?
Soy wax is recommended for beginners due to its ease of use and eco-friendliness, but paraffin and beeswax are also popular options.How much fragrance should I add?
A common guideline is to use 1 ounce of fragrance oil for every pound of wax, although this can vary depending on personal preference and the strength of the fragrance.What type of wick should I use?
The size of your wick should be determined based on your candle’s diameter. Medium cotton wicks are often a good choice for standard containers.Are homemade candles safe?
Yes, when made and burned properly, homemade candles can be a safe and enjoyable way to enhance your environment.What should I do if my candle does not burn evenly?
This could be due to wick size or the type of wax used. Enhancing your wick size or checking for obstructions while burning can help.
Conclusion
Candle making is not only a delightful craft but also a way to bring your personality into your living space. With this beginner-friendly guide, you now have the knowledge to create beautiful, custom candles right at home. Don’t hesitate to experiment with fragrances, colors, and designs—after all, the best part of DIY projects is unleashing your creativity!
So gather your materials, follow these steps, and enjoy the soothing experience of making your very own candles. Happy crafting!