
DIY Candle: A Step-by-Step Guide to Crafting Your Own Scented Candles
Creating your own DIY candles is not only a rewarding project but also a wonderful way to add a personal touch to your home or to give thoughtful handmade gifts. In this comprehensive guide, you’ll learn everything you need to know about making your own scented candles, from selecting the right materials to customizing your unique fragrance blends.
Why You Will Love This Recipe
Making candles at home allows you to experiment with different wax types, scents, and colors, enabling you to create a product that perfectly suits your taste and style. Whether you’re looking to brighten your space with your favorite fragrance or create a lovely handmade gift for friends and family, DIY candle making is an enjoyable and fulfilling craft that anyone can master.
Ingredients
- Wax: 1 pound (16 oz) of soy wax or paraffin wax
- Fragrance oil: 1 to 2 ounces (depending on scent strength preference)
- Dye (optional): Candle dye chips or liquid dye (in various colors)
- Essential oils (optional): For a more natural scent profile (2-5% of wax weight)
Equipment
- Double boiler (or a makeshift one using a heat-safe container)
- Candle thermometer (to monitor wax temperature)
- Wick (choose the appropriate size for your container)
- Wick holder or pencil
- Container (glass jars, metal tins, or silicone molds)
- Stirring stick (wooden or metal)
- Scale (for accurate measurements)
- Measuring cup (for fragrance)
- Safety gloves and goggles (recommended)
Step-by-Step Instructions
Step 1: Prepare Your Work Area
Before you begin, make sure your workspace is clean and you have all your supplies ready. Lay down newspaper or a protective covering to catch any wax spills.
Step 2: Measure Your Materials
Using a scale, measure out 1 pound of wax. If you are using a container, you can calculate how much wax you’ll need based on its size (a typical small jar requires about 8 oz of wax).
Step 3: Melt the Wax
- Set up your double boiler on medium heat and place the wax in the top container.
- Stir occasionally as the wax melts. Monitor the temperature with your thermometer; your target is approximately 170-180°F (77-82°C).
- If you are using dye, add it once the wax is fully melted, stirring until you reach the desired color.
Step 4: Add Fragrance and Stir
Once the wax is melted, let it cool slightly to around 160°F (71°C) before adding your fragrance oil. This temperature helps to maximize scent throw. Stir gently for about 2 minutes to ensure the fragrance is evenly distributed throughout the wax.
Step 5: Attach the Wick
- While the wax cools a bit, prepare your container. Use a wick holder (like a pencil) to keep the wick centered.
- Dip the bottom of the wick in the melted wax and quickly stick it to the bottom center of the container. This helps secure the wick in place.
Step 6: Pour the Wax
Carefully pour the melted wax into your container, leaving a little space at the top (about 1/2 inch). Pour slowly to avoid air bubbles.
Step 7: Cool and Finish
Let your candle cool undisturbed at room temperature for several hours or until it hardens completely. Trim the wick to about 1/4 inch above the wax after it has cooled.
Tips for Success
- Temperature Matters: Keeping an eye on the wax temperature is crucial for optimal scent retention and good adhesion.
- Test Your Wicks: Different wick sizes might be required for different wax and container types. Conduct a wick test to see which wick performs best.
- Be Creative: Don’t hesitate to mix fragrance oils or colors for a unique touch.
Common Mistakes to Avoid
- Not Measuring Accurately: Use a scale for precise measurements to ensure your candle burns properly.
- Pouring at the Wrong Temperature: Pouring at too high or too low a temperature can lead to defects in the candle.
- Ignoring Wick Size: A wick that is too small won’t burn properly, and one that is too large may burn too fast or cause excessive soot.
Variations and Customization Ideas
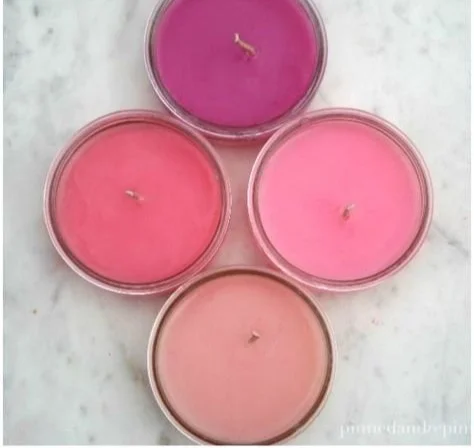
- Color: Experiment with different colors by using candle dyes or natural colorants like beet juice.
- Fragrance: Mix essential oils for a custom scent or combine fragrance oils with complementary notes.
- Decorative Elements: Add dried flowers, herbs, or spices to the wax for an aesthetic touch.
Storage and Shelf Life
Store your candles in a cool, dry place away from direct sunlight to preserve the scent and color. Properly stored, homemade candles can last for up to a year without losing their fragrance.
Safety Tips
- Always work in a well-ventilated area.
- Wear gloves and goggles to protect your skin and eyes from hot wax.
- Do not leave melting wax unattended.
- Keep the workspace free from flammable materials.
Frequently Asked Questions
1. Can I use any type of fragrance oil?
Yes, but be sure to check if the oil is candle-safe to avoid producing harmful fumes.
2. How long do DIY candles take to set?
Typically, a candle will take about 4-6 hours to fully solidify at room temperature.
3. Can I repurpose old candles?
Absolutely! You can melt down old candles to create new ones, just make sure to blend similar wax types.
4. What if my wick keeps drowning in wax?
Try using a larger wick or a wick designed for the type of wax you’re using.
5. How can I make my candle smell stronger?
Increase the amount of fragrance oil (up to the recommended limit) or mix fragrance oils for more complex aromas.
Conclusion
Making your own DIY candles is a delightful project that opens the door to creativity and personalization. Armed with this comprehensive guide, you’re now ready to craft beautiful, aromatic candles for your home or to share with loved ones. Enjoy the process—each candle you make is a step towards mastering the art of candle-making. Grab your supplies, gather your friends or family, and let’s get crafting! Happy candle making!