
Making Your Own Candles: A Complete Guide for Beginners
Making your own candles is a delightful and rewarding process. Whether you’re crafting them for home decor or to fill your space with lovely aromas, there’s no denying the satisfaction that comes from seeing those beautiful, flickering flames. In this guide, we’ll walk you through the entire candle-making process, from gathering your ingredients to customizing your scents. So, roll up your sleeves and get ready to illuminate your space with DIY candles!
Why You Will Love This Recipe
Creating homemade candles is not just a fun DIY project; it allows for endless creativity. You can choose your wax, scents, colors, and containers. These candles make excellent handmade gifts and can be customized for any occasion. Plus, there’s nothing quite like the ambiance of a candle that you created yourself!
Ingredients
- Wax: 1 pound (16 ounces) (soy wax or paraffin wax)
- Fragrance Oil: 1 ounce (adjust according to preference)
- Color Dye: Optional (use candle dye specifically designed for wax)
- Wicks: Size appropriate for your container (typically 6-8 inches long for average-sized candles)
Equipment
- Heat-safe container for melting wax (a double boiler or a microwave-safe pour container)
- Thermometer (preferably a candy thermometer)
- Stirring utensil (wooden stick or metal spoon)
- Pouring jug or pitcher (for easy pouring)
- Wick holder (for stabilizing the wick while the wax sets)
- Silicone mold or glass jars for your candles
- Scale (for precise measurements)
Step-by-Step Instructions
1. Prepare Your Equipment
Make sure your work area is clean. Gather all your materials and equipment. If using glass jars, wash and dry them thoroughly.
2. Measure Your Wax
Using a scale, measure out 16 ounces of wax. This will typically fill two regular-sized candle jars.
3. Melt the Wax
- Fill the bottom pot of your double boiler with water, then place it on the stove over medium heat.
- Place the wax in the top pot of the double boiler, stirring occasionally as it melts. Use the thermometer to check for a melting temperature of around 170-180°F (77-82°C).
4. Add Fragrance and Color
- Once melted, remove the wax from heat and let it cool slightly (around 160°F or 71°C) before adding fragrance oil. Stir thoroughly to combine.
- If you’re adding color, now’s the time to mix in your candle dye until you achieve your desired color.
5. Prepare the Wick
- Secure the wick to the bottom of the container using a small amount of melted wax or a wick sticker.
- Use a wick holder to keep the wick centered as you pour.
6. Pour the Wax
- Carefully pour the wax into your container, leaving a small space at the top. Make sure the wick stays centered.
7. Let It Cool
- Allow the candle to cool undisturbed at room temperature. This can take several hours. Avoid moving the candle as it sets to prevent any imperfections.
8. Trim the Wick
- Once fully set, trim the wick to about 1/4 inch above the wax surface.
Tips for Success
- Temperature is Key: Always use a thermometer to ensure your wax is at the right temperature before pouring.
- Stir Gently: When adding fragrances or dyes, stir gently to minimize bubbles.
- Test Your Wicks: Different wax types and fragrances may require different wick sizes to burn properly.
Common Mistakes to Avoid
- Skipping Safety Gear: Always wear safety goggles and work in a well-ventilated area.
- Pouring Too Hot: Pouring wax that’s too hot can cause sinkholes or cracks as it cools.
- Overcrowding Containers: Avoid using oversized wicks and containers; stick to the recommended sizes for the best burn.
Variations and Customization Ideas
- Scent Combinations: Experiment with different fragrance combinations. Popular mixes include lavender and chamomile or citrus and mint.
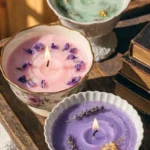
- Natural Additives: Add dried herbs, flower petals, or spices for a decorative touch. Be cautious as these can affect the candle’s burning properties.
- Holiday Themes: Customize for special occasions with colors and scents that reflect the season.
Storage and Shelf Life
Store your candles in a cool, dark place away from direct sunlight, which can fade colors and affect scent. Properly made candles can last for years, although scents may fade over time.
Safety Tips
- Always work in a well-ventilated area to avoid inhaling vapors.
- Keep flammable materials away from your candle-making workspace.
- Invest in fire-safe candle containers to reduce risks while burning.
Frequently Asked Questions
1. Can I use essential oils instead of fragrance oils?
Yes, you can use essential oils for a more natural scent, but be aware that they often have lower scent throw compared to fragrance oils.
2. How long does it take for the candles to cure?
Candles are typically ready to burn after curing for at least 48 hours. However, for the best scent throw, allow your candles to cure for a week.
3. What if my candle has cracks or imperfections?
Cracks often form due to rapid cooling or pouring at the wrong temperature. You can remedy this by melting the top layer gently and smoothing it out or pouring additional wax to fill gaps.
4. How do I ensure my candle burns evenly?
Use the correct wick size and remember to trim the wick before each burn to prevent soot and uneven burning.
5. Can I reuse candle containers?
Absolutely! Just make sure they are thoroughly cleaned and remove any leftover wax before refilling.
Conclusion
Making homemade candles is a fulfilling DIY project perfect for any beginner. With a little practice and creativity, you can create beautiful, fragrant candles that brighten your space and make wonderful gifts. Follow these steps, and soon you’ll be well on your way to mastering the art of candle making. So grab your supplies and let your creativity shine!