
Treat Yourself and Learn How to Make Your Own Adorable Ice Cream Candles!
Creating your very own ice cream candles is a delightful way to make a charming addition to your home décor or to give as a unique, handmade gift. These candles not only look good but are also highly enjoyable to make. With their fun, pastel colors and inviting scents, they add a touch of whimsy wherever they are placed. Let’s embark on this DIY adventure!
Why You Will Love This Recipe
These ice cream candles are:
- Visually Appealing: Mimicking real ice cream, these candles are not only functional but also serve as beautiful decorations.
- Customizable: You can play around with colors and scents, making each candle unique.
- Fun to Create: Candle making is a rewarding craft that can bring joy to both the maker and the recipient.
- Great for Gifting: Handmade gifts add a personal touch and are always appreciated.
Ingredients
To make your adorable ice cream candles, you will need:
- Wax: 1 lb of paraffin wax or soy wax (your choice)
- Candle colorants: A selection of pastel candle dyes (about 1/4 to 1/2 tsp per color)
- Fragrance oil: 1 oz (choose scents like vanilla, strawberry, or bubblegum for a fun ice cream feel)
- Wicks: 2 pre-waxed wicks (size #4 or about 6 inches long)
- Containers: Cupcake holders or small bowls to form the candles
- Toppings: Optional—decorative elements like wax sprinkles or fake cherries
Equipment
Here’s what you’ll need to make your ice cream candles:
- Double boiler or a microwave-safe bowl
- Thermometer (digital is best for accuracy)
- Stirring stick (a wooden or metal stick works well)
- Scale (for precise measurements)
- Pouring pitcher (for easier pouring)
- Utility knife or wick trimmer
- Safety gear (gloves and goggles)
Step-by-Step Instructions
Preparation Time: 30 minutes
Making Time: 1 hour
Yield: 2-4 candles (depending on container size)
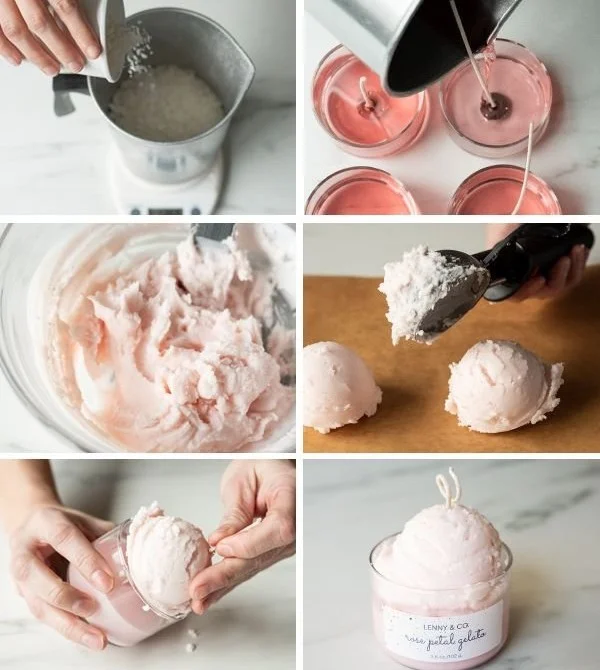
Prep Your Work Area: Clear a flat surface to work on and gather all ingredients and equipment. Safety first—wear gloves and goggles.
Melt the Wax:
- If using a double boiler, fill the bottom pot with water and bring to a simmer. Place the wax in the upper pot.
- If using a microwave, place the wax in a large, microwave-safe bowl and heat in 30-second intervals, stirring in between until completely melted.
Check Wax Temperature: Use a thermometer to ensure your wax reaches between 170°F and 180°F before adding colors or scents.
Add Color:
- Add your desired pastel colorant to the melted wax and stir well until fully integrated. You can create different colors if you want multiple layers.
Add Fragrance:
- Remove the wax from heat, and let it cool slightly (around 150°F). Add your fragrance oil and mix thoroughly.
Prepare the Containers:
- Place the wick in the center of your cupcake holder, using a bit of melted wax to hold it in place if needed.
Pour the Wax:
- Carefully pour a layer of melted wax into your container. If you’d like scoop-like layers, pour a bit, let it cool, repeat with different colors.
Create Ice Cream Texture:
- Once the poured wax is firm, you can create ridges for texture by using a spoon or spatula to gently push and pull the wax.
Cool & Set: Let your candles cool completely for several hours. Ensure they are firm before moving.
Add Decorative Toppings: If desired, sprinkle wax toppings or place a fake cherry on top once the wax is set.
Trim Wicks: Use a utility knife to trim the wick to about 1/4 inch above the wax.
Tips for Success
- Use the Right Wick Size: If you find your candle doesn’t burn well, you might need to test different wick sizes to ensure proper burning.
- Color in Layers: To achieve that perfect ice cream sundae look, let each layer cool slightly before adding the next.
- Experiment with Scents: Blend fragrance oils for unique combinations.
Common Mistakes to Avoid
- Using Low-Quality Wax: It can affect the candle’s burn time and scent throw.
- Not Measuring Ingredients: An imprecise mix can lead to poor scent or burning characteristics.
- Pouring at Wrong Temperatures: Always check temperatures to avoid cracking.
Variations and Customization Ideas
- Scent Blends: Combine different fragrance oils for unique results, such as combining vanilla with cinnamon for a warm twist.
- Non-Toxic Dyes: Opt for natural colorants if you prefer non-synthetic options.
- Add Embeds: Place small items like wax embeds or essential oils within your candle for surprise elements.
Storage and Shelf Life
Store your candles in a cool, dark place away from direct sunlight. If properly stored, these candles can last up to a year. Always keep them upright to avoid warping and damage.
Safety Tips
- Always work in a well-ventilated area when using wax and fragrances.
- Never leave melting wax unattended; it’s important to monitor it closely.
- Ensure wicks are the correct size to minimize smoke and soot while burning.
Frequently Asked Questions
Q: Can I use beeswax instead of paraffin or soy wax?
A: Yes, you can! Beeswax has a natural honey scent and a warm color but may require a different melting temperature.
Q: What if my wax didn’t hold the color well?
A: Make sure you thoroughly mix the colorant into the melted wax. Using higher quality dyes often produces better results.
Q: How do I know which wick size to use?
A: Check recommendations based on wax type and container diameter. Experimenting with different sizes can help find the perfect fit.
Q: Can I add essential oils to my candles?
A: Absolutely, just ensure they are specifically designed for candle making; some essential oils do not hold as well in candles compared to fragrance oils.
Q: Is it safe to burn these candles?
A: Yes, as long as you follow proper candle burning practices, such as trimming wicks and never leaving them unattended.
Conclusion
Creating your adorable ice cream candles is a rewarding and creative project. By following these steps, tips, and safety guidelines, you can delight in the joy of crafting something uniquely beautiful and functional. So gather your materials, invite some friends, and dive into this charming DIY project. Before you know it, you’ll have a delectable array of candle delights to enjoy or share!