
Easy Peppermint & Charcoal Detox Soap Recipe
Soap-making is a delightful and rewarding DIY project that not only allows you to create personalized gifts for friends and family but also enables you to control the ingredients that touch your skin. Today, I’ll guide you through a simple and effective recipe for peppermint and charcoal detox soap. This soap recipe will help unclog pores, remove impurities, fight acne, and improve the overall health of your skin. So, let’s dive in!
Why You Will Love This Recipe
This easy soap recipe utilizes peppermint essential oil, known for its refreshing scent and invigorating properties, combined with activated charcoal, which is renowned for its ability to absorb toxins and impurities from the skin. Together, these ingredients create a cleansing bar that’s not only great for oily and acne-prone skin but also feels wonderful to use. Plus, making your own soap means you avoid harsh chemicals often found in commercial products.
Ingredients
For this peppermint and charcoal detox soap, you’ll need the following ingredients:
- 16 oz. (1 lb.) melt-and-pour soap base (goat’s milk or shea butter work well)
- 1 tsp. activated charcoal powder
- 15-20 drops peppermint essential oil (adjust more or less based on your fragrance preference)
- 1 tsp. vitamin E oil (optional, for added skin benefits)
- Soap colorant (optional, for aesthetic appeal)
Equipment
Gather the following tools and materials before you start:
- Microwave-safe bowl or pot (for melting soap)
- Soap mold (silicone molds are highly recommended)
- Stirring utensil (silicone spatula works best)
- Measuring spoons
- Rubbing alcohol in a spritz bottle (to eliminate bubbles)
- Scale (if you’re measuring the ingredients)
Step-by-Step Instructions
Cut the Soap Base: Begin by cutting your melt-and-pour soap base into small chunks. This helps it melt more evenly and quickly.
Melt the Soap: Place the soap chunks into a microwave-safe bowl or pot. Microwave in 30-second increments, stirring in between until completely melted. Be careful not to overheat, as this can cause the soap to bubble.
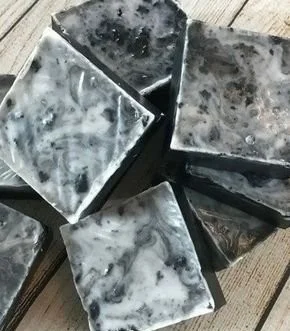
Add Activated Charcoal: Once the soap is fully melted, add 1 teaspoon of activated charcoal powder. Stir thoroughly to ensure it is evenly distributed throughout the mixture.
Incorporate Essential Oils and Vitamin E: Next, add the peppermint essential oil and vitamin E oil (if using). Thoroughly mix to combine all ingredients.
Optional Colorant: If you want to add color, this is the time to do it. Use soap colorant according to the directions on the product, starting with a small amount and adjusting to your desired shade.
Pour into Mold: Carefully pour the soap mixture into your prepared soap mold. Take your time to avoid spills, and fill each cavity completely.
Eliminate Bubbles: Spritz the surface of the soap with rubbing alcohol to remove any bubbles that may have formed while pouring.
Let it Set: Allow the soap to cool and harden completely. This can take 1-2 hours at room temperature, or you can speed up the process by placing it in the refrigerator.
Unmold and Cut: Once the soap is fully set, carefully remove it from the molds. If you used a slab mold, cut the soap into your desired bar sizes.
Tips for Success
- Check Temperature: Always ensure the soap is melted but not boiling. Overheating can cause it to burn, leading to unwanted odors and texture.
- Essential Oil Caution: Peppermint oil can be strong; adjust the quantity based on your fragrance preference.
- Stirring Method: When mixing in the charcoal, mix slowly to prevent air bubbles from forming.
Common Mistakes to Avoid
- Skipped Weighing: Measuring ingredients by volume rather than weight can lead to inconsistency in your final product. Always weigh your soap base for accuracy.
- Not Using a Digital Scale: For precise measurements, especially when using essential oils, a digital scale is invaluable.
- Forgetting the Alcohol Spray: Neglecting to spritz the surface can result in a bumpy texture on the soap top.
Variations and Customization Ideas
- Herbal Add-ins: Incorporate dried herbs or flowers for added texture and natural skin benefits, like lavender or chamomile.
- Different Essential Oils: Substitute peppermint oil with tea tree oil for additional acne-fighting properties or lavender for a calming scent.
- Add Exfoliants: Consider mixing in oatmeal or sea salt for gentle exfoliation.
Storage and Shelf Life
Store your finished soap in a cool, dry place, away from direct sunlight. When properly sealed, your soap can last for up to six months. If you notice any changes in texture, color, or smell, it’s best to discard it.
Safety Tips
- Allergy Check: Always do a patch test with any new essential oils or ingredients to avoid allergic reactions.
- Keep Away From Children: Ensure that finished soaps, especially if made with vibrant colors, are stored out of children’s reach.
- Ventilation: While this recipe doesn’t involve lye, always work in a well-ventilated area, especially when using potent ingredients like peppermint.
Frequently Asked Questions
Can I use this soap on my face?
- Yes, this soap is gentle enough for use on the face, but always conduct a patch test first.
What if my soap didn’t harden?
- If your soap remains soft, it may not have been heated adequately. Re-melt and add a bit more soap base, then let it set again.
Is activated charcoal safe for skin?
- Yes, activated charcoal is commonly used in skincare products for its detoxifying properties. Just be cautious of staining light fabrics.
Can I mix different types of soap bases?
- You can mix bases, but do so with compatible bases (e.g., goat’s milk with shea butter) to ensure even melting and consistency.
What can I do with leftover soap trimmings?
- Gather your leftover soap pieces and melt them down to create a new bar or use them as sample sizes for gifts!
Conclusion
Creating your own peppermint and charcoal detox soap is a fulfilling and enjoyable experience. Not only do you get to embrace your creativity, but you also craft a product tailored to your skincare needs. Whether you’re looking to give a thoughtful handmade gift or pamper yourself with a natural cleansing bar, this easy DIY soap recipe will delight and cleanse your skin. So grab your ingredients, and get started on this refreshing project today! Happy soap-making!