
Exfoliating Citrus Loofah Soap Recipe
Creating your own homemade soap not only allows you to enjoy a delightful fragrance and natural ingredients but also enables you to customize and control the exfoliation properties of your soap. This exfoliating citrus loofah soap is a wonderful DIY project that effectively removes dead skin cells while leaving your skin feeling rejuvenated and refreshed. Let’s dive into this simple yet effective soap recipe perfect for DIY enthusiasts at any level.
Why You Will Love This Recipe
This exfoliating loofah soap combines the benefits of natural exfoliation with the invigorating scent of citrus. Not only does it help slough away dry, dull skin, but it also provides a bright and fresh aroma that can uplift your mood and energize your spirit. Whether you choose to treat yourself or create handmade gifts for loved ones, this soap recipe is sure to impress.
Ingredients
Here’s what you’ll need to make approximately 6 bars of exfoliating loofah soap:
- 1 lb (450 g) melt and pour glycerin soap base
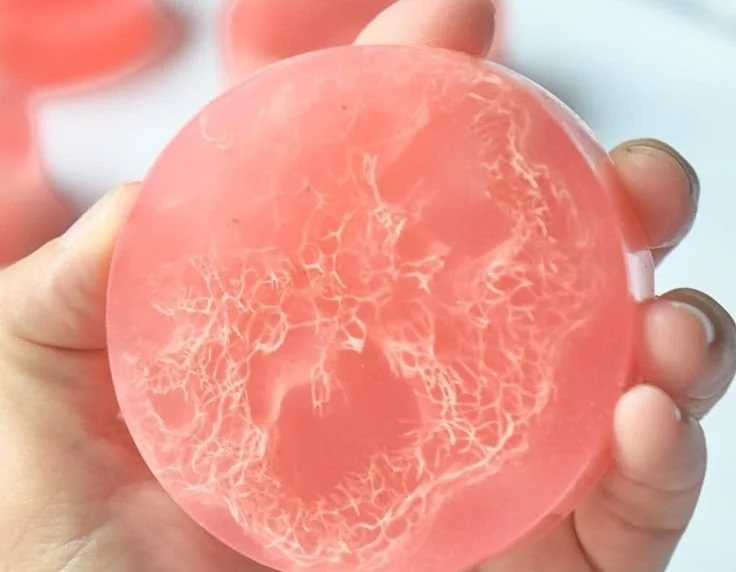
- 1 medium loofah sponge, sliced into ½-inch rounds
- 1-2 tablespoons of citrus essential oils (like lemon or orange), depending on desired strength
- Colorant (optional)
- Silicone soap mold
Equipment
Before you start, make sure you have the following equipment on hand:
- Microwave-safe bowl or double boiler
- Soap cutter (optional)
- Stirring stick or spoon
- Thermometer (optional)
- Spray bottle filled with rubbing alcohol (to eliminate bubbles)
- Gloves (if using colorants or essential oils)
Step-by-Step Instructions
Follow these straightforward steps to create your own exfoliating loofah soap:
Prepare Your Workspace: Clear a clean, flat surface to work on, and gather all your ingredients and equipment. It’s crucial to have everything on hand for a smooth process.
Melt the Soap Base:
- Chop your melt and pour glycerin soap base into small cubes for even melting.
- Place the cubes in a microwave-safe bowl or double boiler and heat until fully melted. If using a microwave, heat in 30-second intervals, stirring in between, until the soap base is completely liquid.
Add Color and Fragrance: (Optional)
- If you wish to color your soap, this is the time to add a few drops of colorant and stir until evenly distributed.
- Next, incorporate 1-2 tablespoons of your citrus essential oil, mixing thoroughly. Adjust the amount based on your scent preference.
Place the Loofah in the Mold:
- Lightly spray the silicone mold with rubbing alcohol to help the soap release easily later.
- Place a slice of loofah in the bottom of each cavity of the mold.
Pour the Soap:
- Slowly pour the melted soap base over the loofah slices in each mold, filling them completely. Leave a little space if you want to add more loofah in layers (more on this below).
Allow to Set:
- Let the soap sit undisturbed for about 1-2 hours until completely hardened. You can speed this process up by placing them in the refrigerator.
Unmold:
- Once your soap is set, gently pull the edges of the silicone mold away, and pop out the soap. If they’re difficult to remove, place them in the freezer for about 15 minutes to help them come out more easily.
Cure (Optional):
- Although melt and pour soaps don’t require a curing time like cold process soaps, letting them sit for a day or two can enhance their hardness and longevity.
Tips for Success
- Distinct Loofah Slices: Ensure your loofah slices are evenly cut to help them sit flat in the mold, allowing for an even soap layer.
- Avoid Air Bubbles: Spraying your mold with alcohol before pouring the soap helps reduce bubbling. Pour slowly to avoid creating air pockets.
- Temperature Check: If adding too much fragrance oil, monitor the temperature of your soap as it may start to thicken quickly.
Common Mistakes to Avoid
- Overheating the Soap Base: Watch carefully while melting to avoid scorching, which can affect the soap’s texture.
- Using Too Much Colorant: Less is often more with colorants; start with a few drops and build up from there.
- Neglecting the Safety of Essential Oils: Essential oils should be used in moderation. They can cause skin irritation if used excessively.
Variations and Customization Ideas
Feel free to customize the recipe to fit your preferences!
- Different Exfoliants: Consider incorporating different natural exfoliants like oatmeal, coffee grounds, or sea salt.
- Fragrance Blends: Experiment with other essential oils such as lavender or eucalyptus for a unique scent.
- Glycerin Alternatives: Use natural soap bases such as shea butter or olive oil soap bases for different textures and benefits.
Storage and Shelf Life
Store your finished bars in a cool, dry place away from direct sunlight. Ideally, wrap them in wax paper or place them in an airtight container. Your exfoliating loofah soap can last up to six months if stored properly.
Safety Tips
- Protective Gear: While dealing with melt-and-pour soap is relatively safe, always wear gloves when working with colorants and essential oils.
- Ventilation: Work in a well-ventilated area to avoid inhaling any fumes when melting your soap base or using fragrant oils.
- Allergies: Conduct a patch test with the essential oils if you have sensitive skin or allergies.
Frequently Asked Questions
1. Can I use any essential oils for this soap recipe?
Yes, you can use any fragrance that you enjoy and is suitable for skin use. Make sure to check for any skin sensitivities.
2. How much loofah should I add?
Slice the loofah into rounds that are around ½ inch thick and adjust the amount based on how exfoliating you want the soap to be.
3. Can I use a different soap base?
Absolutely! You can experiment with different melt and pour soap bases like shea butter or coconut oil for varying properties.
4. What if my soap didn’t harden correctly?
If your soap remains soft, it might be due to overheating the soap base or using too much fragrance. To salvage it, re-melt the soap, adjust your ingredients, and try again.
5. Is it safe for all skin types?
While generally safe, remember that everyone’s skin is different. Conduct a patch test if you have sensitive skin to prevent irritation.
Conclusion
Making your own exfoliating citrus loofah soap at home is not only fun but also rewarding. Each bar offers an invigorating scrub that your skin will appreciate. Share your creations with friends and family, or keep them all for yourself as a daily indulgence in self-care. Dive into the world of DIY soap making, and enjoy the process of crafting something uniquely yours! Happy soap making!