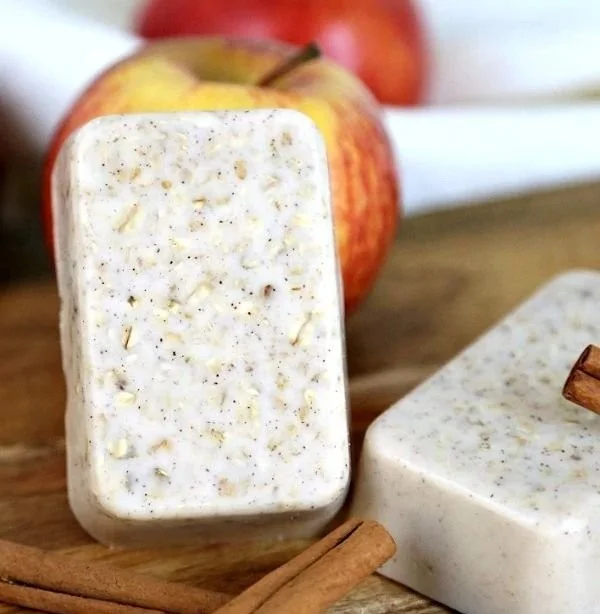

Discover the Joy of Making Apple Cinnamon Oatmeal Soap
Imagine this: you’re cozy at home, perhaps it’s a rainy afternoon, and you find yourself scrolling through Pinterest, looking at all those stunning DIY beauty projects. You know the ones—beautifully crafted soaps, glistening bath bombs, and luscious lotions that seem straight out of a boutique. But then, that little voice in your head starts whispering, “I can’t do that.” Sound familiar? You’re not alone! We’ve all had those moments of doubt, but here’s the truth—making soap, especially this Apple Cinnamon Oatmeal Soap, is so much easier than you think.
This delightful project requires just a few minutes of your time and leaves you with a perfectly sweet-smelling soap that feels luxurious on your skin. Not only does it smell heavenly, but it also makes a thoughtful gift for friends and family. Let’s break it down step by step, so you can create your very own artisan soap without breaking a sweat.
Why Choose Apple Cinnamon Oatmeal Soap?
You might be wondering why you should make apple cinnamon oatmeal soap rather than something else. Well, consider this:
Nourishing Ingredients: Oatmeal is fantastic for your skin. It helps to soothe irritated skin while providing gentle exfoliation. Plus, it absorbs moisture, making it an excellent choice, especially during those dry fall months.
Comforting Aroma: The scent of apple and cinnamon has a warm, inviting quality. It evokes feelings of coziness (hello, fall vibes!) and instantly transforms your space into a small sanctuary.
Personal Touch: Creating something with your own two hands feels empowering. You get to control what goes in it—no nasty chemicals or preservatives, just wholesome goodness.
So let’s dive into the nitty-gritty! Here’s how you can make your very own Apple Cinnamon Oatmeal Soap.
What You’ll Need
Ingredients
- Melt and Pour Soap Base: 1 lb (use natural glycerin soap for a clear appearance or shea butter for creaminess)
- Oatmeal: ½ cup (finely ground)
- Apple Fragrance Oil: 1 teaspoon (choose essential oils for a more natural scent)
- Cinnamon Powder: 1 teaspoon (add a sprinkle more for decoration!)
- Soap Colorant: Optional (if you want to get a gorgeous hue)
- Isopropyl Alcohol: In a spray bottle (helps eliminate bubbles)
Equipment
- Microwave-Safe Bowl: For melting your soap base
- Soap Molds: Silicone molds work wonderfully for easy removal
- Mixing Spoon: To combine your ingredients
- Measure Cups and Spoons: To keep your portions accurate
Let’s Get Crafting
Step 1: Melt the Soap Base
Start by cutting your soap base into small chunks. This makes it much easier to melt evenly. Place it in your microwave-safe bowl and heat it in thirty-second intervals. Stir well after each heating until the soap is completely melted.
Tip: Avoid overheating! You want it liquefied, not bubbling.
Step 2: Mix in the Goodies
Once your soap base has melted, it’s time to add your fun ingredients. Gently stir in the finely ground oatmeal, apple fragrance oil, and cinnamon powder. Blend them until you see an even distribution throughout the mixture.
Picture this: the lovely aroma of apples and spices wafting through your kitchen—heavenly, right?
Step 3: Add Color (Optional)
If you’re feeling a bit creative, now’s the time to add color to your soap. Just a drop or two of soap colorant will do the trick. Mix until you achieve your desired shade. Don’t worry; if it’s not perfect, you can always make more in the future!
Step 4: Pour and Set
Carefully pour the mixture into your soap molds, filling them just below the top rim. Remember to gently tap the molds on the counter to release any air bubbles—this will help you get a smoother finish. Then, spritz the tops with isopropyl alcohol to eliminate any lingering bubbles.
Step 5: Let It Cool
Allow your soap to cool completely. This usually takes about 1-2 hours at room temperature, but you can speed things up by placing them in the fridge (not the freezer!).
Step 6: Unmold and Enjoy
Once the soap is set, gently remove it from the molds. You’ll be pleasantly surprised at how lovely they look! If you want to take it a step further, you can wrap them in pretty packaging to give as gifts or keep them for yourself.
Bonus Self-Care Tips
Crafting your own soap can elevate your self-care routine. Here are some ideas to take it to the next level:
Create a Spa Day: Pair your homemade soap with a luxurious bath, some scented candles, and perhaps a glass of your favorite wine. You deserve it!
Mix It Up: Experiment with different essential oils or mix up the fragrances. What if you blended lavender with your apple cinnamon for a relaxing twist?
Gift It Forward: Make a batch or two to share with friends during the holidays. Everyone loves a thoughtful gift, and who wouldn’t want a bar of this?
Common Mistakes to Avoid
Even though this project is simple, a few common mistakes can pop up. Here’s how to sidestep them:
Overheating the Soap Base: As previously mentioned, keep an eye on the soap while it’s melting. If it starts bubbling, you’ve gone too far!
Not Using Enough Fragrance: It can be tempting to skimp on the scents, but remember, this is what will make your soap special. Don’t shy away from adding that extra splash.
Skipping the Alcohol Spray: Believe me, you’ll want to spray the top of your soap for a smooth finish. Those little air bubbles can be stubborn!
Frequently Asked Questions
Can I Use Different Types of Oatmeal?
Absolutely! You can use rolled oats for a chunkier texture if you like. Just know that it might affect the final appearance slightly.
How Long Will My Soap Last?
If stored properly in a cool, dry place, your soap can last several months. Just make sure to keep it in an airtight container to prevent moisture absorption.
Is This Soap Safe for All Skin Types?
As with any skincare product, it’s a good idea to do a patch test first, especially if you have sensitive skin. This way, you can ensure that the ingredients work for you.
Wrapping Up Your Soap-Making Adventure
There you have it, your complete guide to creating your own Apple Cinnamon Oatmeal Soap. Not only is this project fun and fulfilling, but it also provides a sense of accomplishment that comes from making something beautiful and useful. Plus, the delightful scent will remind you of cozy afternoons spent crafting.
So the next time you’re feeling a bit uninspired or overwhelmed, grab some oatmeal and cinnamon, and dive headfirst into this simple yet rewarding project. You’ll be surprised at how quickly you can transform your space—and your skincare routine—with just a little creativity.
Remember, self-care doesn’t have to be extravagant; sometimes, it’s just about taking a moment to create something special for yourself and your loved ones. Happy crafting!