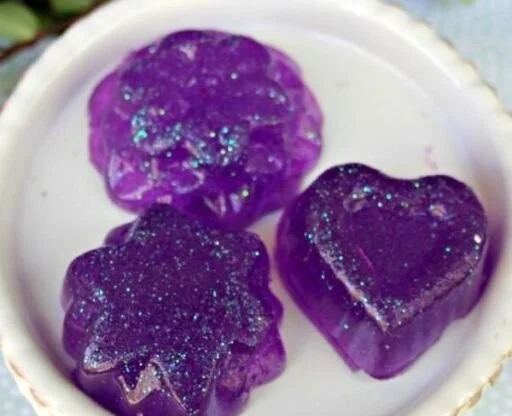

Fun jiggly homemade jelly soap made with gelatin
Imagine a sunny weekend afternoon. The kids are bouncing off the walls, and you’re trying to find an activity that will keep them entertained — something creative, a little messy (in a fun way!), and educational too. Here’s an idea: how about making jiggly homemade jelly soap? That’s right! We’re talking about gelatin soap that’s not only quirky and bright but also a fantastic way to engage the whole family.
Now, you might be wondering why you’d want to take on this little project. Let’s be honest, the store-bought soaps can get a bit mundane. But with this homemade jelly soap, you’re diving into a world of fun colors, shapes, and scents, turning an ordinary bath time into an extraordinary experience. And here’s the best part: they make perfect party favors or non-food class gifts.
Here’s what you’ll learn in this article:
- Why homemade jelly soap is a fantastic project
- All the materials you’ll need
- Step-by-step instructions for making the jelly soap
- Creative suggestions for coloring, scents, and shapes
- Tips for wrapping them up as gifts
- FAQs and common mistakes to avoid
Why homemade jelly soap is a fantastic project
First off, working with your kids in the kitchen or craft area fosters learning and quality time together. This is a chance to teach them about measurements and following instructions while exploring their creativity. Plus, there’s something incredibly satisfying about creating something from scratch.
But let’s dive deeper into why this activity stands out:
- Safety First: Unlike commercial soaps that can contain harsh chemicals, you have total control over the ingredients you use.
- Fully Customizable: Choose the colors, scents, and shapes that reflect your child’s personality or party theme. The sky’s the limit here!
- Eco-Friendly: Making your soap means you can use environmentally-friendly ingredients and avoid single-use packaging.
- Fun Science Experiment: Get a sprinkle of chemistry in your crafting! Watching the gelatin set and transform is a delightful science lesson.
All the materials you’ll need
Gathering your supplies is simple and cheap. Here’s what you’ll need to kick off this adventure:
Basic Ingredients:
- 1 cup of water
- 1 tablespoon of unflavored gelatin
- 2 tablespoons of liquid soap (use a gentle, kid-friendly option)
- 1-2 tablespoons of glycerin (optional for moisturizing properties)
- Food coloring (your choice of colors)
- Pouring container (like a measuring cup)
- Molds (silicone molds work best, but you can use any small containers)
Optional Ingredients:
- Essential oils (for that perfect scent)
- Glitter or tiny toys (to add in the soap for a fun surprise)
Step-by-step instructions for making the jelly soap
Now that you’ve got your materials ready, let’s get into the fun part: making your jelly soap! Trust me; this process is as enjoyable as the outcome.
Prepare the gelatin: In a small saucepan, add 1 cup of water. Sprinkle the unflavored gelatin over the water and allow it to sit for about 5 minutes. This is the time for the gelatin to "bloom," absorbing the water.
Heat gently: After blooming, place the saucepan on low heat. Stir until the gelatin is completely dissolved. This should take just a couple of minutes.
Mix in the soap: Remove the saucepan from the heat and add your liquid soap and glycerin. Stir gently to combine (you don’t want to create too many bubbles).
Color it up: Now’s the fun part! Add a few drops of food coloring until you achieve your desired hue. You can mix colors to create unique shades — how about a swirly rainbow effect?
Add scents: If you’re using essential oils, this is the moment to add them in. A few drops will do; it should smell aromatically delightful without overwhelming the kids.
Pour into molds: Carefully pour your mixture into silicone molds or your chosen containers. If you’re adding toys or glitter, this is the perfect time to place them inside, making for a fun surprise when your kids use their soap.
Set it aside: Allow your molds to cool at room temperature. After about an hour, transfer them to the fridge and let them set for an additional 1-2 hours.
Remove from molds: Once fully set, gently peel your jelly soap out of the molds. If they’re stubborn, you can place them in warm water for a few minutes to help release them.
Creative suggestions for coloring, scents, and shapes
The beauty of making your jelly soap is how customizable it is. Here are some tips to personalize your creations:
Colors: Mixing food coloring can yield stunning results. Think about layering colors or even swirling them for a marbled look.
Scents: Pair scents with colors! Lavender for purple, lemon for yellow, or peppermint for green can be a fun way to engage the kids’ senses.
Shapes: From hearts to stars, there are endless silicone mold options available online or at craft stores. You can even use cookie cutters if you’re feeling crafty!
Tips for wrapping them up as gifts
Once you’ve made your jelly soap, it’s time to make it look fabulous. If you want to use them as party favors or small gifts, consider:
- Wrap each piece in cellophane: Tie it off with a cute ribbon or string for a lovely presentation.
- Use labels: Attach a tag with the scent and a fun note like "Jiggly Soap for Jolly Kids!"
- Basket them together: Group a few together in a pretty basket, adding some more smaller items (like sponges or loofahs) for a complete gift set.
Common mistakes to avoid
Making jelly soap is straightforward, but there are a few common missteps to watch out for:
- Don’t rush the cooling: Allowing adequate time for your soap to set is crucial. Otherwise, you’ll end up with a gooey mess instead of jiggly delights.
- Use gentle heat: Cooking on high heat can destroy the properties of the gelatin. Keeping it low ensures everything dissolves beautifully.
- Overstuffing molds: If you’re adding toys or glitter, don’t fill the molds to the brim. Leave space for the soap to expand as it sets.
FAQs
How long will my jelly soap last?
If kept stored in a cool, dry place, your jelly soap can last for several weeks. Just avoid exposing them to humidity or heat.
Can I use flavored gelatin instead of unflavored?
Yes! However, keep in mind that flavored gelatins can add sugars and colors that may not create the same texture or effect.
Are these safe for sensitive skin?
Always patch-test any new soap on a small area if you’re concerned about sensitivities, especially for kids with known allergies.
Bonus Self-Care Ideas
After all that creativity, don’t forget to treat yourself! You could mix up a little time for self-care while the soap sets. Here are some ideas:
- Enjoy a calming cup of herbal tea.
- Take a leisurely bath using store-bought or leftover jelly soap.
- Dedicate a few moments to face masking or painting your nails while your kids stay busy.
Conclusion
I hope you feel inspired to dive into this jiggly jelly soap project with your kids! Besides being a delightful activity, you’re making something truly unique that brings joy to bath time and is perfect as personal gifts. Plus, it’s a wonderful way to bond and create lasting memories together. So, let’s keep our days colorful, scented, and beautifully fun!
If you have photos of your creations or want to share your experiences, I would love to hear about them! Let’s keep the creative juices flowing and make our self-care routines even more special. You’ve got this superstar — happy crafting!