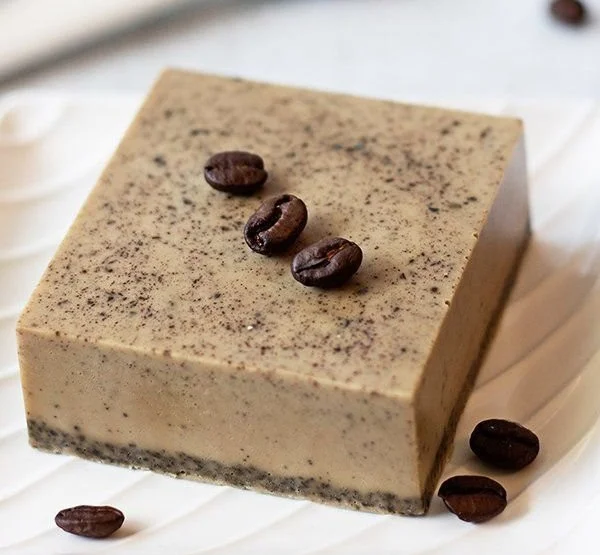

Indulge Your Senses with a Homemade Coffee Soap Recipe
Imagine this: it’s a Sunday morning, you’re sipping your favorite cup of coffee, and the aroma fills the air, wrapping you in a cozy blanket of warmth. Sounds delightful, right? Now, what if I told you that you could turn that wonderful experience into something truly pampering for your skin? That’s right—today, we’re diving into a quick and delightful homemade coffee soap recipe that’s not just a treat for your skin but also for your nose!
You might be wondering, why coffee? Well, this beloved beverage isn’t just your go-to morning energizer. It’s also packed with some incredible benefits for your skin. If you’ve ever wondered how to make your daily skincare routine a little more indulgent, this coffee soap could be your new best friend. Let’s explore how to make it, the reasons it’s such a fantastic addition to your beauty regimen, and sprinkle in some helpful tips along the way.
The Benefits of Coffee Soap for Your Skin
Before we roll up our sleeves and get into the nitty-gritty of soap making, let’s talk about why this coffee soap is such a game changer for our skincare routine.
Natural Exfoliation
Coffee grounds are a gentle yet effective exfoliant. They work wonders at removing dead skin cells, giving your skin that fresh, radiant glow we all crave. Say goodbye to rough patches and hello to silky smooth skin!
Rich in Antioxidants
Coffee is loaded with antioxidants that help fight free radicals. This means that using coffee soap can aid in combatting early signs of aging, leaving your complexion looking youthful and vibrant.
Invigorating Scent
The aroma of coffee is known to be uplifting. Using this soap during your shower can elevate your mood and wake you up better than a cup of joe! It’s the ultimate shower experience that combines self-care and sensory delight.
Suitable for All Skin Types
Whether you have dry, oily, or combination skin, this soap is gentle enough to cater to your needs. Just remember to test it on a small patch of skin first!
Simple and Fun to Make
Let’s face it, making your own skincare products can be incredibly fulfilling. Plus, it’s a fun activity you can do with friends or even your kids. Imagine the smiles and laughter while crafting something so lovely together!
Gather Your Ingredients
Now that you’re convinced of the multiple benefits coffee soap offers, let’s gather what you’ll need to whip this up. Here’s a simple list of ingredients:
- 1 cup of coffee grounds (used or fresh)
- 1 cup of melt-and-pour soap base (choose glycerin-based for an extra moisturizing effect)
- 2 tablespoons of olive oil (for added nourishment)
- 10-15 drops of your favorite essential oil (like vanilla or almond for a delightful fragrance)
- Optional: natural colorants (like a little cocoa powder for a deeper hue)
Optional Tools
- Soap molds (silicone molds work wonderfully)
- A microwave-safe bowl or double boiler
- A whisk or spoon
- A knife (for cutting the soap base)
Step-by-Step Guide to Making Coffee Soap
Let’s get down to the good stuff! Here’s how to create your very own coffee soap.
Step 1: Melt the Soap Base
Start by cutting your melt-and-pour soap base into small pieces. This helps it melt evenly. If you’re using a double boiler, fill the bottom pot with water and bring it to a gentle simmer. Place the top pot with the soap base over it, stirring until fully melted. If you prefer the microwave, heat it in short intervals (about 30 seconds), stirring in between until it’s smooth.
Step 2: Mix in the Coffee Grounds and Olive Oil
Once your soap base is melted, remove it from the heat. Now’s the time to stir in your coffee grounds and olive oil. This mixture will not only retain the benefits of coffee but also add a moisturizing kick for dry skin.
Step 3: Add Essential Oils
This is where the magic happens! Add the essential oils into the mix. This is also your opportunity to personalize your soap. Do you prefer a more floral scent? Or perhaps something earthy? The choice is yours! Stir the mixture well to ensure that the oils are evenly distributed.
Step 4: Pour into Molds
Carefully pour the mixture into your soap molds. You might want to use a ladle or funnel for more precision. Tap the molds gently on a flat surface to release any air bubbles. If you have some natural colorants, this is the perfect moment to add a sprinkle and create a beautiful marbled effect.
Step 5: Let It Set
Allow your soap to cool and harden. This usually takes about 1-2 hours at room temperature. If you’re in a hurry (and who isn’t?), you can also place them in the fridge for about 30 minutes.
Step 6: Unmold and Enjoy
Once the soap is completely hardened, gently remove them from the molds. They should pop out easily if you’re using silicone. Now, take a moment to admire your handiwork—you did that!
Step 7: Store and Use
Keep your soaps in a cool, dry place until you’re ready to use them. If you want to give them as gifts, consider wrapping them in some pretty paper or placing them in a cute little box.
Common Mistakes to Avoid
Now, while this process is relatively straightforward, there are a few pitfalls to watch out for. Here are some common mistakes you might encounter while making your coffee soap and how to avoid them:
- Not testing fragrance: Always test how strong your chosen essential oil is. You can always add more, but you can’t take it out!
- Using wet coffee grounds: Make sure your coffee grounds are completely dry before adding them to the soap. Otherwise, it could lead to clumping.
- Overheating the soap base: If you need to heat the soap, do it gradually. Overheating can change the texture and effectiveness of the soap.
- Skipping the stirring step: This is crucial for evenly distributing the coffee and oils.
Quick Beauty Tips for Maximum Benefits
To boost your skincare routine further, here are some handy tips on using your coffee soap:
- Follow Up with Moisturizer: After using your coffee soap, always come back with a nourishing moisturizer to keep your skin hydrated.
- Use Twice a Week: For those with sensitive skin, using it once or twice a week should suffice for gentle exfoliation.
- Pair with a Coffee Scrub: For those days when your skin craves extra TLC, combine your coffee soap with a coffee scrub for an invigorating experience.
Bonus Self-Care Ideas
Let’s chat about some other self-care practices that complement your new soap-making hobby. Here are a few ideas to help you unwind while indulging your senses:
- Start a Coffee-Conscious Morning Ritual: Pair your soap with a morning routine that embraces your love for coffee. Brew a fresh cup, take a few moments to breathe deeply, and pamper yourself.
- Pamper Your Feet: Mix up some coffee grounds with coconut oil for a DIY coffee foot scrub. Trust me, your feet will thank you!
- Create a Luxurious Body Scrub: Blend coffee grinds with a bit of sugar and olive oil for an all-over body scrub that invigorates your skin.
Frequently Asked Questions
Can I use leftover coffee grounds?
Absolutely! It’s a great way to recycle used coffee grounds. Just make sure they’re completely dry.
How long does the soap last?
With proper care, your soap can last several months. Just keep it in a cool, dry place away from direct sunlight.
Is this soap suitable for sensitive skin?
Most people can use it without issues, but if you have particularly sensitive skin, do a patch test first.
Embrace Your New Beauty Ritual
Now that you’ve got your very own homemade coffee soap recipe, the world of skincare is at your fingertips. You’ve not only created something fabulous but also embraced a self-care practice that can transform your everyday routine. So take a moment to celebrate your achievement; you deserve it!
Remember, self-care isn’t just about the products you use but also the rituals you create. Transitioning to this coffee soap in your shower routine might redefine your mornings. So go ahead, treat yourself to this delightful indulgence, and bask in the beauty of your skin and spirit!
Here’s the truth: you are worthy of beautiful and caring moments, and your homemade coffee soap is the perfect ticket to all that and more. So grab your ingredients, follow these steps, and let your skincare journey take a delicious turn! 🛁✨