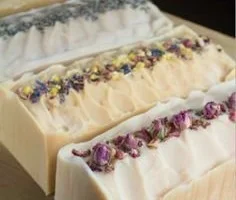

Embrace Self-Care with Flower Infused Milk Soap
Imagine this: after a long, hectic day filled with the chaos of juggling work, family, and your ever-growing to-do list, you step into a warm bath filled with soothing scents. The world outside fades away, and you’re left with a moment just for yourself. Sound familiar? There’s something incredibly special about those little acts of self-care. Today, I want to share a beautiful and rewarding project that not only enhances your bathing experience but also injects a touch of artistry into your skincare routine—making flower infused milk soap.
Making your own flower infused milk soap is more than just a craft; it’s a way to pamper yourself and treat your skin to nourishing ingredients. Trust me, there’s a certain satisfaction that comes from creating something beautiful with your own hands—one that smells heavenly, feels amazing, and makes you feel like the confident, empowered woman you are.
Why Choose Flower Infused Milk Soap
Before we dive into the how-tos, let’s take a moment to appreciate why this soap is worth your time and effort:
Natural Nourishment: Milk is a fantastic moisturizer, while flowers bring antioxidants and other nourishing properties. Think of it this way—who wouldn’t want their skincare to smell as heavenly as a blooming garden?
Customizable: You get to choose which flowers to use based on your personal taste (and skin needs). Lavender? Chamomile? The options are endless!
Therapeutic Crafting: The act of making something with your hands can be incredibly therapeutic. Plus, the process of infusing flowers in milk is a sensory delight.
What You’ll Need
To get started, gather your supplies. Don’t worry if you feel like a beginner—I’ve got you covered every step of the way.
Ingredients
- Milk (you can use whole milk, goat milk, or coconut milk)
- Dried flowers (lavender, chamomile, calendula, or rose petals work beautifully)
- Lye (sodium hydroxide)
- Olive oil
- Coconut oil
- Essential oils (optional, but I love adding a few drops of lavender or lemon for an extra aromatic touch)
- Distilled water (for mixing with lye)
Equipment
- Protective gear (gloves, goggles, and a mask—safety first!)
- Digital scale (for precise measurements)
- Thermometer
- Soap mold (silicone molds work wonders)
- Stick blender or whisk
- Large stainless steel mixing bowl
- Precision measuring cups
Step-by-Step Guide to Making Flower Infused Milk Soap
Ready to unleash your inner artisan? Let’s get into the nitty-gritty of how to create your own flower infused milk soap! This process can feel a bit technical, but with some patience and care, you’ll be transforming your bathroom into a mini spa in no time.
Step 1: Prepare Your Flower Infused Milk
Start by infusing your flowers into the milk. Here’s how:
- Heat the Milk: Gently warm the milk in a small saucepan until it’s warm but not boiling.
- Add Flowers: Stir in about ¼ cup of dried flowers into the warm milk.
- Steep: Let it steep for at least 30 minutes, allowing the flowers to impart their lovely essence.
- Strain: Once cooled, strain out the flowers through a fine mesh strainer, collecting just the infused milk.
Step 2: Prepare Lye and Water
This is where you need to pay attention—lye can be dangerous if not handled properly.
- Combine Lye and Water: In a well-ventilated area, put on your gloves and goggles. Carefully measure the lye and distilled water. Always add lye to water, never the other way around, to prevent a dangerous reaction.
- Cool the Mixture: Stir the mixture until the lye is completely dissolved, then set it aside to cool.
Step 3: Measure Oils and Combine
While the lye cools down, measure out your oils:
- Measure Olive and Coconut Oil: Combine about 2 cups of olive oil and 1 cup of coconut oil in a large stainless steel bowl.
- Heat the Oils: Gently heat the oils to around 100-110°F (38-43°C).
Step 4: Mix Everything Together
When both your lye mixture and oils are at a similar temperature (ideally between 95°F and 110°F), you can combine them:
- Slowly Add Lye to Oils: Pour the lye solution into the oils carefully, using a stick blender to mix them together.
- Blend to Trace: Blend the mixture until it reaches "trace," which means it thickens and leaves trails on the surface when you lift the blender.
Step 5: Incorporate the Flower Infused Milk
This is where your creation starts to shine:
- Add the Infused Milk: Slowly stir in your strained flower-infused milk into your soap mixture.
- Optional Oils: If you’re adding essential oils for added fragrance, now’s the time!
Step 6: Pour and Set
Now for the moment of truth:
- Mold Your Soap: Pour the soap mixture into your mold, ensuring any air bubbles are released by gently tapping the mold.
- Cover and Insulate: Cover your mold with a towel or cardboard to insulate the soap as it sets. Keep it in a cool place for about 24-48 hours.
Step 7: Unmold and Cure
Once your soap has set, you can take it out of the mold:
- Remove from Molds: Carefully unmold your soap and cut it into bars (they don’t need to be perfect—each piece has its charm!).
- Cure: Let your soap cure in a cool, dry place for about 4-6 weeks. This allows the lye to fully saponify and makes your soap milder on the skin.
Common Mistakes to Avoid
Here’s the honest truth—making soap can be tricky. Here are a few common pitfalls to be aware of:
- Not Measuring Precisely: Soap making is a science, so use a digital scale for accuracy.
- Skipping Safety Gear: I can’t stress this enough—always wear gloves and goggles when working with lye.
- Ignoring Temperature: Ensure your lye and oils are at similar temperatures for the best results.
- Rushing the Cure Time: Patience is key here! Rushed soap is often harsh on the skin.
Quick Beauty Tips for Your Soap
- Customize Scents: Play around with different essential oils. Try bergamot for a citrusy scent or eucalyptus for a fresh, uplifting aroma.
- Add Exfoliants: If you like a little texture in your soap, consider adding oatmeal or sea salt for gentle exfoliation.
- Use Colorants: Natural colorants like turmeric or spirulina can add a beautiful hue to your bars without the use of dyes.
What If I Want to Personalize My Soap?
Be creative! Maybe you want to create a specific holiday-themed bar or gifts for friends. Consider opting for seasonal flowers or layering colors in your molds. The sky’s the limit! You might even customize the packaging for a beautiful presentation if you’re gifting them.
Bonus Self-Care Ideas
While you’re on this self-care journey, why not explore other blissful activities? Here are some ideas:
- Create a Bath Ritual: Pair your flower infused milk soap with a calming bath, candles, and your favorite playlist to fully unwind.
- Journal Your Experiences: Take a few moments to jot down how making this soap made you feel. Reflecting helps enhance your self-care experience.
- Spa Day with Friends: Invite your besties over for a fun soap-making party. It’s a great way to bond and share the joy of self-care.
Conclusion
Making flower infused milk soap might seem like a project for the experts, but I’m here to tell you it’s totally doable and absolutely rewarding. The beauty of this journey lies in the creation, the scents, and the knowledge that you’re treating your skin with love.
So the next time you find yourself yearning for a little self-care, consider this rich, aromatic journey of soap making. Embrace the process, enjoy the moments, and know that every bar you create is a beautiful step toward nurturing yourself. You deserve it!
Let’s celebrate those small acts of self-care, one bar of soap at a time. Happy crafting!