
Discover the Joy of DIY Soap Making: Four Popular Methods
Looking for a fun and rewarding DIY project? Why not try making your own soap base? Soap making is not only creative but also practical, allowing you to craft customized scents and textures that suit your preferences. Whether you want to whip up some luxurious bars of soap for personal use or handmade gifts for others, creating your own soap can be an incredibly satisfying endeavor. This article dives into four popular methods for creating soap: melt and pour, cold process, hot process, and rebatching.
Why You Will Love This Recipe
Making your own soap can be an enlightening experience! You’ll love the satisfaction of creating something beautiful and useful. Plus, homemade soap can often contain fewer chemicals than conventional brands, making it a more natural option for your skincare routine. Here’s a glimpse of what you’ll gain from each method:
- Melt and Pour: The easiest and quickest method for beginners, allowing for lots of creativity.
- Cold Process: A more intricate method ideal for those seeking to immerse in the craft.
- Hot Process: Similar to cold process but quicker, with a rustic finish that many adore.
- Rebatching: Perfect for beginners who want to rectify mistakes or utilize leftover soap scraps.
Ingredients for Each Method
1. Melt and Pour
- Soap Base: 1 pound (16 oz) of your favorite melt and pour soap base (glycerin, shea butter, goat milk, etc.)
- Colorants (Optional): Soap colorant or mica
- Fragrance Oils (Optional): 1-2 teaspoons of essential oils or fragrance oils
- Additives: Dried herbs, flower petals, or exfoliants (e.g., oatmeal) if desired
2. Cold Process
- Oils: 12 oz olive oil, 12 oz coconut oil, 16 oz palm oil
- Sodium Hydroxide: 5.5 oz (Handle with care, follow safety tips)
- Water: 12 oz distilled water
- Colorants and Fragrance: As desired (refer to specific amounts in the Tips section)
3. Hot Process
- Oils: Same as for cold process (12 oz olive oil, 12 oz coconut oil, 16 oz palm oil)
- Sodium Hydroxide: 5.5 oz (Handle with care, follow safety tips)
- Water: 12 oz distilled water
- Fragrance: As desired
4. Rebatching
- Leftover Soap Scraps: 12-16 oz
- Liquid (Optional): Distilled water or milk for moisture
- Colorants and Fragrance: As desired
Equipment for Each Method
Melt and Pour:
- Microwave-safe bowl or double boiler
- Silicone molds
- Spoons or stirrers
Cold Process:
- Safety goggles and gloves
- Heat-resistant container
- Stick blender
- Soap molds
- A kitchen scale for accurate measurements
Hot Process:
- Same as cold process
- Slow cooker (for heating)
Rebatching:
- Grater or food processor (for shredding)
- Microwave-safe bowl or double boiler
- Soap molds
Step-by-Step Instructions
Melt and Pour Soap
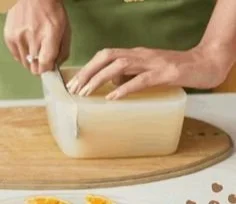
- Cut the Soap Base: Chop the soap base into small cubes.
- Melt the Base: Place the cubes into a microwave-safe bowl and heat in 30-second intervals, stirring until fully melted.
- Add Color and Fragrance: Once completely melted, stir in your desired colorants and fragrance oils.
- Pour Into Molds: Carefully pour the mixture into your molds. Add any additional additives on top before it hardens.
- Cool and Remove: Let the soap cool completely (about 1-2 hours) before gently removing it from the molds.
Cold Process Soap
- Prepare Your Workspace: Put on protective gear and ensure proper ventilation.
- Combine Lye and Water: Slowly add sodium hydroxide to distilled water (never the reverse); stir until fully dissolved. Let it cool.
- Melt Oils: In a separate container, melt the coconut and palm oil; combine with olive oil.
- Mix Oils and Lye: When both mixtures are about 100-110°F (37-43°C), slowly add the lye solution to the oils and mix with a stick blender until "trace" is achieved.
- Add Color and Fragrance: At trace, add colorants and fragrance oils. Stir well.
- Pour Into Molds: Pour the soap into molds and cover lightly with a towel.
- Cure: Leave for 24-48 hours before unmolding and curing for 4-6 weeks.
Hot Process Soap
- Prepare as in Cold Process: Follow the preparation steps (step 1 to step 4) as above.
- Cook the Soap: Pour the mixture into a slow cooker and cook on low for 1-2 hours until the texture becomes dough-like.
- Add Color and Fragrance: At the end of cooking, mix in colorants and fragrance.
- Mold: Pack the mixture into soap molds and let cool.
Rebatching Soap
- Shred the Soap Scraps: Use a grater to break down leftover soap.
- Melt the Shredded Soap: Combine the shredded soap in a double boiler or microwave for moisture.
- Mix Additives: Stir in any added fragrance, color, or moisture.
- Mold and Cool: Pack into molds and let cool completely.
Tips for Success
- Accuracy is Key: Always measure ingredients carefully for best results.
- Keep Records: Document your recipes and adjustments for future reference.
- Experiment Gradually: Start by customizing small batches to tweak your formula.
- Temperature Matters: Be mindful of temperatures to avoid lye reaction issues.
Common Mistakes to Avoid
- Skipping Safety Gear: Always wear gloves and goggles when handling lye.
- Incorrect Measurements: Use a precise scale to measures oils and lye.
- Rushing the Process: Allow enough time for each stage, especially curing and cooling.
Variations and Customization Ideas
- Color: You can use natural colorants such as turmeric or activated charcoal.
- Fragrance: Experiment with essential oils to find your perfect scent blend.
- Add Exfoliants: Add ground oatmeal, coffee grounds, or poppy seeds for texture.
Storage and Shelf Life
- Melt and Pour: Store in a cool, dry place for up to 6 months.
- Cold and Hot Process: Cure for 4-6 weeks and store in an airtight container for 1 year.
- Rebatching: Keep in a cool and dry area for up to 1 year.
Safety Tips
- Lye Handling: Lye (sodium hydroxide) is caustic. Always blend it in a well-ventilated area, avoid skin contact, and wash hands thoroughly after use.
- Work Area: Use dedicated utensils and work surfaces for soap making.
Frequently Asked Questions
What is ‘trace’ in cold process soap making?
Trace refers to the point when your soap mixture thickens and leaves a trail when drizzled across the surface. It’s a key indication that it’s ready to add fragrances and color.
Can I use any essential oil in soap making?
Not all essential oils are compatible for soap making. Some can go rancid or lose their scent. Always check their stability and safety for skin contact.
How do I know my soap has fully saponified?
Cold process soap should be tested with a pH strip after 4-6 weeks of curing. A pH of 7-10 indicates saponification is complete.
Can I make soap without lye?
Melt and pour soap does not require lye, as it’s already saponified. However, cold and hot processes will always need lye to create soap from scratch.
Is it possible to over-scent soap?
Yes, using too much fragrance can lead to diminished lather or undesired effects. Stick to recommended amounts for best results.
How long does it take to make soap?
The actual hands-on time varies based on the method, ranging from about 30 minutes for melt and pour to several hours for cold and hot processes, including curing time.
Conclusion
Creating your own soap can be a delightful adventure! With the methods outlined in this article—melt and pour, cold process, hot process, and rebatching—you have a variety of options to explore. Each method has its unique benefits and allows for creativity while delivering personalized results. So grab your ingredients and equipment, and let your soap-making journey unfold. Happy crafting!