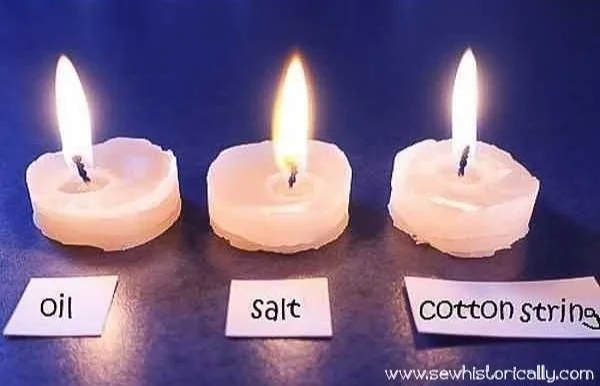

Did You Know? You Can Make DIY Candle Wicks with Household Items!
Are you ready to dive into the delightful world of DIY candle making? If you love the idea of creating custom candles at home, you’ll be excited to learn that making your own candle wicks is surprisingly easy—and all you need are a few common household items! With just cotton string, vegetable oil, and salt, you can craft effective wicks that will elevate your homemade candles.
Let’s get started!
Why You Will Love This Recipe
Homemade candles not only add warmth and ambiance to your home, but they also make fantastic gifts for friends and loved ones. By making your own candle wicks, you’ll not only save money but also gain the ability to customize the burn characteristics, size, and scent of your candles. Plus, there’s something deeply satisfying about creating something from scratch!
Ingredients
To create your DIY candle wicks, you will need:
- Cotton String: Approximately 10-12 inches long per wick (you can adjust based on the size of your container).
- Vegetable Oil: 1 tablespoon, for soaking the string.
- Salt: 1 teaspoon, to help the wick burn more steadily.
Equipment
Gather the following equipment:
- Scissors
- Small bowl or dish for soaking the string
- A heatproof container or candle mold
- Wax for your candles (beeswax, soy wax, or paraffin)
- A double boiler (or a microwave-safe bowl if using a microwave)
- Fragrance oils (optional)
- Wick holder or stabilizer (you can use a pencil or skewer)
Step-by-Step Instructions
1. Prepare the Cotton String
Cut the String: Measure and cut your cotton string into pieces of about 10-12 inches. Adjust the length based on the height of your candles.
Soak the String: In a small bowl, combine 1 tablespoon of vegetable oil with 1 teaspoon of salt. Soak the cotton string pieces in this mixture for at least 30 minutes. This process helps to create a stronger wick that burns more efficiently.
2. Melt the Wax
Create a Double Boiler: Fill a pot with a couple of inches of water and place your heatproof container inside. Heat the pot on medium heat to create a double boiler effect. (If using a microwave, place the wax in a microwave-safe bowl.)
Melt the Wax: Add your wax (the amount may vary based on how many candles you are making) to the heatproof container. Monitor the melting process closely. If using a microwave, heat in short bursts of 30 seconds, stirring in between.
3. Set the Wick
Insert the Wick: After the cotton string has soaked and your wax is melted, carefully remove the wick from the oil mixture. You can attach one end to the bottom of the container using a little melted wax or a wick sticker to secure it.
Hold the Wick Steady: Use a pencil or skewer placed across the top of the container to keep the wick centered while you pour in the wax.
4. Pour the Wax
- Pour the Wax: Carefully pour the melted wax into your container, making sure to leave some space at the top. Allow the wax to cool and harden.
5. Trim the Wick
- Trim: Once the wax has cooled and set, trim the wick to about 1/4 inch above the surface of the candle.
Tips for Success
- Choose the Right Cotton String: Use 100% cotton string for the best results. Avoid using synthetic fibers, as they may not burn properly.
- Testing Wicks: If you’re unsure about the wick size, always test your candle by lighting it to ensure it burns evenly.
Common Mistakes to Avoid
- Using Non-Cotton String: This can lead to an inconsistent burn. Always use pure cotton.
- Not Soaking Enough: If your wick isn’t soaked long enough, it may not burn well. Allow adequate time for the salt and oil to absorb.
Variations and Customization Ideas
- Flavored Wicks: For additional fragrance, add a few drops of essential oils to the oil mixture when soaking the wick.
- Colored Wax: You can add dye to your melted wax for a pop of color in your candles.
Storage and Shelf Life
Once your candles are made, store them in a cool, dark place away from direct sunlight. Properly made candles can last for months if stored correctly.
Safety Tips
- Always supervise candle-making processes, especially around heat sources and hot wax.
- Ensure good ventilation when melting wax.
- Burn candles in a safe location, away from flammable materials.
Frequently Asked Questions
1. Can I use other types of oils for soaking the wicks?
Yes! Any natural oil, such as olive oil or coconut oil, can be used instead of vegetable oil. However, be mindful of the scent.
2. How do I adjust the wick size for larger candles?
For larger candles, increase the wick size by using a thicker cotton string or combining multiple strands for a more robust wick.
3. What if my candle doesn’t burn evenly?
If your candle isn’t burning evenly, it could be due to several factors: the wick size, the type of wax used, or how the candle is poured. Adjust the wick size and ensure proper pouring techniques in future batches.
4. Can I use scented oil in my candles?
Absolutely! Adding a few drops of your favorite fragrance oils to the melted wax can create beautifully scented candles.
5. Is it safe to leave a candle burning unattended?
No, it’s never safe to leave a candle unattended. Always keep an eye on burning candles to prevent accidents.
6. How can I reuse old candle wax?
You can melt down old candle stubs and mix them with fresh wax. Just be sure to filter out any debris and check the wick for suitability.
Conclusion
You’re all set to create beautiful candles with homemade wicks! Not only is this project budget-friendly, but it’s also a fantastic way to personalize your candle-making experience. Friends and family will appreciate your handmade creations, making them perfect for thoughtful gifts as well. So gather your supplies, ignite your creativity, and enjoy the soothing process of candle-making! Happy crafting!