
Create Your Own Natural Lavender Mint Eucalyptus Soap Bar: A DIY Guide
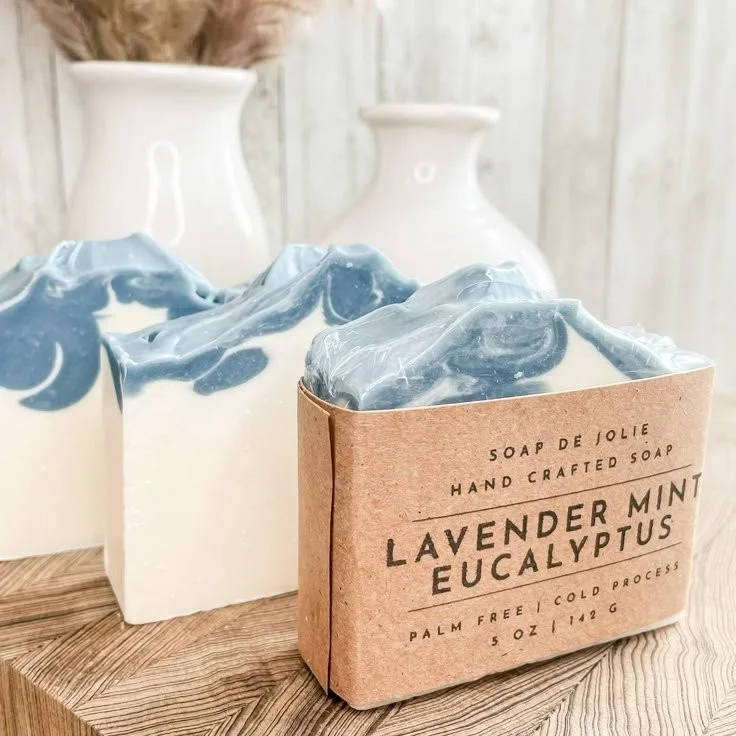
Welcome to the world of DIY soap making! Today, we’ll explore the delightful process of creating your own cold process soap bars, focusing on a refreshing and aromatic Lavender Mint Eucalyptus soap. This beautifully crafted bar combines the calming scent of lavender with the invigorating notes of mint, enhanced by base notes of lemon, verbena, and eucalyptus. Using high-quality natural ingredients, this soap not only nourishes the skin but fills your home with a delightful fragrance.
Why You Will Love This Recipe
Making your own homemade soap is not only a fun and rewarding project but also a wonderful way to personalize your body care routine. The Lavender Mint Eucalyptus bar is 100% vegan and palm oil-free, ensuring that you can enjoy luxurious soap without compromising your values. Hand-poured in small batches, this soap is made with an emphasis on quality and natural goodness. Plus, you can control the ingredients, knowing exactly what you’re using.
Ingredients
To create your Lavender Mint Eucalyptus soap bars, you will need:
- Oils:
- 10 oz Coconut Oil
- 10 oz Olive Oil
- 5 oz Avocado Oil
- 5 oz Castor Oil
- Butters:
- 4 oz Cocoa Butter
- 4 oz Shea Butter
- Lye: Sodium Hydroxide (carefully measure using a reliable soap calculator)
- Water: Distilled water, approximately 14 oz (will be adjusted based on lye calculation)
- Fragrance:
- 1.5 oz Lavender Essential Oil
- 1 oz Peppermint Essential Oil
- 1 oz Eucalyptus Essential Oil
- 0.5 oz Lemon Fragrance Oil (optional)
- Colorant: Mica powder for coloring (optional)
Equipment
Before you begin, gather the following equipment:
- Digital scale
- Heat-resistant mixing bowls
- Stick blender
- Soap molds
- Measuring spoons
- Safety goggles and gloves
- Thermometer
- Spatulas
- Airtight container for storage
Step-by-Step Instructions
Preparation Time: 30 minutes
Making Time: 1 hour
Yield: Approximately 4-6 bars, averaging 5 oz each
Prepare Your Workspace:
- Ensure your workspace is clean and organized. Lightly spray your work surfaces with rubbing alcohol to disinfect.
- Put on your safety goggles and gloves, as handling lye requires precaution.
Measure the Lye and Water:
- Using your scale, accurately measure your sodium hydroxide (lye). The amount of lye will depend on the weight of your oils; always use a reliable soap calculator for precise measurements.
- In a well-ventilated area, carefully add the lye to the distilled water (never the other way around). Stir until the lye is completely dissolved. This mixture will heat up quickly; allow it to cool to around 100-110°F.
Melt the Oils and Butters:
- In a heat-resistant bowl, combine the coconut oil, olive oil, avocado oil, and castor oil along with the cocoa and shea butters.
- Heat gently until melted, then remove from heat and allow to cool to around 100-110°F, which should be similar to your lye solution.
Mix the Lye and Oils:
- Once both the lye solution and oils are at a similar temperature, slowly pour the lye into the bowl of oils while mixing gently with your stick blender.
Blend to Trace:
- Blend until you reach "trace," where the mixture leaves a trail on the surface when drizzled. This can take around 5-10 minutes.
Add Fragrance and Color:
- Stir in the essential oils and fragrance oils, mixing thoroughly. If you’re using mica, add it at this point and stir well to avoid clumps.
Mold the Soap:
- Pour the soap mixture into your molds and smooth the top with a spatula.
- Optional: Sprinkle some additional mica or herbs for decoration.
Cure the Soap:
- Cover the molds lightly with a towel and let them sit undisturbed for 24-48 hours until the soap is firm enough to unmold.
Cut and Cure Further:
- After unmolding, cut the soap into bars and place them on a drying rack. Allow them to cure in a cool, dry place for 4-6 weeks to ensure they are safe and ready to use.
Tips for Success
- Temperature Control: It’s crucial that both your oils and lye are at the same temperature for proper emulsification.
- Patience is Key: Allowing your soap to cure for the full 4-6 weeks is essential for the lye to saponify completely.
- Keep It Simple: As a beginner, try sticking to this basic recipe before exploring more complex fragrances or additives.
Common Mistakes to Avoid
- Incorrect Lye Measurements: Always double-check your lye calculations using a soap calculator to avoid potentially dangerous results.
- Skipping Safety Equipment: Always wear gloves and goggles when working with lye, and do not work in closed spaces or around children.
- Not Allowing Soap to Cure Fully: Using soap too soon can irritate the skin due to unreacted lye.
Variations and Customization Ideas
- Scent Options: Experiment with different fragrances or essential oils, like rosemary or lemongrass, for a unique twist.
- Additions: Consider adding natural exfoliants like oatmeal or poppy seeds for texture and added skin benefits.
- Color Variations: Use different colors of mica to create layers or swirls in your soap.
Storage and Shelf Life
- Store your cured soap bars in a dry, cool place away from direct sunlight. They will last for up to a year if stored properly.
- Use a soap dish to allow the soap to drain between uses, prolonging its life.
Safety Tips
- Always handle sodium hydroxide (lye) with care. It is corrosive and can cause severe burns.
- Ensure good ventilation in your workspace to avoid inhaling fumes and wear appropriate protective gear.
Frequently Asked Questions
1. Can I use this recipe with different essential oils?
Absolutely! Feel free to substitute your favorite essential oils for a unique scent.
2. How do I know if my soap is ready to use?
Your soap should be cured fully for at least 4-6 weeks to ensure it’s safe for the skin.
3. What should I do if my soap didn’t set?
If your soap did not set properly, it may be due to incorrect lye measurements or temperatures. It may be salvaged by rebatching, but it is essential to ensure accurate measurements next time.
4. Is this soap good for sensitive skin?
This recipe is crafted with natural ingredients and is vegan, making it suitable for most skin types, but always conduct a patch test first.
5. Can I use different oils in this recipe?
Yes, you can substitute similar oils, but keep in mind that different oils have different saponification values and may change the recipe’s balance.
6. How can I get creative with my soap design?
Try swirling colors, layering different scents, or adding natural botanicals to Customize your soap’s appearance.
Conclusion
Making your own cold process Lavender Mint Eucalyptus soap is an incredibly satisfying experience that allows you to create a personalized, natural product. By following the steps outlined in this guide, you’ll be well on your way to crafting beautiful, fragrant soap bars that are great for you and make wonderful handmade gifts for others. Embrace the joy of DIY, and don’t hesitate to experiment – the world of natural soap making is as vast as it is rewarding. Happy soaping!