
Natural Cocoa and Coffee Soap: A Delightful DIY Recipe
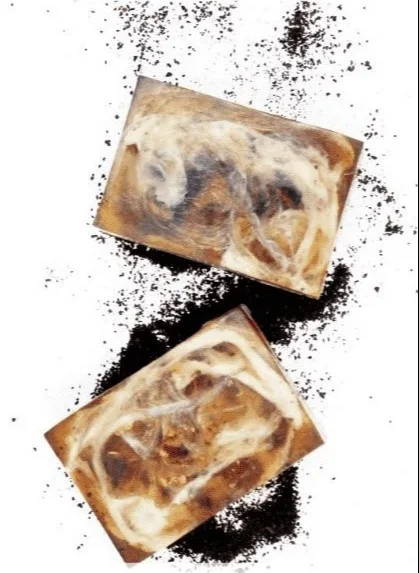
Making your own soap can be one of the most fulfilling DIY projects. Not only does it allow you to create gorgeous, personalized products, but it also lets you experiment with delightful scents and natural ingredients. This Natural Cocoa and Coffee Soap recipe is easy to follow, smells heavenly like spiced chocolate and coffee, and serves as an excellent gift for friends and family. Let’s dive right in!
Why You Will Love This Recipe
This cocoa and coffee soap harnesses the nourishing properties of cocoa powder and coffee grounds, making it not only fragrant but also beneficial for your skin.
Benefits of Cocoa and Coffee in Soap
- Cocoa Powder: Rich in antioxidants and known to hydrate the skin, cocoa powder adds a delightful chocolate scent and a natural color to the soap.
- Coffee Grounds: Coffee acts as a natural exfoliant, helping to slough off dead skin cells. Its invigorating aroma can help awaken your senses, making this soap ideal for a morning shower.
With a straightforward process and readily available ingredients, this recipe is perfect for beginners and experienced soap makers alike. Let’s get started!
Ingredients
- 14 oz. (397 g) Olive oil
- 14 oz. (397 g) Coconut oil
- 14 oz. (397 g) Palm oil
- 4 oz. (113 g) Castor oil
- 6 oz. (170 g) Lye (sodium hydroxide)
- 15 oz. (425 g) Distilled water
- 1 oz. (28 g) Cocoa powder
- 2 oz. (56 g) Coarsely ground coffee
- Optional: Essential oils or fragrance oils (e.g., vanilla, coffee, cinnamon) for added scent
Equipment
- Safety goggles
- Rubber gloves
- Scale (for accurate measurements)
- Heat-resistant container (for mixing lye)
- Large mixing bowl (stainless steel or glass)
- Stick blender
- Soap mold (silicone molds work well)
- Measuring cups and spoons
- Digital thermometer
- Spatula
- Towel or blanket (to insulate the soap)
Step-by-Step Instructions
Preparation Time: 15 minutes
Making Time: 1 hour
Yield: Approximately 10 bars of soap
Safety First: Before starting, put on your safety goggles and gloves. Ensure you are in a well-ventilated area.
Calculate Lye Amount: Use a reliable soap calculator to ensure the right amount of lye for the oils you are using. The ratio varies depending on the mix; follow the calculator’s guidance.
Prepare the Lye Solution: Measure out the distilled water into a heat-resistant container. Carefully add the lye to the water (never the other way around), stirring gently until fully dissolved. This solution will get hot, so be cautious. Allow it to cool to around 100°F (38°C).
Melt the Oils: Weigh and combine the olive oil, coconut oil, palm oil, and castor oil in a large mixing bowl. If using solid oils, gently heat until melted and combined. Let the oils cool to about 100°F (38°C).
Combine Lye and Oils: Once both the lye solution and oils are around the same temperature, slowly pour the lye solution into the oils. Use a stick blender to mix the combination until it reaches a light trace (the mixture should slightly thicken and leave a trail on the surface).
Add Cocoa and Coffee: Add the cocoa powder and coffee grounds to the soap batter. Blend thoroughly, ensuring everything is well incorporated.
Add Fragrance (Optional): If you’re using any essential or fragrance oils, now is the time to stir them in.
Pour into Molds: Carefully pour the soap mixture into your soap mold. Tap the mold gently to remove any air bubbles.
Cure the Soap: Cover the mold with a towel or blanket for insulation and let it sit undisturbed for 24 – 48 hours. After this period, when the soap is firm, remove it from the mold and cut it into bars.
Curing Time: Allow the soap bars to cure in a cool, dry place for 4-6 weeks before using. This allows the saponification process to complete and the soap to harden properly.
Tips for Success
- Measure Accurately: Use a digital scale for accurate measurements of oils and lye.
- Stay on Temperature: Maintaining the correct temperature is key to a successful saponification process.
- Mix Thoroughly: Ensure all ingredients are well blended to prevent any clumping.
Common Mistakes to Avoid
- Incorrect Lye Handling: Always measure and mix lye carefully. Lye can cause burns and reactions; handle with care.
- Skipping the Cure Time: Rushing to use the soap will result in a product that can be harsh on the skin.
- Inconsistent Measurements: Using volume instead of weight can lead to errors in the chemical reaction.
Variations and Customization Ideas
- Fragrance: You can experiment with scents by adding different essential oils or fragrance oils.
- Color: Add natural colorants such as turmeric or spirulina for a unique visual appeal.
- Add-ins: Consider incorporating other exfoliants like oatmeal or dried herbs for different textures and benefits.
Storage and Shelf Life
Store the finished soap bars in a cool, dry place uncovered for the initial cure period. After they’re cured, wrap them in paper or store them in a cardboard box to protect them from moisture. With proper care, the soap should last for about 6 to 12 months.
Safety Tips
- Always wear safety goggles and gloves when handling lye.
- Work in a well-ventilated space.
- Keep lye and soaps out of reach of children and pets.
Frequently Asked Questions
1. Can I use different oils in this recipe?
Yes, you can customize your oils by using a variety of vegetable oils like sweet almond or avocado oil, but be sure to recalculate the lye amount needed.
2. How do I know when the soap is properly cured?
The soap will be hard to the touch and will not have a strong lye odor after curing for 4-6 weeks.
3. What happens if I touch the lye before it dissolves?
Lye can cause chemical burns, so it’s essential to wear gloves and goggles at all times during preparation.
4. Is it safe to use on sensitive skin?
While this recipe uses natural ingredients, it’s always best to perform a patch test on a small area of skin before full use, especially if you have sensitive skin.
5. Can I use coffee grounds from brewed coffee?
Yes, it’s best to use coarsely ground coffee that’s dry. Ensure that there are no liquid residues to maintain the integrity of the soap.
Conclusion
Making your own Natural Cocoa and Coffee Soap is a joyful and rewarding project that connects you with the art of DIY. The aromatic blend of cocoa and coffee makes every wash a delightful experience, while the skin-loving ingredients nourish and exfoliate. Whether you’re treating yourself or creating charming handmade gifts for loved ones, this soap recipe is sure to impress.
So gather your ingredients, put on your safety gear, and dive into the world of soap making. You might just find a new favorite hobby! Happy crafting!