
Discover the Joy of DIY Soap: A Complete Guide for Beginners
Making your own soap can be an incredibly rewarding and fun project. It’s a chance to create something that not only enhances your bathing experience but also makes for heartfelt gifts or delightful additions to your home. In this guide, we will walk through the melt-and-pour soap-making method, perfect for beginners, and learn how to craft beautiful, customized bars of soap with ease.
Why You Will Love This Recipe
Crafting your own soap offers a sense of accomplishment and the ability to personalize scents, colors, and textures. The melt-and-pour method is straightforward and requires minimal equipment, making it ideal for beginners. You can choose from a variety of bases—like glycerin soap or shea butter soap—to create a product that suits your skin type and preferences. Plus, homemade soap eliminates harmful ingredients often found in commercial options.
Ingredients
For this melt-and-pour soap recipe, here’s what you will need:
- 1 pound of soap base (glycerin, shea butter, or goat milk)
- 1 tablespoon of fragrance oil (your choice, such as lavender, vanilla, or citrus)
- 1 teaspoon of soap colorant (optional, based on your preference)
- Add-ins: dried herbs, oatmeal, or essential oils are optional for texture and fragrance
Equipment
Before you dive in, gather the following tools and supplies:
- A microwave-safe container or double boiler
- A soap mold (silicone molds work great)
- A stirring stick or spoon
- A measuring cup
- A cutting board and knife (for chopping the soap base)
- Rubbing alcohol in a spray bottle (to eliminate bubbles)
Step-by-Step Instructions
Step 1: Prepare Your Workspace
Make sure your workspace is clean and organized. Lay down some newspaper or a protective cloth to catch any spills.
Step 2: Cut the Soap Base
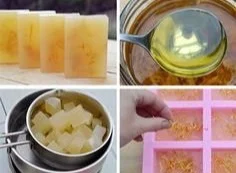
Using a cutting board and knife, chop your soap base into small, even cubes. This allows for quicker melting.
Step 3: Melt the Soap Base
- Place the soap cubes into your microwave-safe container or double boiler.
- If using a microwave, heat in 30-second intervals, stirring between each interval until completely melted.
- If using a double boiler, bring water to a gentle simmer and melt the soap base while stirring continuously.
Step 4: Add Fragrance and Color
Once the soap base is melted:
- Remove it from the heat and let it cool for a moment.
- Add your chosen fragrance oil and soap colorant, stirring thoroughly to combine. You can also mix in any add-ins like dried flowers or oatmeal.
Step 5: Pour into Molds
- Carefully pour the soap mixture into your mold.
- If bubbles form on the surface, lightly spray with rubbing alcohol to eliminate them.
Step 6: Let It Set
Allow the soap to cool and harden at room temperature, which may take 1-2 hours depending on the size of your mold.
Step 7: Unmold and Cut
Once firm, gently pop the soap out of the mold. If you used a loaf mold, cut it into bars.
Tips for Success
- Use a scale to measure your ingredients for a perfect mix.
- Experiment with small batches first, so you can adjust the fragrance and color to your liking without wasting ingredients.
- Leave a little time between pouring and applying any additional layers to prevent them from mixing.
Common Mistakes to Avoid
- Overheating the soap base may cause it to lose its beneficial properties or change its texture. Always melt slowly and stir regularly.
- Using too much fragrance oil can result in a soap that is harsh on the skin, so stick to the recommended amounts.
- Skipping the rubbing alcohol spray can lead to unsightly bubbles, especially if you’re layering colors.
Variations and Customization Ideas
- Herbal Infusions: Infuse your soap with herbs like chamomile or eucalyptus for added therapeutic benefits.
- Exfoliating Soap: Add natural exfoliants such as oatmeal, coffee grounds, or sugar for a simple scrub.
- Layered Soaps: Pour different colors in layers to create a visually appealing striped effect.
Storage and Shelf Life
Store your homemade soap in a cool, dry area, away from direct sunlight. Properly wrapped, the soap can last up to a year without degrading.
Safety Tips
- If you are pregnant, nursing, or have sensitive skin, consult with a healthcare provider regarding the specific ingredients.
- Keep soap-making materials and equipment out of reach of children and pets.
- Always work in a well-ventilated area, especially when using fragrance oils.
Frequently Asked Questions
Q1: Can I use kitchen supplies for soap making?
A1: While you can use some kitchen supplies for soap, it is best to designate specific equipment (like measuring cups and spoons) for soap making to avoid contamination.
Q2: Is it necessary to use colorants?
A2: No, adding color is purely optional. You can make beautiful, natural soaps without any added color.
Q3: How do I know which soap base to use?
A3: Different bases have unique properties; for example, goat milk is great for sensitive skin, while glycerin is more transparent and moisturizing.
Q4: Can I change the fragrance and still have good results?
A4: Absolutely! Feel free to experiment with different fragrances, but be mindful of recommended usage to maintain skin safety.
Q5: Can melted soap be reused?
A5: Yes! You can remelt soap scraps to create new batches, but be careful not to overheat.
Conclusion
Making homemade soap is not just a fun project; it’s a fantastic way to indulge in creativity while producing something practical that you can use or gift. By following this guide, you’ll be able to create beautiful, fragrant, and customized soaps safely and easily. Remember, the joy of DIY soap making lies in experimentation and personalization, so don’t be afraid to play around with different scents and shapes. Happy crafting!