
Pressing Real Flowers and Decorating Glass Teacups for Homemade Candles
Creating personalized candles with pressed real flowers is a charming and heartfelt DIY project. Not only do these handmade candles serve as beautiful decorations, but they also make thoughtful gifts for friends and family. Whether you’re a beginner or have some experience, this step-by-step tutorial will guide you through the process of pressing flowers and using them to decorate glass teacups for your homemade candles.
Why You Will Love This Recipe
This project combines the art of flower pressing with candle making, resulting in an elegant and unique addition to your home décor. The candles are perfect for special occasions or simply to brighten up your space. You can customize them with your favorite scents and colors, making them truly one-of-a-kind. Plus, it’s an enjoyable way to spend an afternoon!
Ingredients
For the pressed flower candles, you will need:
For Pressing Flowers:
- Fresh flowers (e.g., daisies, pansies, lavender, or any thin-petaled flower)
- Heavy books or a flower press
For Making Candles:
- Wax Type: 2 pounds of soy wax (eco-friendly and easy to work with)
- Fragrance Oil: 1 ounce of your favorite candle fragrance (optional)
- Wick: 4 cotton or wood wicks (size depending on the container)
- Dyes: Candle dye (optional, for coloring the wax)
Equipment
You will require the following equipment:
- Glass teacups (4 to 5, depending on the size)
- Double boiler or wax melting pot
- Thermometer
- Stirring utensil (wooden or silicone)
- Wick holders or pencil for wick positioning
- Scissors
- Safety gloves and goggles (for safety)
Step-by-Step Instructions
Part 1: Pressing the Flowers
Select Your Flowers: Choose thin-petaled flowers that press well and look beautiful, like pansies or violets.
Prepare the Flowers: Trim the stems and remove any leaves. Place them between two pieces of parchment paper to avoid stains.
Pressing the Flowers:
- Place the parchment paper with flowers inside a heavy book or flower press.
- Leave them pressed for about 1-2 weeks.
- Check occasionally to ensure they are drying and pressing evenly.
Part 2: Making the Candles
Prepare Your Workspace: Lay down newspaper or an old tablecloth to protect your surface.
Melt the Wax:
- Fill the bottom pot of the double boiler with water and bring it to a simmer.
- Place the soy wax in the top pot, stirring gently until fully melted. Use a thermometer to check that the wax reaches about 180°F (82°C).
Add Fragrance and Color:
- If using, mix in the fragrance oil and dye. Stir well to incorporate.
Prepare the Wicks:
- While the wax is melting, attach the wick to the bottom of the teacup using a little melted wax or a wick sticker.
- Use a wick holder or pencil across the top of the cup to keep the wick centered.
Pour the Wax:
- Let the wax cool to about 160°F (71°C). Carefully pour it into each teacup, leaving space below the rim for the pressed flowers to sit on top.
Add the Pressed Flowers:
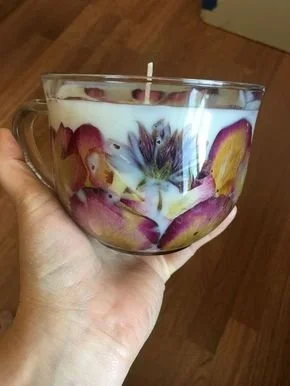
- After pouring, gently place the pressed flowers on the surface of each candle while the wax is still warm but has begun to set. Press down softly to ensure they adhere.
Finish the Candles:
- Allow the candles to cool completely. This can take a few hours. Once firm, trim any excess wick to about 1/4 inch above the wax.
Tips for Success
- Use well-dried flowers to prevent moisture from compromising the candles.
- Test a small batch first to assess how well the flowers hold up in the wax and how they affect the appearance.
- Be patient with the cooling process; rushing it can lead to cracks in the wax.
Common Mistakes to Avoid
- Using Thick-Petaled Flowers: These flowers often do not press well and can retain moisture, leading to mold or failure to adhere to the candle surface.
- Pouring Wax Too Hot: If the wax is too hot when you add the flowers, they might get damaged or warped. Allow the wax to cool first.
- Not Securing the Wick: Ensure that the wick is firmly anchored before pouring the wax to avoid it moving.
Variations and Customization Ideas
- Scents: Experiment with different fragrance oils such as lavender, vanilla, or citrus blends to create unique scented candles.
- Colors: Utilize different candle dyes to match the season or personal preference.
- Decorative Elements: Besides flowers, consider using herbs or glitter for added flair.
Storage and Shelf Life
Store your candles in a cool, dark place to preserve their fragrance and appearance. When properly made and stored, these candles can last for up to 1-2 years.
Safety Tips
- Always work in a well-ventilated area when melting wax to avoid inhalation of fumes.
- Wear gloves and goggles to protect your skin and eyes.
- Never leave melting wax unattended; it can become a fire hazard.
Frequently Asked Questions
Can I use any type of flower for pressing?
- While you can use a variety of flowers, prefer thin-petaled varieties that press well.
What type of wax is best for beginners?
- Soy wax is user-friendly and provides a clean burn, making it ideal for beginners.
How can I ensure my candles burn evenly?
- Test different wick sizes and positions; a properly sized wick is crucial for an even burn.
Can I use essential oils instead of fragrance oils?
- You can, but essential oils may have a weaker scent throw in candles compared to synthetic fragrance oils.
What should I do if my candles smoke when lit?
- This may be due to a wick that is too long or too thick. Trim the wick to about 1/4 inch, and ensure proper wick placement.
Conclusion
Creating pressed flower candles is not just a fun craft, but a way to express creativity while bringing a personal touch to your home. You can experiment with different flowers, designs, and scents to produce delightful candles that will brighten any space. Whether for personal use or as gifts, these candles are sure to be cherished. So gather your supplies, press some flowers, and start making your own unique creations! Happy crafting!