
Ready to try making soap at home
Imagine this: it’s a cozy Saturday morning. You’re curled up on the couch with a cup of tea, scrolling through Instagram and admiring the beautifully crafted soaps that friends are posting. You might think, “I wish I could do that!” Here’s the truth: you can. Making soap at home isn’t just for the crafty genius or the DIY influencer; it can be a fun and rewarding project for anyone, including you. It’s one of those hobbies that can bring out your creative side while giving you skincare benefits as well.
If you’ve been curious about starting a creative hobby, making your own natural soap is a fantastic way to get going. This guide covers everything from essential supplies to a simple homemade soap recipe to beginner tips, making the process feel totally doable.
Gathering Your Soap Making Supplies
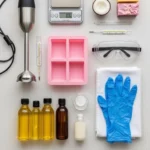
Before you dive in, you’ll need to gather some essential supplies. Here’s a handy list to get you started:
- Lye: This is a crucial ingredient for traditional cold process soaps. Don’t worry, it’s safe when handled correctly.
- Fats and Oils: Common options include olive oil, coconut oil, palm oil, and shea butter. Each contributes different properties to your soap.
- Distilled Water: Always use distilled water to mix with lye.
- Fragrance or Essential Oils: Choose your favorites! Lavender, eucalyptus, and peppermint can add delightful scents.
- Colorants: You can use natural colorants like spirulina, turmeric, or even clay for a pop of color.
- Safety Gear: Goggles and gloves are essential. Lye can be caustic, so protecting your skin and eyes is a must.
- Containers: A measuring cup, mixing bowls, and a stick blender will be your best friends in this process.
- Soap Molds: You can purchase these or even use silicone molds from your kitchen.
The beauty of homemade soap is that you get to choose everything that goes into it! We all want to know exactly what we’re applying to our skin, don’t we? Plus, being able to customize your scents and colors makes for a delightful experience.
Let’s Make Soap
Now that you have your supplies, it’s time to put on your apron and get started. Here’s a simple homemade soap recipe for you to try—perfect for beginners!
Easy Homemade Soap Recipe
Ingredients:
- 12 oz. coconut oil
- 12 oz. olive oil
- 12 oz. palm oil
- 4.6 oz. lye
- 12 oz. distilled water
- Essential oils for fragrance (30-40 drops, your choice!)
- Natural colorants (if desired)
Equipment:
- Safety goggles
- Gloves
- Heat-resistant container
- Stick blender
- Soap mold
- Thermometer
- Scale
Instructions:
- Safety First: Put on your goggles and gloves before starting.
- Mix Lye and Water: In a well-ventilated area, carefully add the lye to the distilled water (never the other way around!). Stir until dissolved. This mixture will heat up quickly—be cautious!
- Heat the Oils: In a separate container, melt your coconut oil and mix it with your olive and palm oils. Allow it to cool to around 100-110°F.
- Combine: Once both mixtures are roughly the same temperature, slowly pour the lye mixture into the oils while blending with a stick blender.
- Blend to Trace: Blend until the mixture thickens to a light trace (it should leave a faint trace of the mixture when drizzled on the surface). This can take a few minutes.
- Add Scents and Colors: Now’s the time to be creative! Stir in your essential oils and colors.
- Pour into Mold: Carefully pour the soap mixture into your mold.
- Cure: Let the soap sit for 24-48 hours until solid, then unmold and cut it into bars. Allow them to cure for 4-6 weeks before using.
Pretty simple, right? The satisfaction of making your own soap can’t be overstated. It’s incredibly rewarding to unwrap a bar you created yourself.
Beginner Tips for Successful Soap Making
As you start your soap-making journey, here are a few beginner tips that I wish I had known when I first started:
- Read Up: Before you get started, do a little research on soap-making techniques and safety. Join online communities where you can ask questions and share your progress.
- Start Slow: Don’t feel pressured to create intricate designs right away. Simple, solid bars will help you understand the process without frustration.
- Measure Accurately: Proper measurements are crucial. Invest in a good kitchen scale for the best results.
- Experiment with Scents: Don’t be afraid to mix different essential oils to create unique fragrances. Just remember to keep track of amounts used!
- Take Notes: Document your soap-making adventures. Jot down what worked and what didn’t. This will help you improve as you go along.
You might be wondering what to do if something goes wrong. That’s okay! We’ve all been there—a faulty batch, a scent that didn’t quite marry well, or an unexpected texture. Don’t let those bumps in the road discourage you. Every soapy setback is a step toward improvement.
Common Mistakes to Avoid
We all make mistakes, especially when trying something new. Here are some common soap-making missteps and how to steer clear of them:
- Skipping Safety Gear: As mentioned, don’t skip the goggles and gloves. Lye is no joke, and safety should be your top priority.
- Ignoring Temperature: Mixing lye with oils that are at different temperatures can lead to separation. Always strive for similar temperatures for both.
- Rushing the Process: Soap making takes time, and if you rush through it, you might end up with less-than-desirable results.
- Using Non-Suitable Containers: Always use glass or stainless steel to mix your lye. Avoid plastic, which can warp.
- Not Allowing Enough Cure Time: Patience is key! Uncured soap can be harsh on the skin. Try to resist diving in too quickly.
Bonus Self-Care Ideas
After your soapy creation is complete, why not treat yourself to some self-care time? Here are a few ideas to unwind and enjoy the fruits of your labor:
- Take a Relaxing Bath: Use your homemade soap to indulge in a luxurious bath. Add in some Epsom salts for an extra soothing experience.
- Create a Spa Day: Combine your soap with a facial mask, a soothing playlist, and maybe even a glass of your favorite wine.
- Invite Friends Over: Why not have a little soap-making party? It can be a wonderful way to bond with friends while sharing your new passion.
FAQs
Is homemade soap safe for all skin types?
Most homemade soaps are gentle on the skin, but if you have sensitive skin, always do a patch test before full use.
Can I sell my homemade soap?
Absolutely! Just be aware of local regulations regarding labeling and safety.
How long does homemade soap last?
Well-made soap can last up to a year, if stored properly away from moisture and sunlight.
Conclusion
Now that you’ve got the scoop on all things soap-making, why not dive in? You have the supplies, the recipe, and the tips you need. Picture this: a lovely bar of your own creation sitting in your bathroom, ready to enhance your daily self-care routine. If you’ve been on the fence about starting a creative hobby, giving soap making a try is an excellent and fulfilling way to express yourself.
So gather those supplies, put on your protective gear, and enjoy the delightful process of crafting your beautiful soap. You’re now well-equipped to embark on this fabulous journey. Trust me, you won’t regret it!