
The Sweet Side of Soaps: Crafting Candy Corn with a Twist
Imagine this: the leaves are turning, the air is crisp, and the excitement of Halloween is in the air. You might be thinking of decorations, costumes, or even treats, but have you ever thought about homemade soap? Love it or hate it, candy corn is a Halloween staple, and its colorful layers translate perfectly into fun and festive melt-and-pour soap. Let’s dive into how you can create your very own Candy Corn Soap, just in time for the spooky season.
The Allure of Candy Corn
Candy corn is one of those candies that most people have an opinion about — you either love it or you can’t stand it. But what if we could take that vibrant orange, yellow, and white aesthetic and create something a bit more practical and delightful? Soap making, particularly with melt-and-pour techniques, is the perfect way to celebrate this seasonal treat without the sugar rush. Besides, making your own soap allows you to customize fragrances and colors, making it a more personal touch for gift-giving or decorating your own bathroom.
If you’ve never tried the melt-and-pour method before, don’t worry! It’s surprisingly easy and doesn’t require any fancy equipment or chemicals. You can start creating impressive soaps, just like the ones you see in stores or online. For a cozy family night, why not experiment with different kinds of soap, like these easy honey vanilla candles that add warmth and charm to your home?
Gathering Your Supplies
Before diving into crafting, let’s gather everything you need:
- Melt-and-pour soap base (white and clear)
- Soap colorants (yellow, orange, and white)
- Pumpkin spice fragrance oil
- A Tall 12" Silicone Loaf Mold
- Soap shaver or cutter
- Vanilla color stabilizer (to prevent discoloration)
With all your materials ready, you’re set to start creating your candy corn masterpiece!
Step-by-Step Guide to Create Candy Corn Soap
Melting the Soap Base: Cut your soap base into small cubes for even melting. Use a microwave or double boiler to melt your soap. Be sure to check regularly as it can overheat and bubble.
Coloring Your Soap: Once melted, divide the soap into three bowls. In the first bowl, add your yellow colorant until you achieve your desired shade. In the second, mix in the orange colorant, and leave the third bowl uncolored for the white layer.
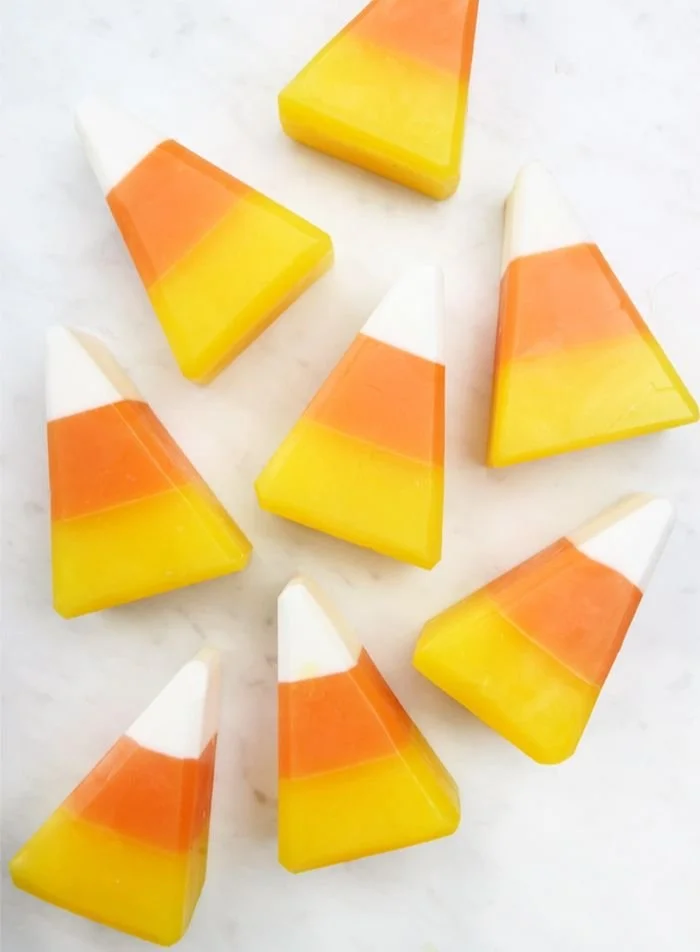
Layering: Pour the yellow soap mixture into the mold. Allow it to cool and harden slightly, about 10-15 minutes. Then, pour the orange layer on top, followed by the white layer. This step is crucial for achieving that signature candy corn look.
Using the Vanilla Stabilizer: Don’t forget to mix in the vanilla color stabilizer to your scented soap mixtures. This is key in maintaining those bright colors and preventing them from turning tan over time.
Cutting Your Soaps: Once your soap is fully cooled and hardened, take it out of the mold. Use the soap shaver or cutter to shape them into triangles, resembling candy corn. If you prefer, you can cut them upside down for a slightly different look, but they’ll still be adorable either way!
Finishing Touches: Let your finished soaps cure for a few days, allowing the fragrance to set completely. Then, your candy corn soaps are ready to be displayed, gifted, or used in your own pampering sessions.
Tips for a Successful Soap Making Experience
Experiment with Fragrances: While pumpkin spice is a seasonal favorite, you could swap in other scents like vanilla, cinnamon, or even a hint of citrus.
Layering Though Color Blocks: The use of a layered aesthetic can also be applied to other themes—think about creating DIY terracotta pot citronella candles for busy moms to ward off those pesky summer bugs while remaining stylish.
Common Mistakes to Avoid
Not Waiting Long Enough Between Layers: Give the previous layer enough time to set before adding the next, or else they will mix together and muddle your colors.
Overheating Your Soap: Always use low heat when melting the soap base to avoid bubbling and scorching.
Ignoring Fragrance and Color Precautions: High-quality colorants and fragrances are important in soap making to ensure vibrant and lasting scents and hues.
Exploring Further
If you’re intrigued by the world of homemade candles and soaps, there are so many other creative techniques you can use. For example, trying out lavender candle hacks can add a beautiful touch to any room while offering soothing scents that can enhance relaxation.
Conclusion
As you embrace the spirit of Halloween through these delightful Crafty Candy Corn Soaps, remember that you’re not just creating a fun project — you’re also indulging in the joy of creativity and self-care. Homemade soaps make fantastic gifts, or even lovely additions to your festive decor.
If you’re looking to further enhance your soap-making journey, there are tons of resources out there. You might want to check out the Candy Corn Soap Project by Bramble Berry for detailed insights. Another exciting option could be the Wonderful Goat Milk Soap Recipe For Fall – Candy Corn Soap, which could elevate your homemade soaps into a luxurious treat. Lastly, don’t miss out on the Yellow Color Block for Soap Making to help streamline your color mixing process.
So, roll up your sleeves and get crafting! A whole new world of fragrant, colorful soap is just waiting for you. Happy soap making!