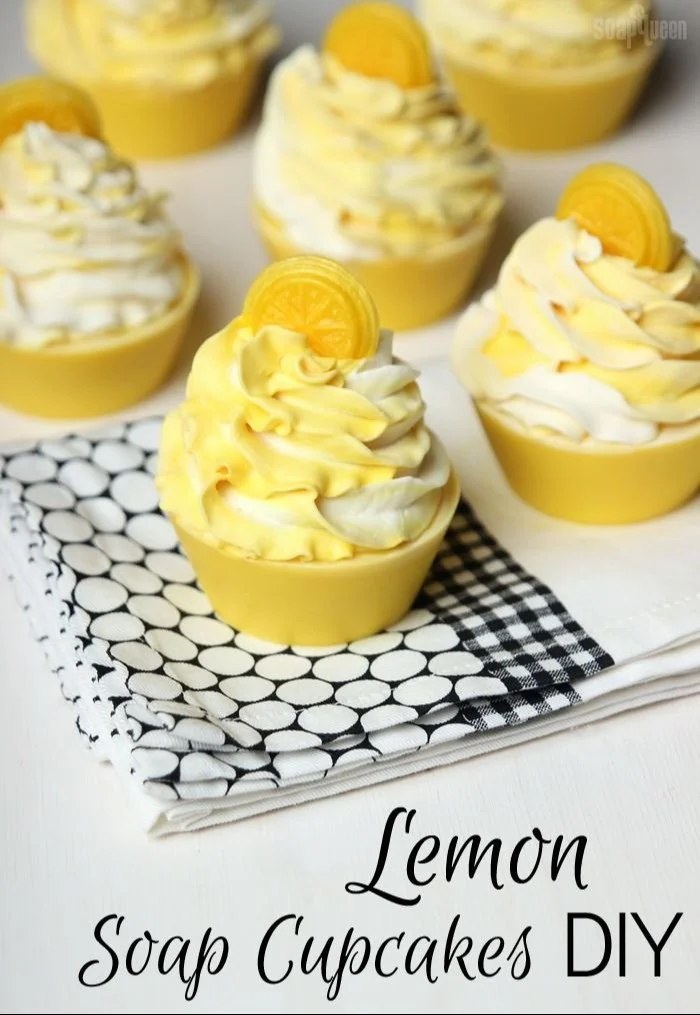

Imagine stepping into your bathroom and being greeted by the delightful scent of lemon, like a fresh summer morning. Don’t you just wish you could capture that feeling every day? Here’s the truth: making your own Lemon Cold Process Soap Cupcakes at home is not just about the product; it’s about indulging in a burst of creativity and self-care. Creating these delightful treats for your skin can transform your routine into a joyful ritual. Plus, they make for fabulous gifts that are sure to impress friends and family! You may also find Christmas Jars Decoration With Lights Diy 2025 useful.
Creating your own lemon-scented soap doesn’t have to be daunting. If you’ve never considered diving into DIY beauty products, you’re in for a delightful surprise. This simple yet rewarding craft allows you to blend aromatherapy with skincare, giving your body the nourishment it craves while also serving as a beautiful decoration for your bathroom. Whether you’re new to soap-making or you’re looking to expand your crafty repertoire, let’s explore how to whip up these lovely lemon soap cupcakes. You may also find Candle Making Beginners Guide Making Your Own Candles useful.
Understanding Cold Process Soap
Cold process soap is a method of soap-making that combines oils with an alkaline substance (lye) through a process of saponification. This is the art of soap-making that creates a creamy, luxurious lather that’s gentle on the skin. The beauty of cold process soap lies in how you can personalize it by adding various essential oils, colors, and textures.
The Magic of Saponification
You’ve probably heard that great things take time. Saponification is a perfect example—this chemical process takes about 24 to 48 hours to complete, after which your soap will be ready to cut and cure. So, while you’re waiting, think of the anticipation: it’s like waiting for a cake to bake! And let’s be honest, just as baking can lead to mouth-watering results, so can soap-making.
Gathering Your Ingredients
Before you jump into the soap-making process, you’ll want to gather all your ingredients. The exciting part is that you probably already have some of these in your kitchen, and everything else can be easily sourced online or at your local craft store.
Essential Ingredients
- Oils: Olive oil, coconut oil, and palm oil are some essentials. Each contributes to the soap’s lather and moisturizing properties.
- Lye: This is necessary for the saponification process; just be careful, as it can be caustic.
- Distilled Water: You’ll mix this with lye to initiate the soap-making process.
- Essential Oils: For this recipe, lemon essential oil will give your soap its delightful scent.
- Colorant: A natural yellow mica or other skin-safe colorant will add a pop of color to your creations.
Optional But Fun Add-ins
Feel free to experiment! You might want to add dried lemon peel for a bit of texture and some extra moisture, or a sprinkle of sugar for added exfoliation. Don’t forget, once you get comfortable with the basic recipe, you can try out different scents and colors.
Step-by-Step Instructions
Ready to get started? Follow these steps for your DIY Lemon Cold Process Soap Cupcakes.
Step 1: Prepare Your Workspace
Always start by prepping your workspace. This is a must! Make sure to clean the surfaces you’ll be working on, and have all your tools handy. It’s a good idea to wear gloves and safety goggles, as you’ll be working with lye.
Step 2: Measure and Mix Lye with Water
In a well-ventilated area, carefully measure the lye using a digital scale. Slowly add the lye to the distilled water (never the other way around), stirring gently until it’s fully dissolved. This mixture will heat up as you stir and emit fumes—breathe carefully!
Step 3: Measure and Melt Your Oils
While your lye mixture cools, measure the oils. Heat them gently until completely melted together. You’ll want both mixtures to be around 100-110 degrees Fahrenheit before combining them.
Step 4: Combine Lye and Oils
Once both mixtures are at the right temperature, slowly pour the lye into the oils while mixing with an immersion blender. Blend until you reach "trace," a point where the mixture thickens and leaves a trail on the surface when drizzled.
Step 5: Add Fragrance, Color, and Add-ins
Now’s the time to add your lemon essential oil and colors. Stir gently but thoroughly to disperse everything evenly. If you’re adding in dried lemon peel, fold it into the mixture here.
Step 6: Pour into Molds
Finally, pour your soap mixture into cupcake molds. You can use silicone molds for easier removal later. Tap them down gently to release any air bubbles.
Step 7: Insulate and Cure
Cover your molds with a towel and let them sit undisturbed for 24 hours. After that, you can unmold your soap and let them cure on a drying rack for 4-6 weeks.
Pro Tips for Your Soap-Crafting Journey
- Use a Stick Blender: This will make achieving trace much easier and faster than stirring by hand.
- Choose Good Quality Oils: The quality of your ingredients directly affects the final product, so opt for premium oils whenever possible.
- Label Your Ingredients: Keeping things organized will help you in future soap-making endeavors.
You might be wondering how to enjoy these creations or share them with friends. They make delightful gifts, especially when wrapped beautifully. Consider pairing them with a soothing bath bomb or a beautifully scented candle for a complete self-care package. Speaking of candles, you might find interests in making them too. For anyone interested in the intricacies of this craft, DIY candle-making for beginners could be a great next step!
Common Mistakes to Avoid
We’ve all been there—making soap can sometimes lead to unexpected outcomes. Here are a few common pitfalls to avoid:
- Not Measuring Ingredients Properly: Soap-making is a science, and precision is key.
- Skipping Safety Gear: Lye requires respect—always wear gloves and goggles during the mixing process.
- Rushing the Curing Process: Soap needs time to cure and develop its qualities fully.
FAQs About Your DIY Soap
How long can I store my homemade soap?
Your soap can last for years if stored properly in a cool, dry place. The fragrance may fade over time, but it will still be usable.
Can I use different scents?
Absolutely! Play around with various essential oils to discover your favorites.
Conclusion
Incorporating DIY projects like Lemon Cold Process Soap Cupcakes into your life brings not only creativity but also a sense of achievement and well-being. The scent of lemon can uplift your spirits, reminding you to embrace self-care every day. So why not elevate your bath routine with these charming treats? For more inspiration, check out Lemon Cold Process Soap Cupcakes DIY to dive deeper into the craft. If you’re looking for delicious ways to use up leftover lemon curd, why not explore the 43 best lemon curd desserts? And for those curious about a lovely cake recipe, you should consider Soap Queen Cuisine: Earl Grey Tea Cake with Orange Zest Frosting. Happy crafting!