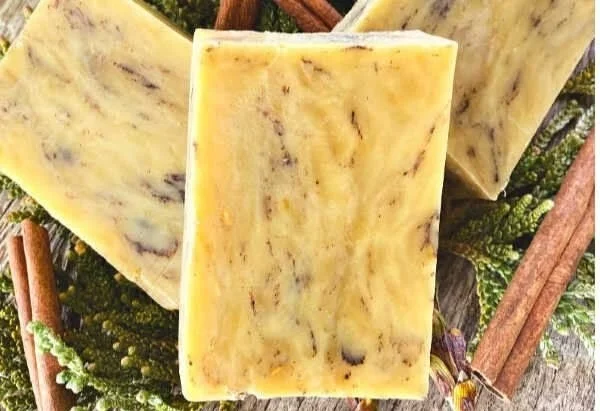

Handmade Soap Recipe: A Seductive Cedar, Cinnamon, and Lemongrass Blend
Welcome to the captivating world of homemade soap making! Today, I’m excited to share with you an incredible hot process soap recipe that has become one of my most beloved creations. This soap is not only a favorite among my friends, but it also resonates perfectly with the men in my life—in fact, I haven’t met a single guy who didn’t love it! The enchanting blend of cedar, cinnamon, and a hint of lemongrass creates a deep, unisex, and alluring scent that’s perfect for anyone. So let’s roll up our sleeves and dive into this delightful DIY project!
Why You Will Love This Recipe
Making your own soap is not only a rewarding hobby, but it’s also a great way to customize products to your personal taste and needs. This particular recipe is fantastic because:
- Unique Fragrance: The combination of earthy cedar, spicy cinnamon, and refreshing lemongrass gives this soap a rich, invigorating scent that’s perfect for any occasion.
- All-Natural Ingredients: You can control what goes into your soap, ensuring that you’re using only the best natural ingredients free from harsh chemicals.
- Gifting Potential: This soap makes a wonderful handmade gift for friends, family, or that special someone.
Ingredients
For this hot process soap recipe, you will need the following ingredients:
- Olive Oil: 8 oz (225 g)
- Coconut Oil: 8 oz (225 g)
- Palm Oil: 8 oz (225 g)
- Sodium Hydroxide (Lye): 4.5 oz (128 g, please see safety tips below)
- Distilled Water: 12 oz (340 g)
- Cedarwood Essential Oil: 0.9 oz (25 g or about 18 drops)
- Cinnamon Essential Oil: 0.2 oz (5 g or about 6 drops)
- Lemongrass Essential Oil: 0.3 oz (8.5 g or about 10 drops)
Note: Make sure to use high-quality, skin-safe essential oils.
Equipment
Before starting your soap-making journey, gather the following equipment:
- Safety goggles
- Rubber gloves
- Digital scale
- Stainless steel or heat-safe mixing bowls
- Stick blender
- Soap mold (silicone molds work well)
- Thermometer
- Measuring spoons
- Spatula
- Parchment paper
- Safety apron (optional, but recommended)
Step-by-Step Instructions
Ready to get started? Here’s how to make your own seductive cedar, cinnamon, and lemongrass soap:
Preparation Time: 15 minutes
Making Time: Approx. 2 hours
Yield: 8-10 bars of soap
1. Prepare the Workspace
Ensure your workspace is clean and well-ventilated. Put on your safety goggles, gloves, and an apron to protect yourself from lye.
2. Measure and Mix Lye
In a heat-safe bowl, measure the distilled water. In a separate bowl, carefully measure out the sodium hydroxide. Always add lye to water, never the other way around, to prevent a violent reaction. Stir slowly until dissolved. The mixture will heat up—this is normal.
3. Prepare Oils
In a large stainless-steel pot, measure and combine your olive oil, coconut oil, and palm oil. Heat these oils gently until melted and the mixture reaches around 110°F (43°C).
4. Combine Lye and Oils
Once your lye solution and oils are both around 100-110°F (38-43°C), pour the lye solution into the pot of melted oils.
5. Blend to Trace
Using a stick blender, mix the oils and lye until the mixture reaches "trace"—this means that when you drizzle some of the soap mixture over the surface, it leaves a slight trail before sinking in.
6. Add Essential Oils
Once trace is achieved, add the cedarwood, cinnamon, and lemongrass essential oils and stir vigorously to incorporate.
7. Pour Into Molds
Pour your soap mixture into the prepared molds, smoothing out the top as you go.
8. Insulate and Cool
Cover the molds with a piece of parchment paper or a lid, and wrap them in a towel to keep the heat in, which helps the soap saponify.
9. Unmold
After 24 hours, check your soap. If it feels firm, it’s time to unmold. Gently pop the soap out of the mold and cut it into bars if needed.
10. Cure
Place your bars on a drying rack in a cool, dry place for 4-6 weeks to cure. This step is crucial for developing the final hardness and longevity of your soap.
Tips for Success
- Don’t Rush: Each step, particularly mixing your lye, requires patience and precision.
- Stick to the Recipe: Altering the quantities can lead to less than desirable results. Following the recipe closely will make sure your soap turns out perfectly.
- Testing for Fragrance Strength: Before adding all your essential oils, consider testing a small amount to find your preferred fragrance strength.
Common Mistakes to Avoid
- Inaccurate Measurement: Always use a digital scale for precise measurements, especially when dealing with lye and oils.
- Ignoring Safety Precautions: Always wear protective gear when working with lye, and never leave it unattended.
- Skipping the Cure Time: Your soap won’t be ready for use immediately after making. Ensure it cures for at least 4 weeks.
Variations and Customization Ideas
- Additives: Consider adding natural colors such as turmeric for color or exfoliants like oatmeal.
- Essential Oil Blends: Mix in other essential oils according to your preference—for a more invigorating scent, eucalyptus can work well.
- Textures: You can create swirls or layers by pouring the soap in stages, allowing each layer to set slightly before adding the next.
Storage and Shelf Life
Store your cured soap in a cool, dry place away from direct sunlight. Wrapped in parchment paper or placed in a wooden box, your soap can last for up to a year.
Safety Tips
- Lye Handling: Always work in a well-ventilated area. Use proper safety gear—goggles and gloves—while handling lye, as it can damage skin and eyes.
- Lye Storage: Keep sodium hydroxide stored in a secure place, out of reach of children and pets.
Frequently Asked Questions
1. Can I use another type of oil in this soap recipe?
Yes, you can substitute other oils like grapeseed or sunflower oil, but it may change the soap’s characteristics and texture. Always check if the oils are suitable for soap making.
2. What if my soap doesn’t harden?
If your soap remains soft after the curing period, it may be due to incorrect lye measurements. It can also indicate that soap wasn’t fully saponified; in this case, it’s best to rebatch it.
3. Can I add color to my soap?
Absolutely! Natural colorants like beet powder or activated charcoal can be used for a beautiful effect.
4. Is it necessary to use a soap calculator?
Yes, whenever you create or modify a soap recipe, it’s crucial to use a reliable soap calculator to ensure proper lye amounts and safety.
5. Is this soap suitable for sensitive skin?
While this soap is made from natural ingredients, it’s always best to do a patch test with any new soap, especially if you have sensitive skin or allergies.
Conclusion
Congratulations on diving into the art of homemade soap making! This seductive cedar, cinnamon, and lemongrass soap is a fantastic project with a satisfying outcome. Not only will you have beautiful bars to use or gift, but you’ll also gain the rewarding experience that comes from creating something with your own hands. Remember to follow the instructions closely, use safe practices, and feel free to customize the recipe to your liking. Enjoy making your soap, and happy crafting!