
Exfoliating Loofah Soap Recipe: Refresh Your Skin Naturally
Creating your own homemade soap is a rewarding experience that allows you to experiment with natural ingredients while crafting a product tailored just for you. This exfoliating loofah soap recipe combines natural exfoliation with a vibrant citrus scent to invigorate your senses and refresh your skin. Perfect for beginners, this melt-and-pour soap technique is straightforward and allows you to create beautiful, functional bars of soap that make fantastic gifts.
Why You Will Love This Recipe
If you’re on a quest for softer, rejuvenated skin, this soap recipe is a must-try. The loofah naturally exfoliates, removing dead skin cells and revealing the fresh skin underneath, while the citrusy fragrance awakens your senses and uplifts your mood. Plus, making your own soap can be an eco-friendly alternative to commercial products, and you get to control the ingredients!
Ingredients
For this project, you will need the following ingredients:
- Melt and Pour Soap Base: 2 pounds (choose between glycerin, shea butter, or goat’s milk base)
- Loofah Sponge: 1 dried loofah, sliced into rounds (approximately ¼ inch thick)
- Citrus Essential Oil: 1 ounce (such as lemon, orange, or grapefruit)
- Soap Colorant (optional): A few drops for a vibrant hue (ensure it’s soap-safe)
Equipment
Gather the following equipment before getting started:
- Double Boiler or Microwave-Safe Bowl: For melting the soap base
- Soap Mold: Silicone molds or a loaf mold lined with parchment paper
- Stirring Spoon or Spatula: For mixing in the essential oils and colorant
- Measuring Cups and Spoons: For accuracy in measurements
- Knife or Scissors: To cut the loofah and soap base
- Thermometer: (optional) to monitor melting temperature
- Spray Bottled Alcohol: To eliminate bubbles in the soap
Step-by-Step Instructions
Prepare Your Loofah:
- Slice the dried loofah into rounds and set aside. If you prefer smaller pieces, you may cut them into half-moons.
Melt the Soap Base:
- Cut the soap base into small cubes for easier melting.
- Place the cubes in a double boiler over low heat or in a microwave-safe bowl.
- If using a microwave, heat the soap base in 30-second intervals, stirring in between until fully melted.
Add Essential Oils:
- Remove the melted soap from heat and let it cool slightly.
- Stir in the citrus essential oil and any soap colorant you would like to add, mixing thoroughly to ensure even distribution.
Prepare the Molds:
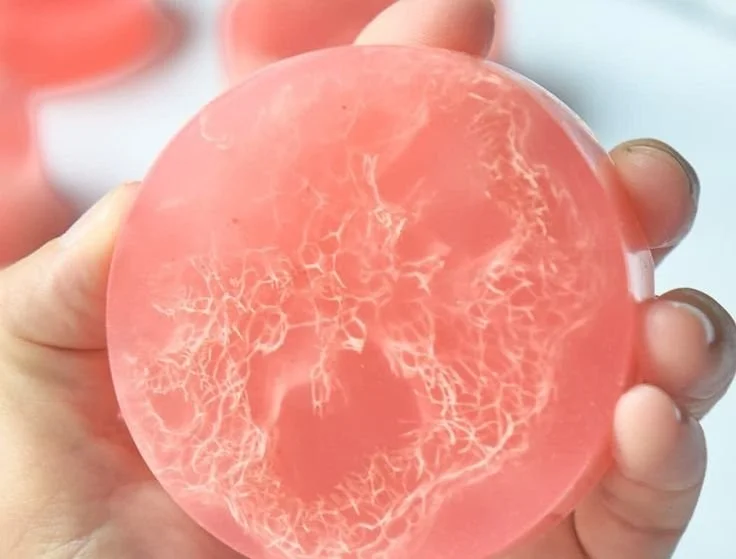
- Place a slice of loofah at the bottom of each soap mold. This will be the exfoliating core of your soap.
Pour the Soap Mixture:
- Gently pour the melted soap mixture over the loofah, filling the mold until the soap reaches the desired height.
- If bubbles form on the surface, lightly spritz with alcohol to eliminate them.
Cool and Set:
- Allow the soap to sit undisturbed at room temperature for at least 1-2 hours until completely solid.
Remove from Molds:
- Carefully remove the soap from the molds. If you used a loaf mold, cut the soap into bars using a knife.
Cure:
- Allow your soap bars to cure in a cool, dry place for an additional 24-48 hours to ensure they are fully hardened.
Tips for Success
- Monitoring Temperature: Avoid overheating the soap base to prevent it from burning or developing an undesirable texture. Keep an eye on it during melting.
- Mixing Essential Oils: Choose essential oils that complement each other for added depth. For example, lemon and lavender or orange and bergamot blend beautifully.
- Colorants: Only use soap-safe colorants, as others may not blend well with the soap base and could be harmful to the skin.
Common Mistakes to Avoid
- Too Much Heat: Using too high of a temperature when melting can cause the soap to scorch. Always melt gently.
- Not Enough Essential Oil: If you prefer a stronger scent, feel free to increase the essential oil amount, but do it in moderation to avoid skin irritation.
- Skipping the Cure Time: Allowing your soaps to cure improves their lather and durability, ensuring a better user experience.
Variations and Customization Ideas
- Scents: Experiment with various essential oils based on your preferences. Herbal oils like eucalyptus or mint can also provide refreshing experiences.
- Additives: Incorporate natural ingredients like oatmeal for added exfoliation or honey for moisture.
- Shape: Use different molds to create unique shapes for gifts or for special occasions.
Storage and Shelf Life
Store your finished loofah soap bars in a cool, dry place away from direct sunlight. If stored properly, they can last for several months. Wrapping them in wax paper or plastic wrap can help extend shelf life and prevent moisture absorption.
Safety Tips
While the melt-and-pour method is generally safe, always take care when handling hot ingredients. Avoid direct contact with melted soap to prevent burns, and ensure good ventilation if working in small spaces.
Frequently Asked Questions
1. Can I use fresh loofah instead of dried?
Unfortunately, fresh loofahs contain moisture, which can affect the soap’s consistency. Dried loofah is ideal for this recipe.
2. How can I prevent bubbles in my soap?
Spritzing the surface with alcohol immediately after pouring can help eliminate bubbles.
3. What if I don’t have a soap mold?
You can improvise with muffin tins or silicone baking molds. Just ensure they are clean and food-safe.
4. Is there a specific soap base I should use?
No preference! Each type of base offers different moisturizing properties but ensure they are suitable for sensitive skin.
5. Can I add colors to my soap?
Absolutely! Use soap-safe colorants for the best results. Mix in small amounts until you achieve the desired shade.
6. How do I ensure my bars are safe for sensitive skin?
Opt for natural, quality ingredients and always do a patch test with any new essential oils.
Conclusion
Creating your own exfoliating loofah soap is a fantastic project that is both fun and functional. With vibrant scents and natural exfoliation properties, this homemade soap will revive your skin and give you a delightful bathing experience. Don’t be shy to express your creativity—play around with scents, colors, and shapes to make your soap truly unique! So grab your ingredients, gather your equipment, and start crafting your own luxurious homemade soap today!