
Learn How to Make Soap Using These Step-by-Step Instructions
Making your own soap can be an incredibly rewarding and enjoyable experience. Whether you dream of creating customized fragrances, enjoying the benefits of natural ingredients, or simply want a fun DIY project, soap making is a craft that unleashes creativity. In this article, I’ll guide you through the process of making soap from start to finish with detailed, step-by-step instructions. Additionally, I’ve included a free printable checklist to help keep you organized throughout the process. Let’s dive in!
Why You Will Love This Recipe
- Customizable: You can choose your favorite scents, colors, and ingredients.
- Natural Ingredients: Craft soaps using nourishing oils and butters that are gentle on the skin.
- Perfect Gifts: Handmade soap makes for beautiful and thoughtful gifts for friends and family.
- Therapeutic Process: The process of making soap can be soothing and enjoyable, turning your home into a mini spa.
Ingredients
For this project, we will be using the Cold Process method, which is a popular technique that allows the soap to cure and develop its properties over time.
Materials Needed:
- Sodium Hydroxide (Lye): 4 oz (113 g)
- Distilled Water: 10 oz (283 g)
- Olive Oil: 10 oz (283 g)
- Coconut Oil: 5 oz (142 g)
- Palm Oil: 5 oz (142 g)
- Essential Oils (optional): 1 oz (28 g), choose your favorite scent like lavender, lemon, or eucalyptus.
- Colorants (optional): Natural pigments, such as clays or micas, or you can leave it unscented and uncolored.
Equipment
Before we get started, make sure you have the following equipment on hand:
- Digital Scale: For accurate measurement of ingredients.
- Glass or Plastic Measuring Cups: For combining lye and water.
- Heat-Resistant Mixing Bowl: For mixing oils.
- Stick Blender: For blending the soap mixture.
- Thermometer: To check the temperature of mixtures.
- Sodium Hydroxide Safety Gear: Including goggles, gloves, and a mask to protect against lye fumes.
- Soap Mold: Silicone molds work great for easy removal.
- Spatula: For scraping and mixing.
Step-by-Step Instructions
Preparation Time
- Prep Time: 15 minutes
- Mixing Time: 30 minutes
- Curing Time: 4-6 weeks (allow for proper curing of the soap)
Yield
This recipe typically yields about 8-10 bars of soap depending on the size of your mold.
Directions
Preparation and Safety First:
- Put on your safety goggles and gloves.
- Work in a well-ventilated area to avoid inhaling any lye fumes.
Mix the Lye Solution:
- Carefully measure out the sodium hydroxide (lye) and distilled water separately using the digital scale.
- Slowly add lye to water (never the other way around); it will generate heat and fumes. Stir gently until dissolved and allow it to cool to about 100°F (38°C).
Combine Oils:
- In a heat-resistant mixing bowl, weigh out and combine the olive oil, coconut oil, and palm oil.
- Heat the oils in a microwave or on a stovetop until melted, then allow to cool down to around 100°F (38°C).
Blend the Lye and Oils:
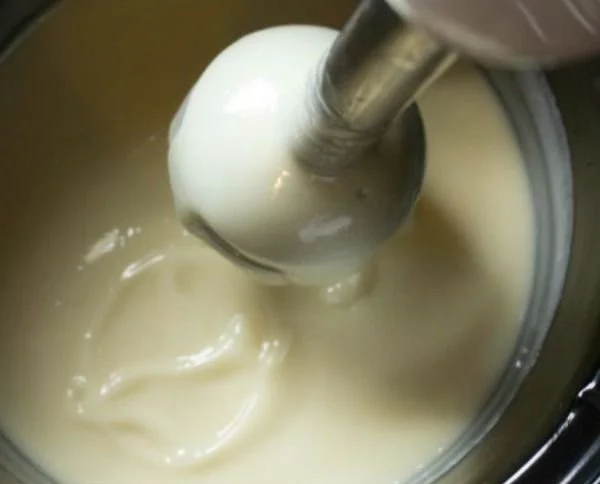
- Once both the lye solution and oils are at the proper temperature, slowly pour the lye solution into the oils while blending with a stick blender.
- Blend until ‘trace’ is achieved; this is when the mixture thickens enough to leave a trail on the surface when drizzled.
Add Essential Oils and Colorants (Optional):
- If you wish to add fragrance and color, do so at this stage. Stir gently to combine.
Pour into Mold:
- Carefully pour the soap mixture into your soap mold, ensuring there are no air bubbles.
- Smooth the top with a spatula if desired.
Insulate and Cure:
- Cover the mold with a towel or lid to keep heat within and allow the soap to set for 24 to 48 hours.
- After the soap has hardened, unmold it and cut into bars.
Cure:
- Place the bars on a drying rack in a cool, dry area. Let them cure for about 4 to 6 weeks before using.
Tips for Success
- Double-Check Measurements: Accuracy is crucial in the cold process method, especially with lye.
- Temperature Control: Make sure both the lye and oils are at the same temperature before mixing.
- Stir Carefully: Avoid splashing as you mix; lye can be very dangerous.
Common Mistakes to Avoid
- Not Wearing Protective Gear: Always handle lye with caution.
- Using Incorrect Measurements: Lye calculations should be precise; use a reliable soap calculator when adjusting recipes.
- Not Allowing Enough Curing Time: Soap will be harsh if used too soon.
Variations and Customization Ideas
- Scent Blends: Experiment with blending different essential oils for unique fragrances.
- Additives: Incorporate natural exfoliants like oatmeal, coffee grounds, or dried herbs at trace for added texture.
- Color: Use natural colorants like turmeric or beet powder for beautiful shades.
Storage and Shelf Life
- Store your finished soap bars in a cool, dry location away from direct sunlight. They can last for up to a year if stored properly, but their best scent and performance will be within six months of making.
Safety Tips
- Handling Lye: Always remember that sodium hydroxide (lye) is corrosive. If it comes into contact with skin, rinse immediately with plenty of water.
- Ventilation: Ensure you’re in a well-ventilated area when mixing lye to avoid inhaling fumes.
Frequently Asked Questions
1. Can I use different oils in my soap recipe?
Yes! You can customize your recipe by substituting different vegetable oils. However, make sure to calculate the lye amounts using a soap calculator to ensure safe saponification.
2. Why did my soap not reach trace?
If the soap doesn’t thicken, it could be due to the oils being too cool or your stick blender not blending sufficiently. Make sure to blend thoroughly and re-check temperatures.
3. Can I add color to my soap?
Absolutely! You can use natural colorants or soap-safe colorants. Just be mindful of the type you choose to ensure they are suitable for skin use.
4. How can I tell when my soap is ready to use?
It’s crucial to allow soap to cure for the recommended 4-6 weeks to ensure the lye has fully saponified. After this time, the soap will be safe and enjoyable to use.
5. Is homemade soap safe for sensitive skin?
While many find homemade soap gentler, it’s essential to ensure that you’re using skin-friendly oils and additives. Always do a patch test before full use.
Conclusion
There you have it! Making homemade soap can be a fulfilling project with beautiful results. The steps outlined above will guide you in creating your very first batch, and I hope you find joy in the process. Don’t forget to download the printable checklist to help keep your project organized. Gather your materials, embrace your inner DIY maker, and get started on your soap-making adventure! Enjoy crafting your unique creations!